Store Guide
Welcome to the DiscountWisp Store Guide, designed to help Shopify merchants effectively use DiscountWisp to run smart, automated discount campaigns across their online store. Once installed and activated, DiscountWisp empowers merchants to segment customers using tier classifications and apply precise, rule-based discounts like fixed amount off, percentage off, MOQ thresholds, and volume ladder pricing — all natively within Shopify. From your Shopify Admin, you’ll be able to manage the entire lifecycle of discount campaigns — including creating, editing, scheduling, and tracking — while also reviewing and handling customer classification requests that determine which pricing tier a customer falls into. Merchants can choose to auto-approve or manually approve tier requests, and configure email preferences for customer communication.
Additionally, the dashboard offers a summary of your campaign performance and tier-wise customer breakdown to give you a quick view of engagement and impact. Whether you're a B2C brand running seasonal promotions or a B2B seller offering wholesale deals, DiscountWisp gives you the flexibility to scale discounting with confidence and compliance. Be sure to check out the Installation Guide if you haven’t already set up the app — then follow along with this guide to get started.
Getting Started
You have installed DiscountWisp already following the on-screen instructions. After installation, go to the DiscountWisp app from your Shopify admin portal and pin the app to your navigation to make it easily accessible.
Accessing the App Dashboard
Log in to your Shopify admin panel. Navigate to the "Apps" section and click on the DiscountWisp app to access its dashboard.
Once installed and at least one campaign is created or published, you’ll be welcomed by a comprehensive dashboard offering quick access to your store’s discounting and customer segmentation performance.
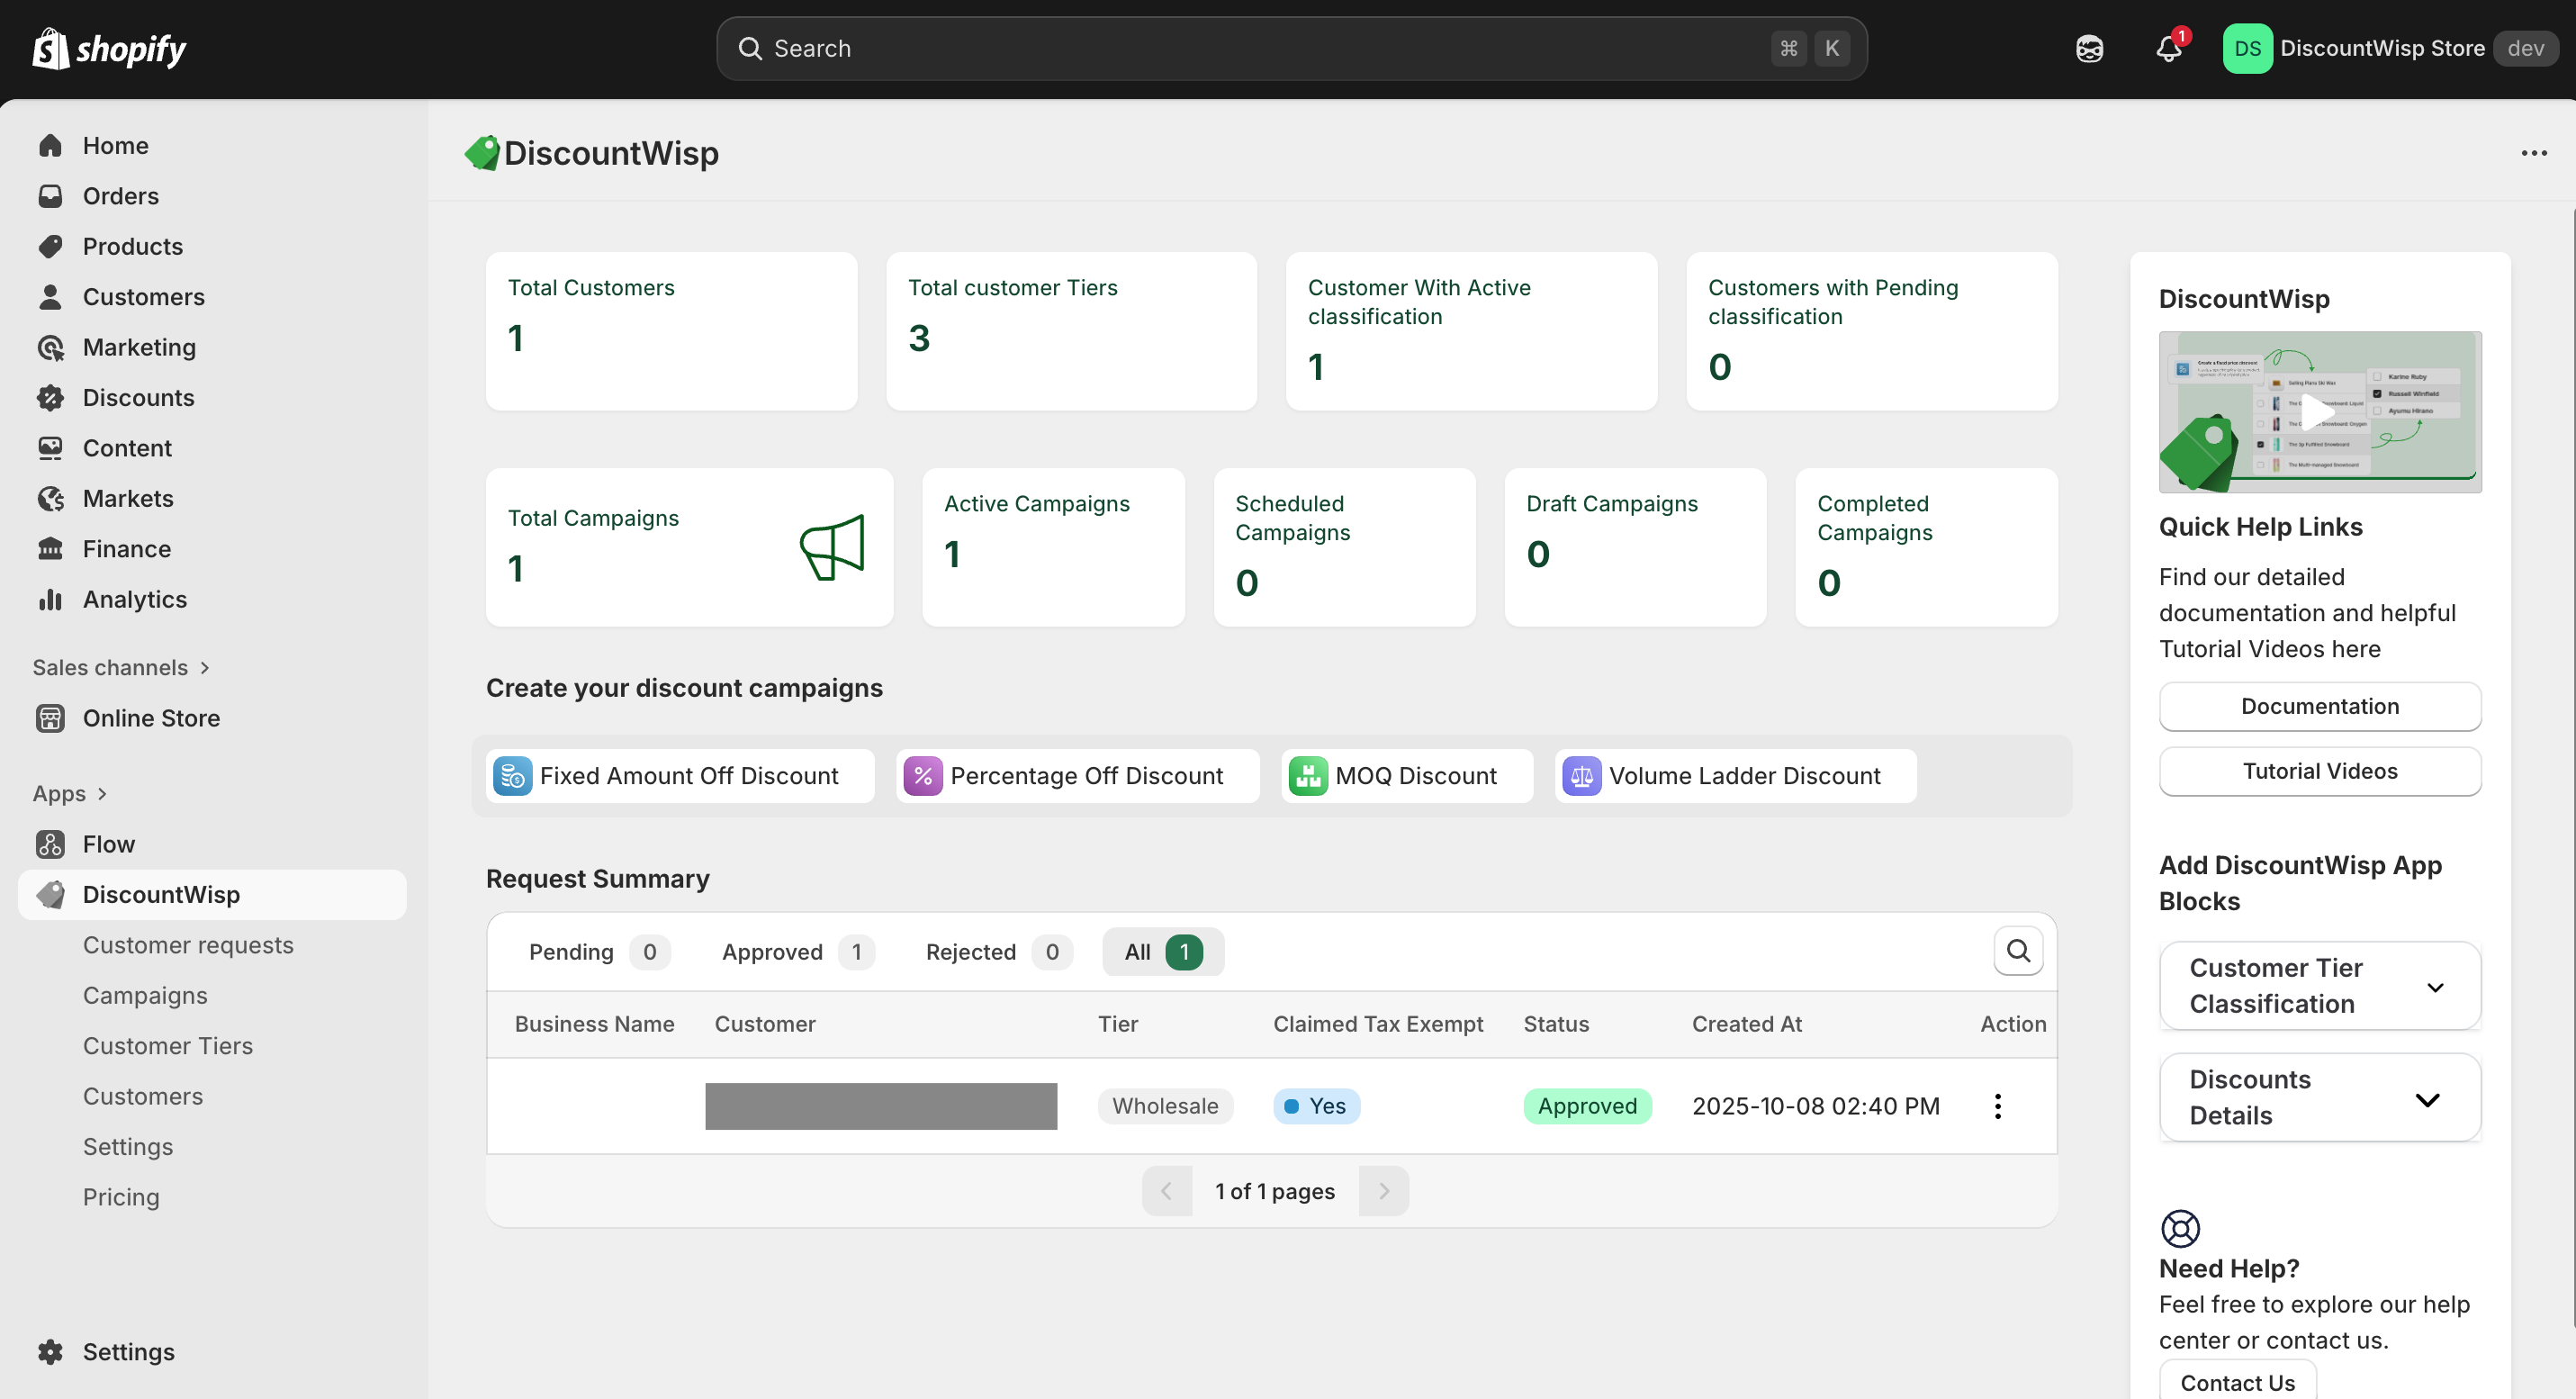
The dashboard includes:
Campaign Insights
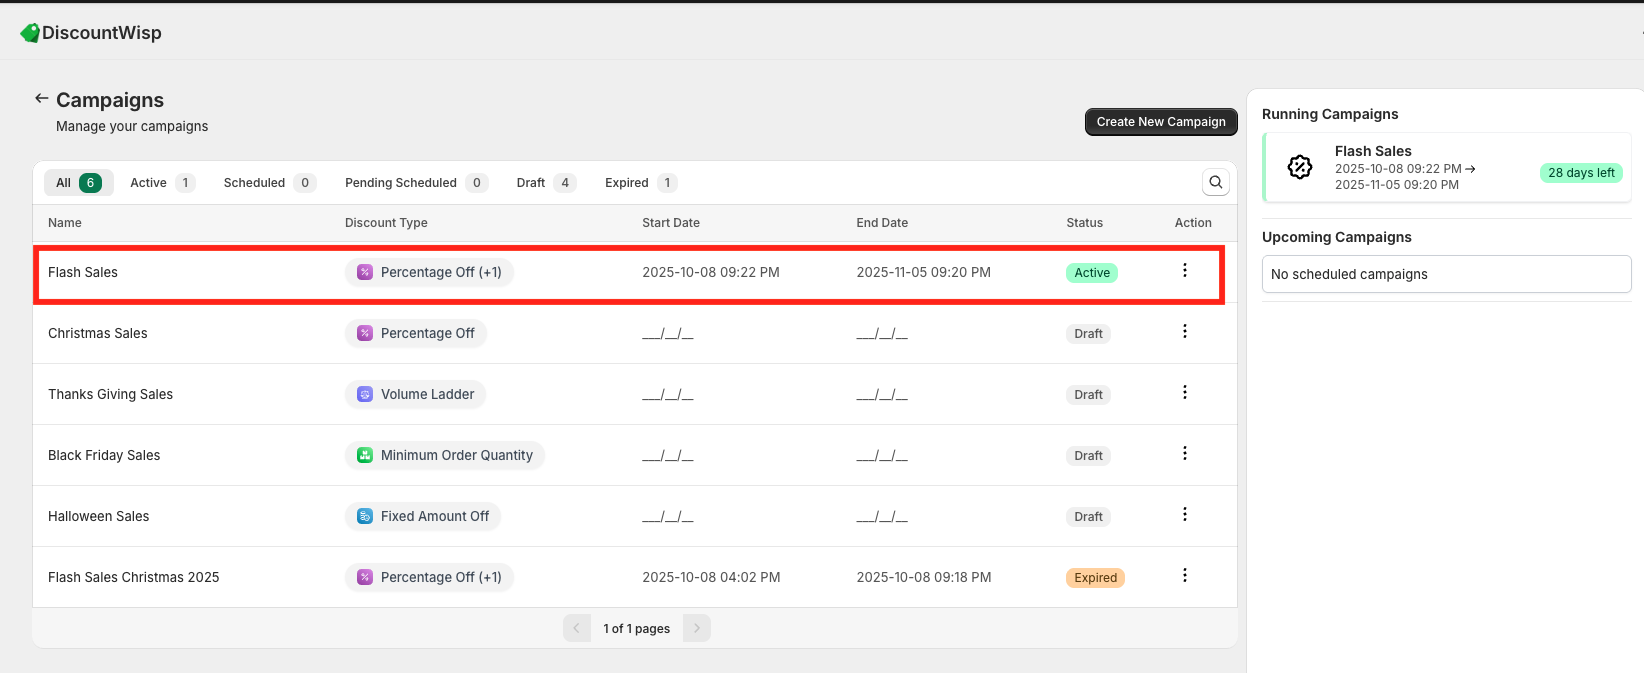
This section gives you a high-level overview of all the discount campaigns you've created, helping you track their current states:
-
Total Campaigns: All campaigns created in DiscountWisp.
-
Active Campaigns: Campaigns that are currently live and serving discounts.
-
Scheduled Campaigns: Campaigns with future start dates.
-
Draft Campaigns: Incomplete or unpublished campaigns.
-
Completed Campaigns: Campaigns that have ended.
Customer Insights
Understand how your customers are segmented and classified:
-
Total Customers: Number of unique customers synced into DiscountWisp.
-
Total Customer Tiers: Number of customer tiers you’ve created.
-
Customers with Active Classification: Customers who have been successfully classified into a tier.
-
Customers with Pending Classification: Customers who’ve submitted a classification request, awaiting approval.
Quick Links
Jump straight into creating new campaigns via these one-click shortcut buttons:
-
Fixed Amount Off Discount
-
Fixed Percentage Off Discount
-
MOQ Discount
-
Volume Ladder Discount
Tier Classification Requests Summary
Monitor and manage incoming customer classification requests with the following breakdown. This summary helps you stay on top of customer onboarding for tier-based discounting and ensures no eligible customer is left behind.
-
Pending Requests: Requests that require review and action from your team.
-
Approved Requests: Customers who’ve been assigned a tier and can now access applicable discounts.
-
Rejected Requests: Requests that were declined — customers may resubmit if allowed.
Think of this dashboard as your command center — it brings together discount performance, customer segmentation, and request handling into one powerful interface to manage everything DiscountWisp offers with ease.
Customer Tier Management
DiscountWisp enables Shopify merchants to segment customers into tiers, allowing personalized and rule-based discounting. Whether you're selling to B2B, B2C, or both — tiers help ensure the right customers receive the right deals at the right time.
Creating and Managing Tiers
Customer tiers can be created to reflect different types of buyers and purchasing behaviors, such as:
-
Customer Type: e.g., Wholesale, Retail, Distributor
-
Purchase Behavior: e.g., High-Spender, Frequent Buyer, Loyal Customers
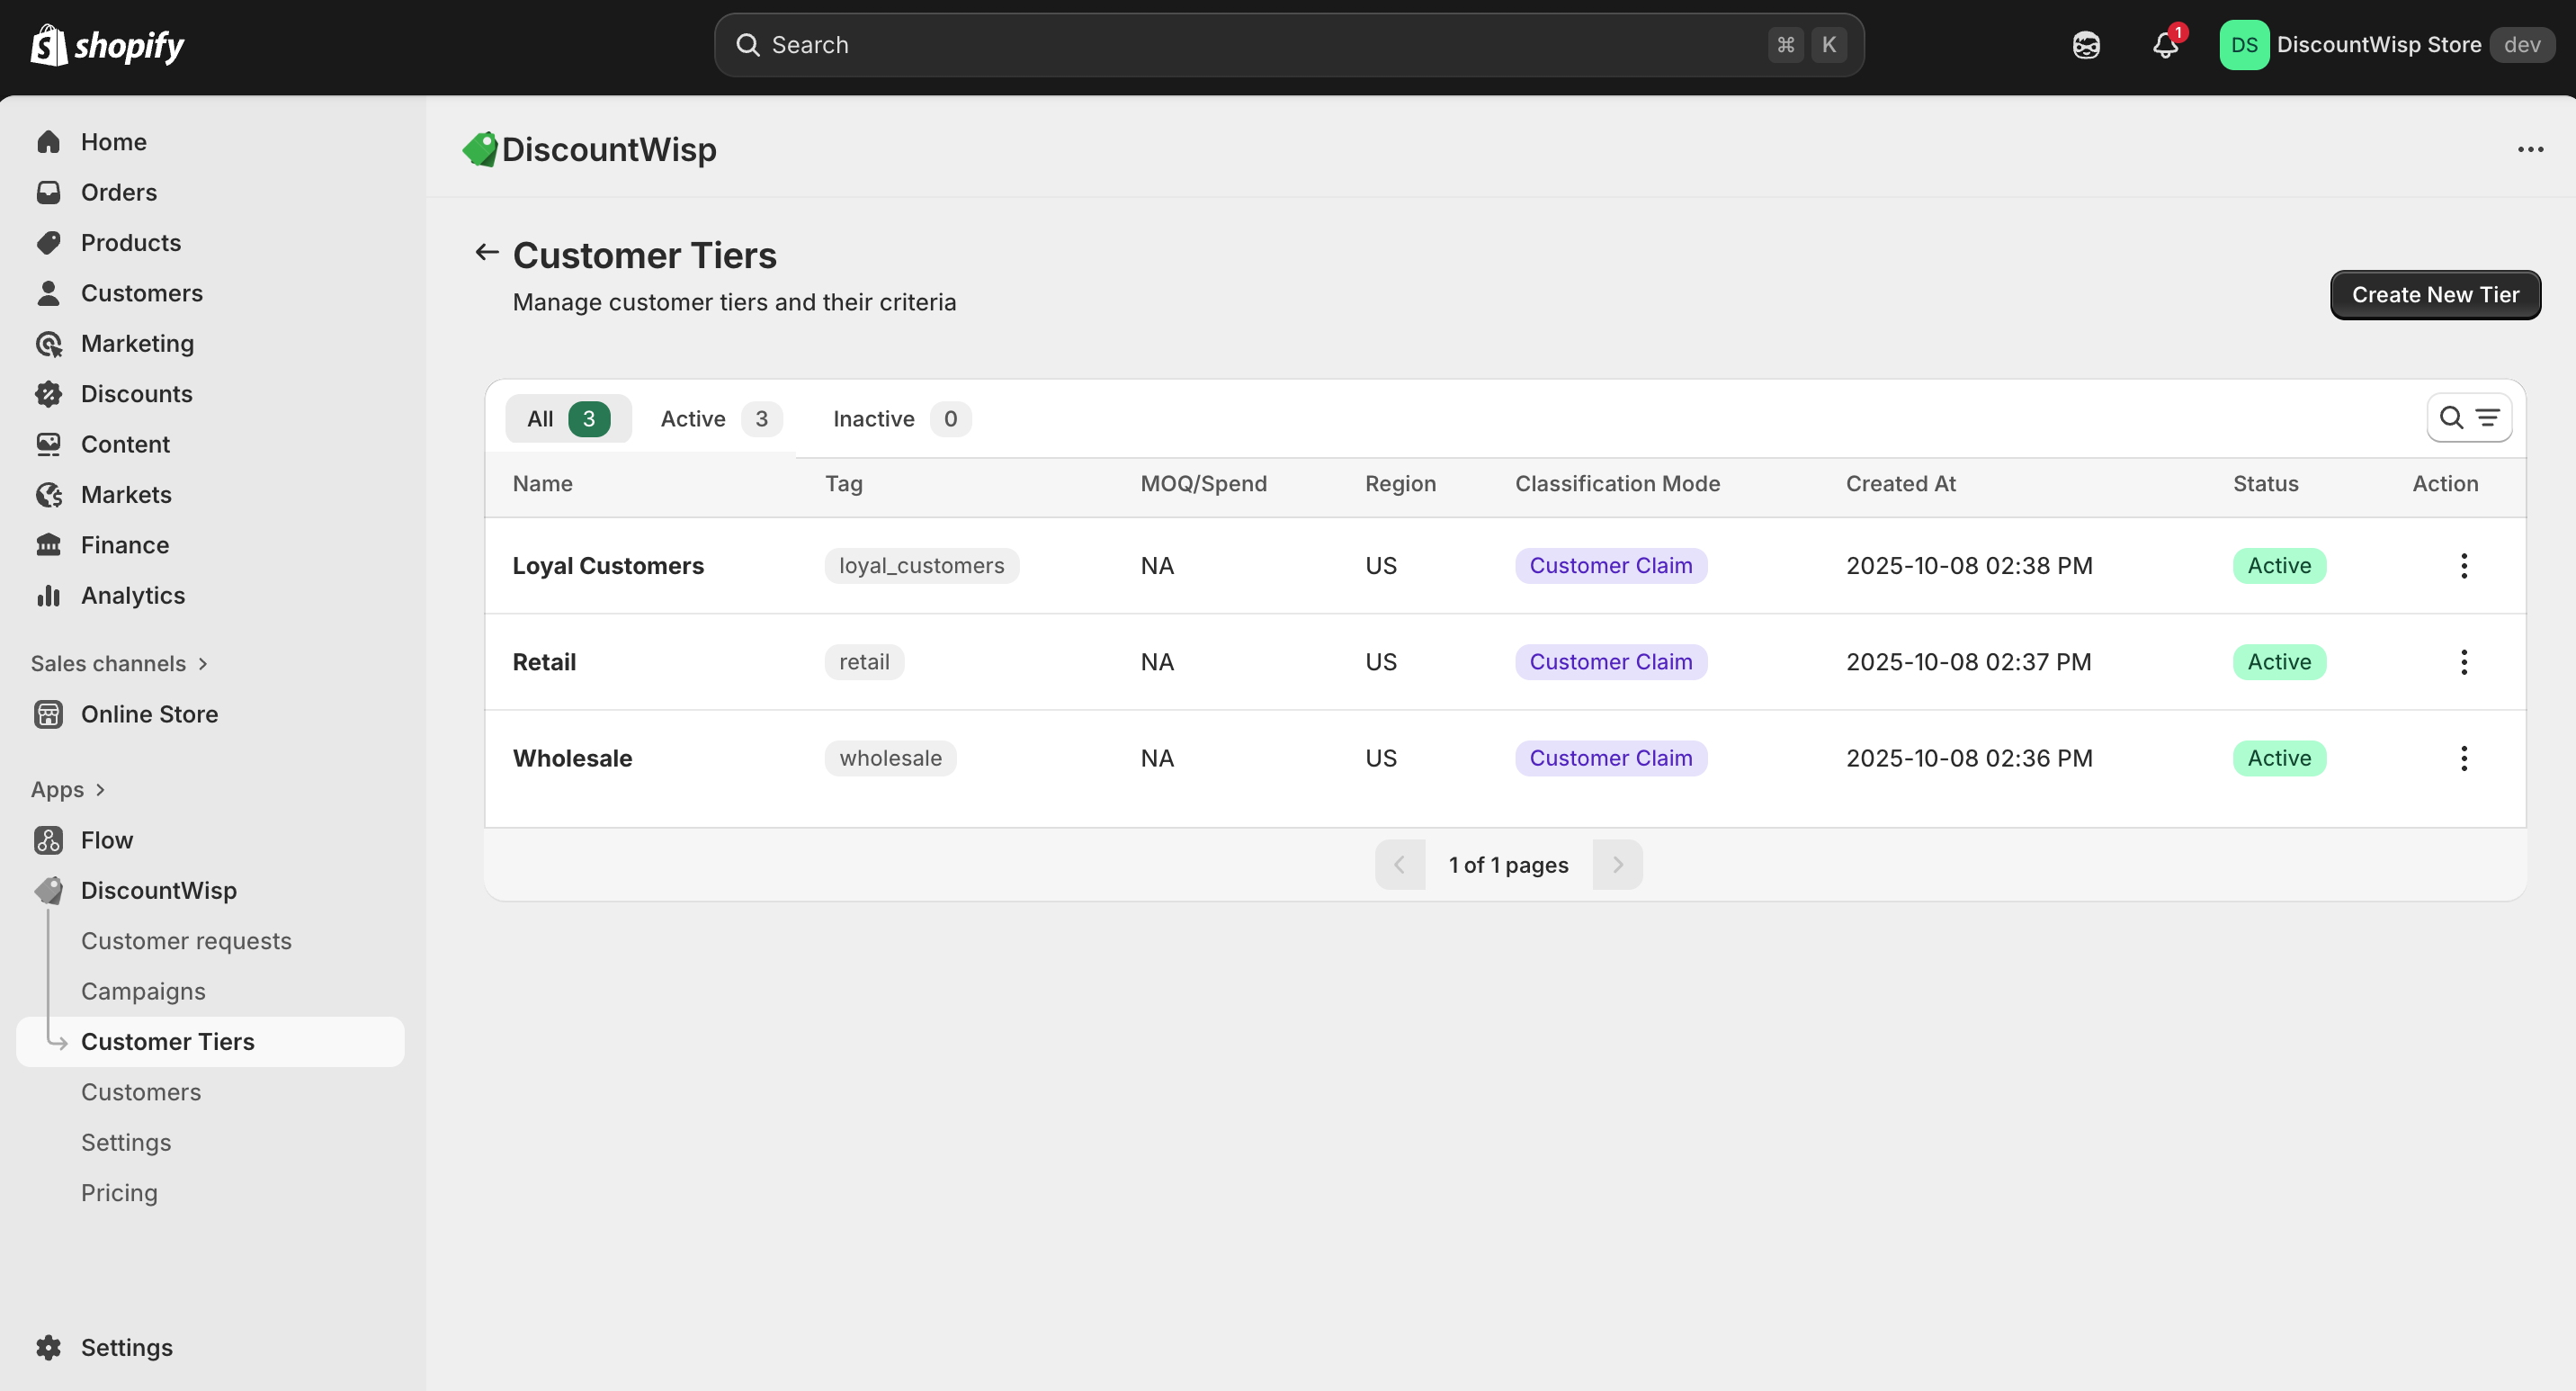
To create a new tier, navigate to the Customer Tiers page in your DiscountWisp app. The summary table displays all existing tiers, along with their current status and configuration. You can create new tiers using the “Create Tier” button.
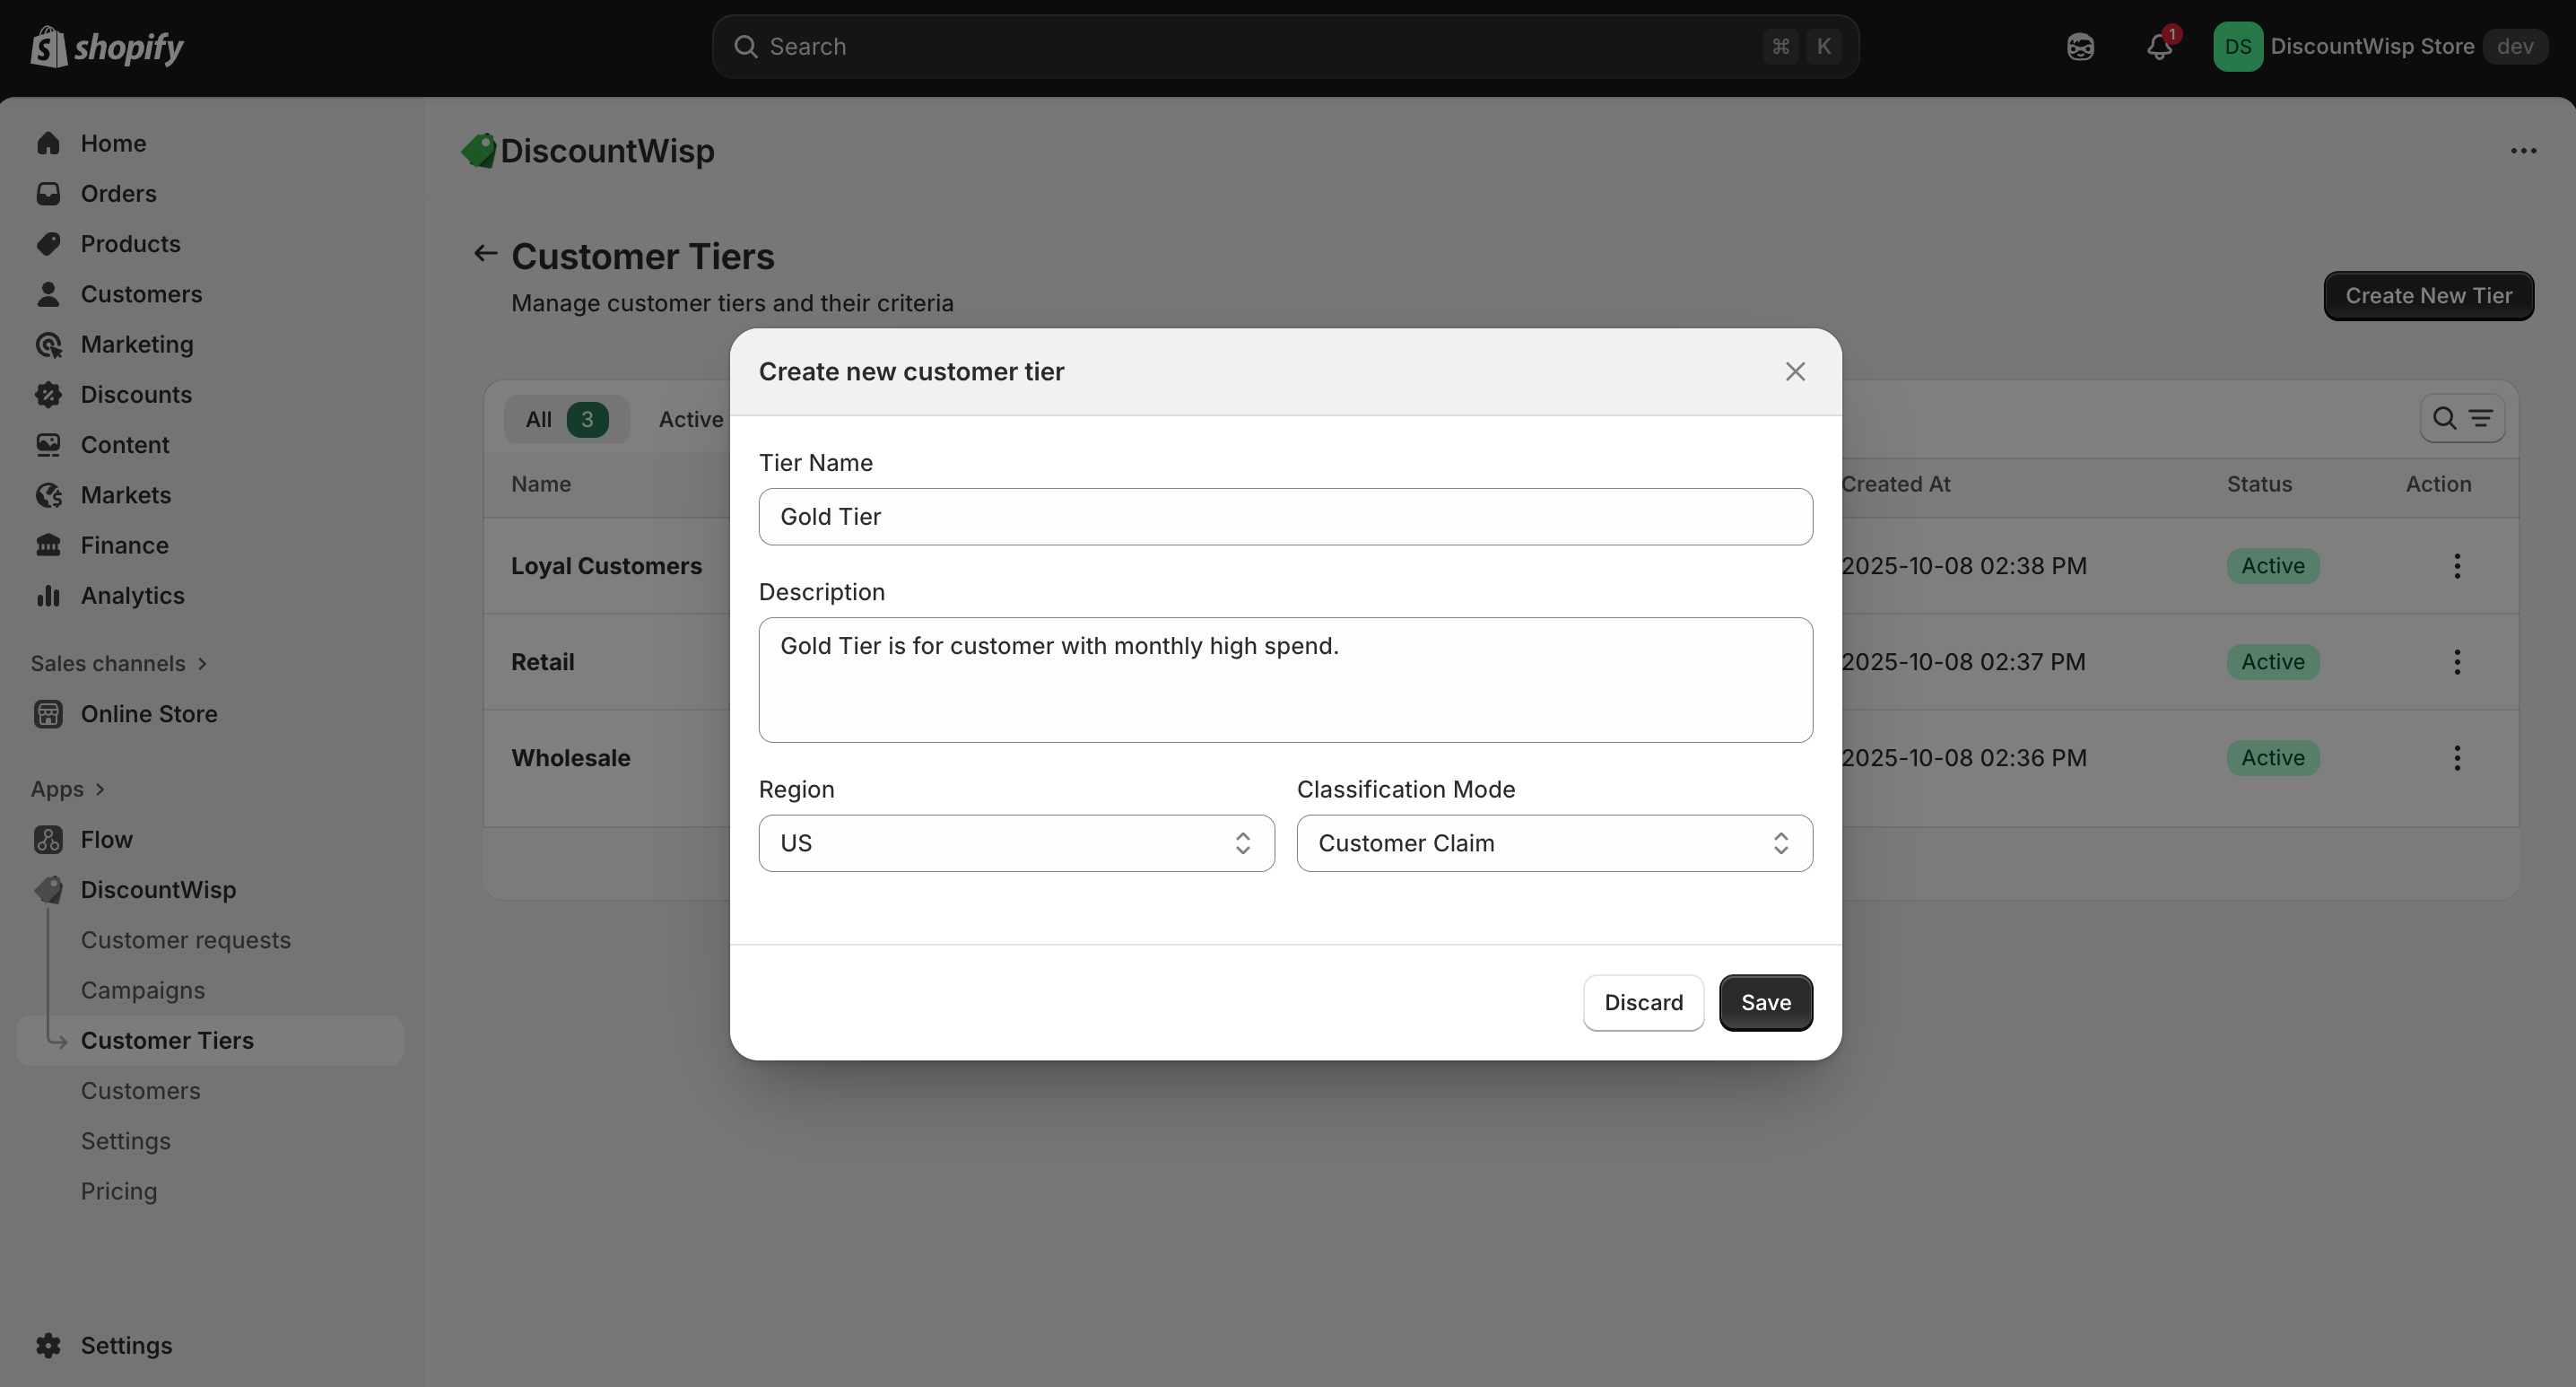
When creating a tier, you'll be asked to provide:
-
Tier Name: A recognizable label for internal use (e.g., "Gold Wholesale")
-
Description: Optional explanation to describe the customer segment or logic
-
Region: Choose a region where this tier should apply. (These are pre-defined and supported by DiscountWisp for geo-targeted discounting)
-
Classification Mode:
-
Criteria-Based: Customers are automatically assigned based on their profile — including past order volume, expected monthly spend, purchase history, and whether they’re individual or business buyers.
-
Customer Claim: Tiers are assigned based on customer-submitted requests (explained further in the Customer Request section). If automated approval is enabled, the customer is assigned directly to their claimed tier. If manual, the merchant reviews the submission and assigns an appropriate tier based on the provided information.
-
Tagging and Tier Status
Each time a customer is assigned to a tier:
-
A Shopify tag is automatically applied to that customer, enabling discount rules to function seamlessly across the storefront.
-
DiscountWisp uses these tags to identify which discount rules apply during checkout and on product pages.
-
Tiers can be marked Active or Inactive depending on whether they should be available for current campaign targeting.
Assigning Customer Tiers & Linking to Campaigns
DiscountWisp offers a flexible and intelligent approach to customer segmentation — allowing you to assign customer tiers manually or let customers request classification via a self-service form.
Assigning Tiers Manually to Existing Customers
Existing customers can be directly assigned to customer tiers from the Customers page on DiscountWisp Admin Console on Shopify Admin by navigating to the Customers section. This allows you to manually segment known buyers into relevant tiers without waiting for them to submit a classification request.
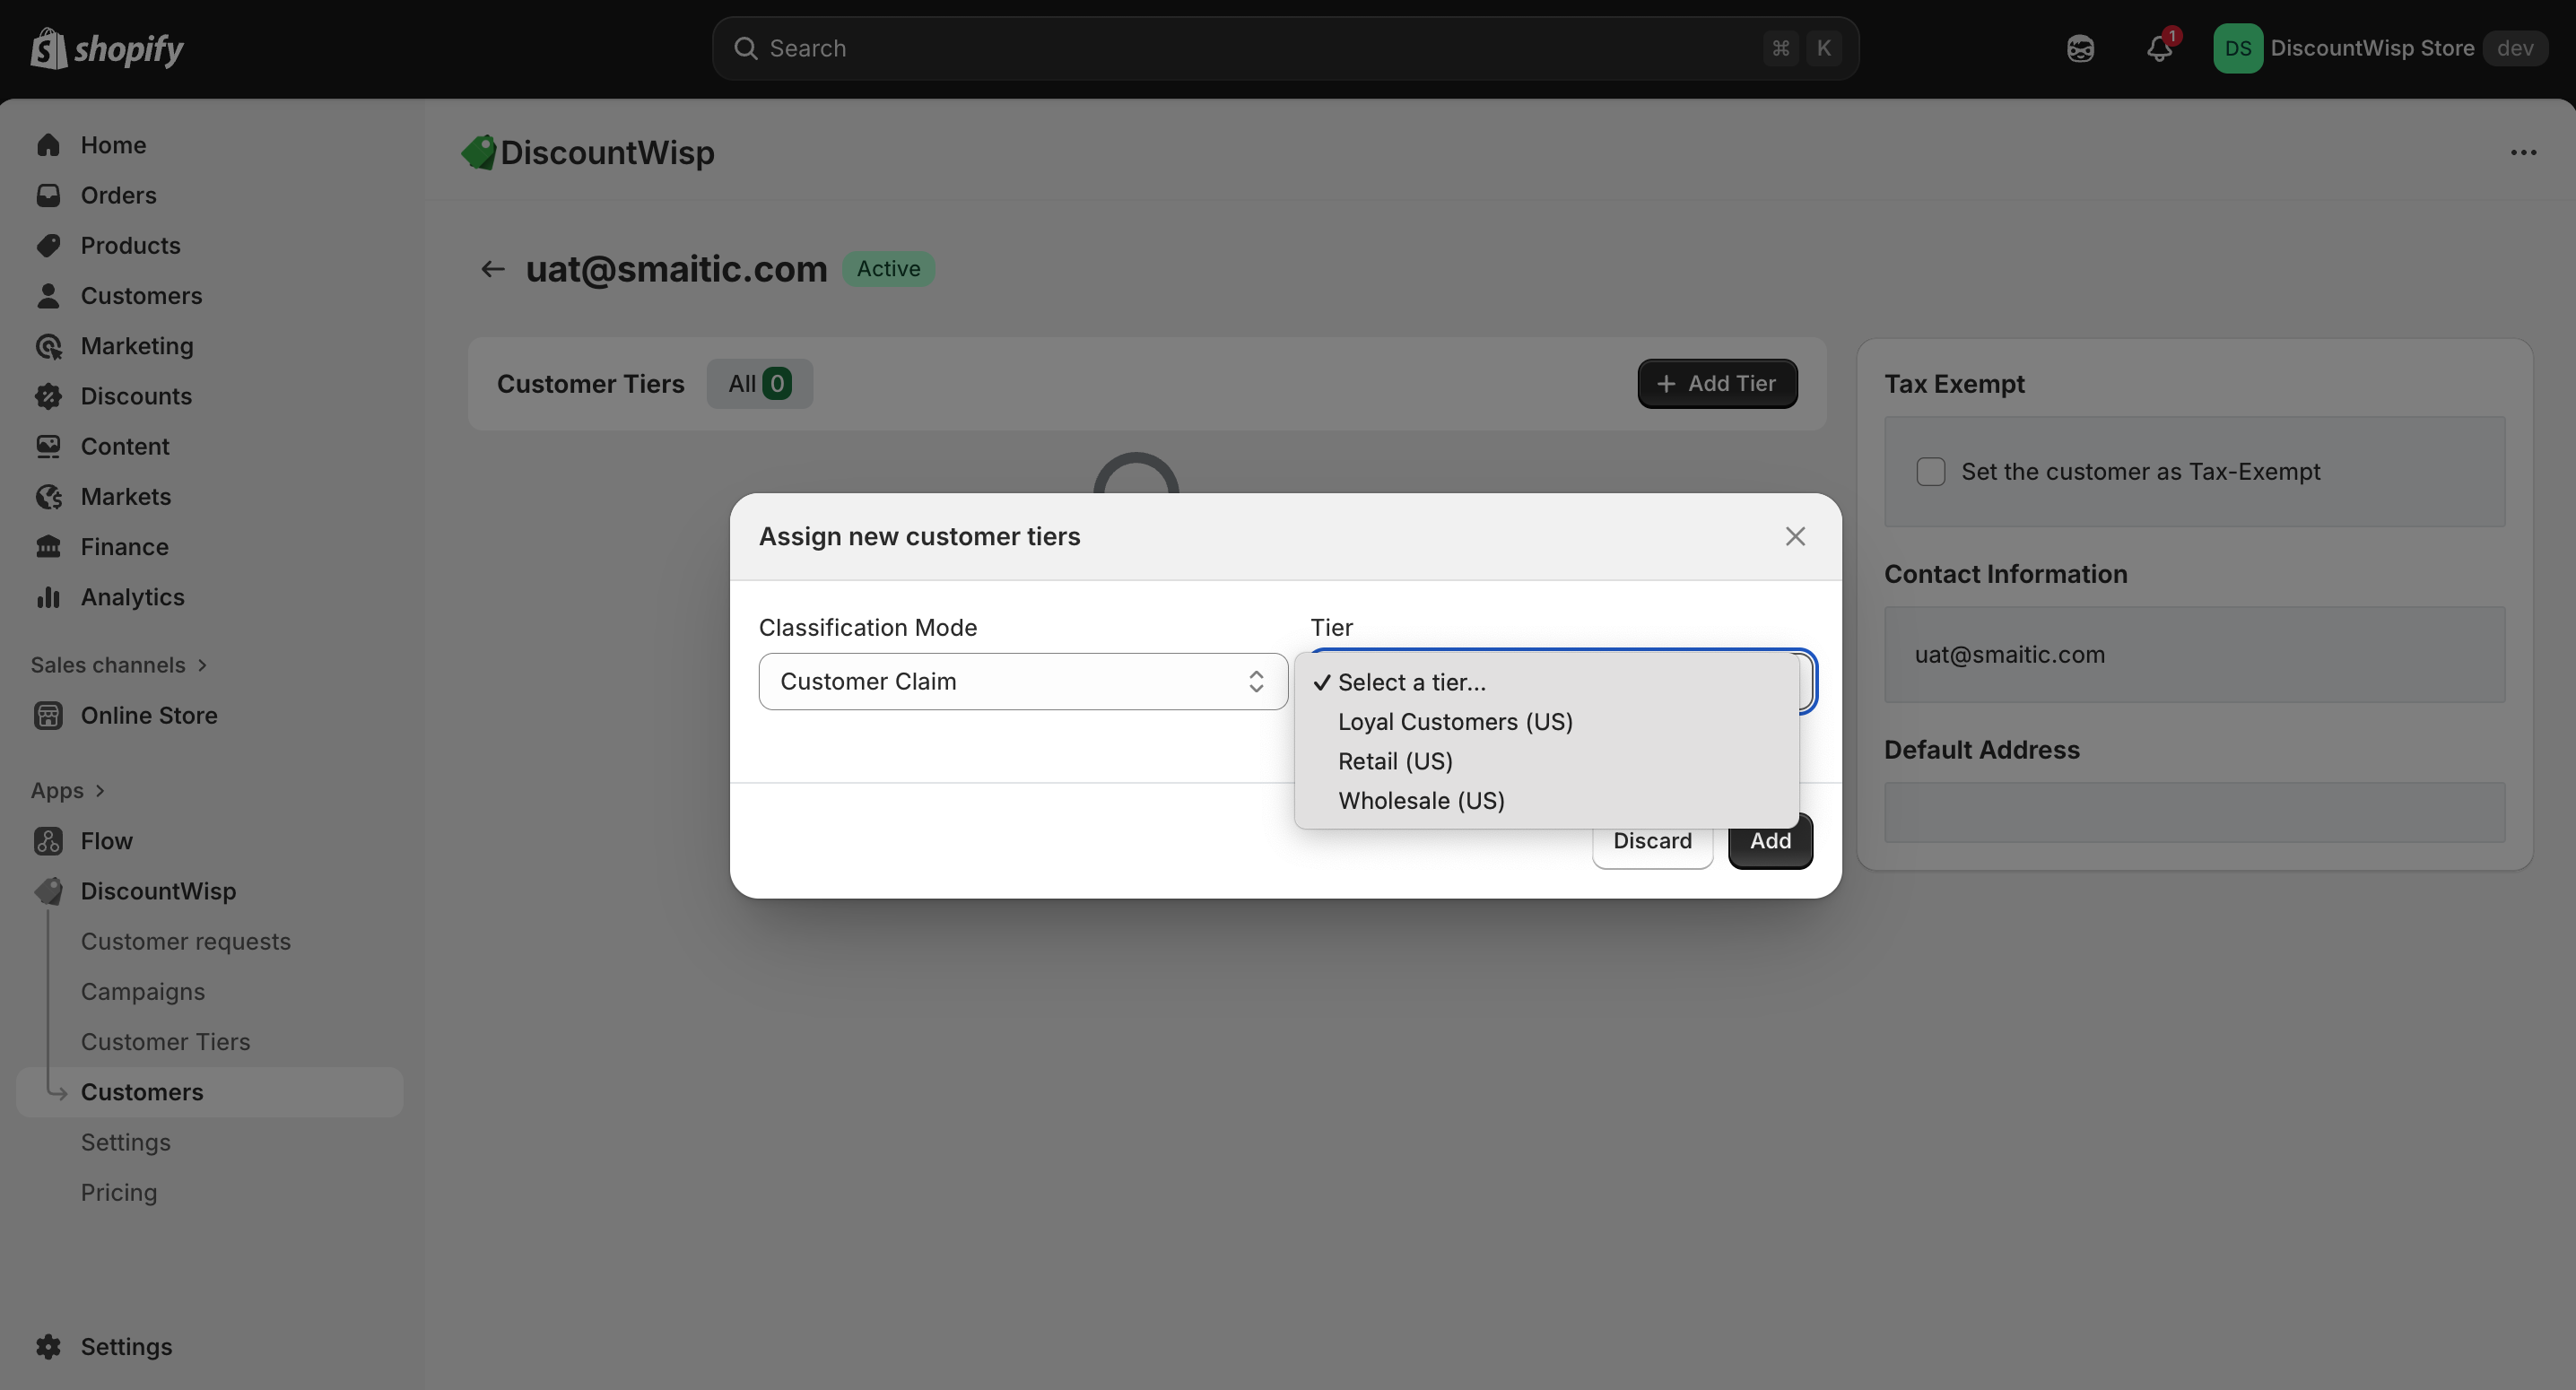
Simply open the desired customer profile and click “Add Tier” to assign them to a tier based on their purchase behavior, business type, or relationship with your store.
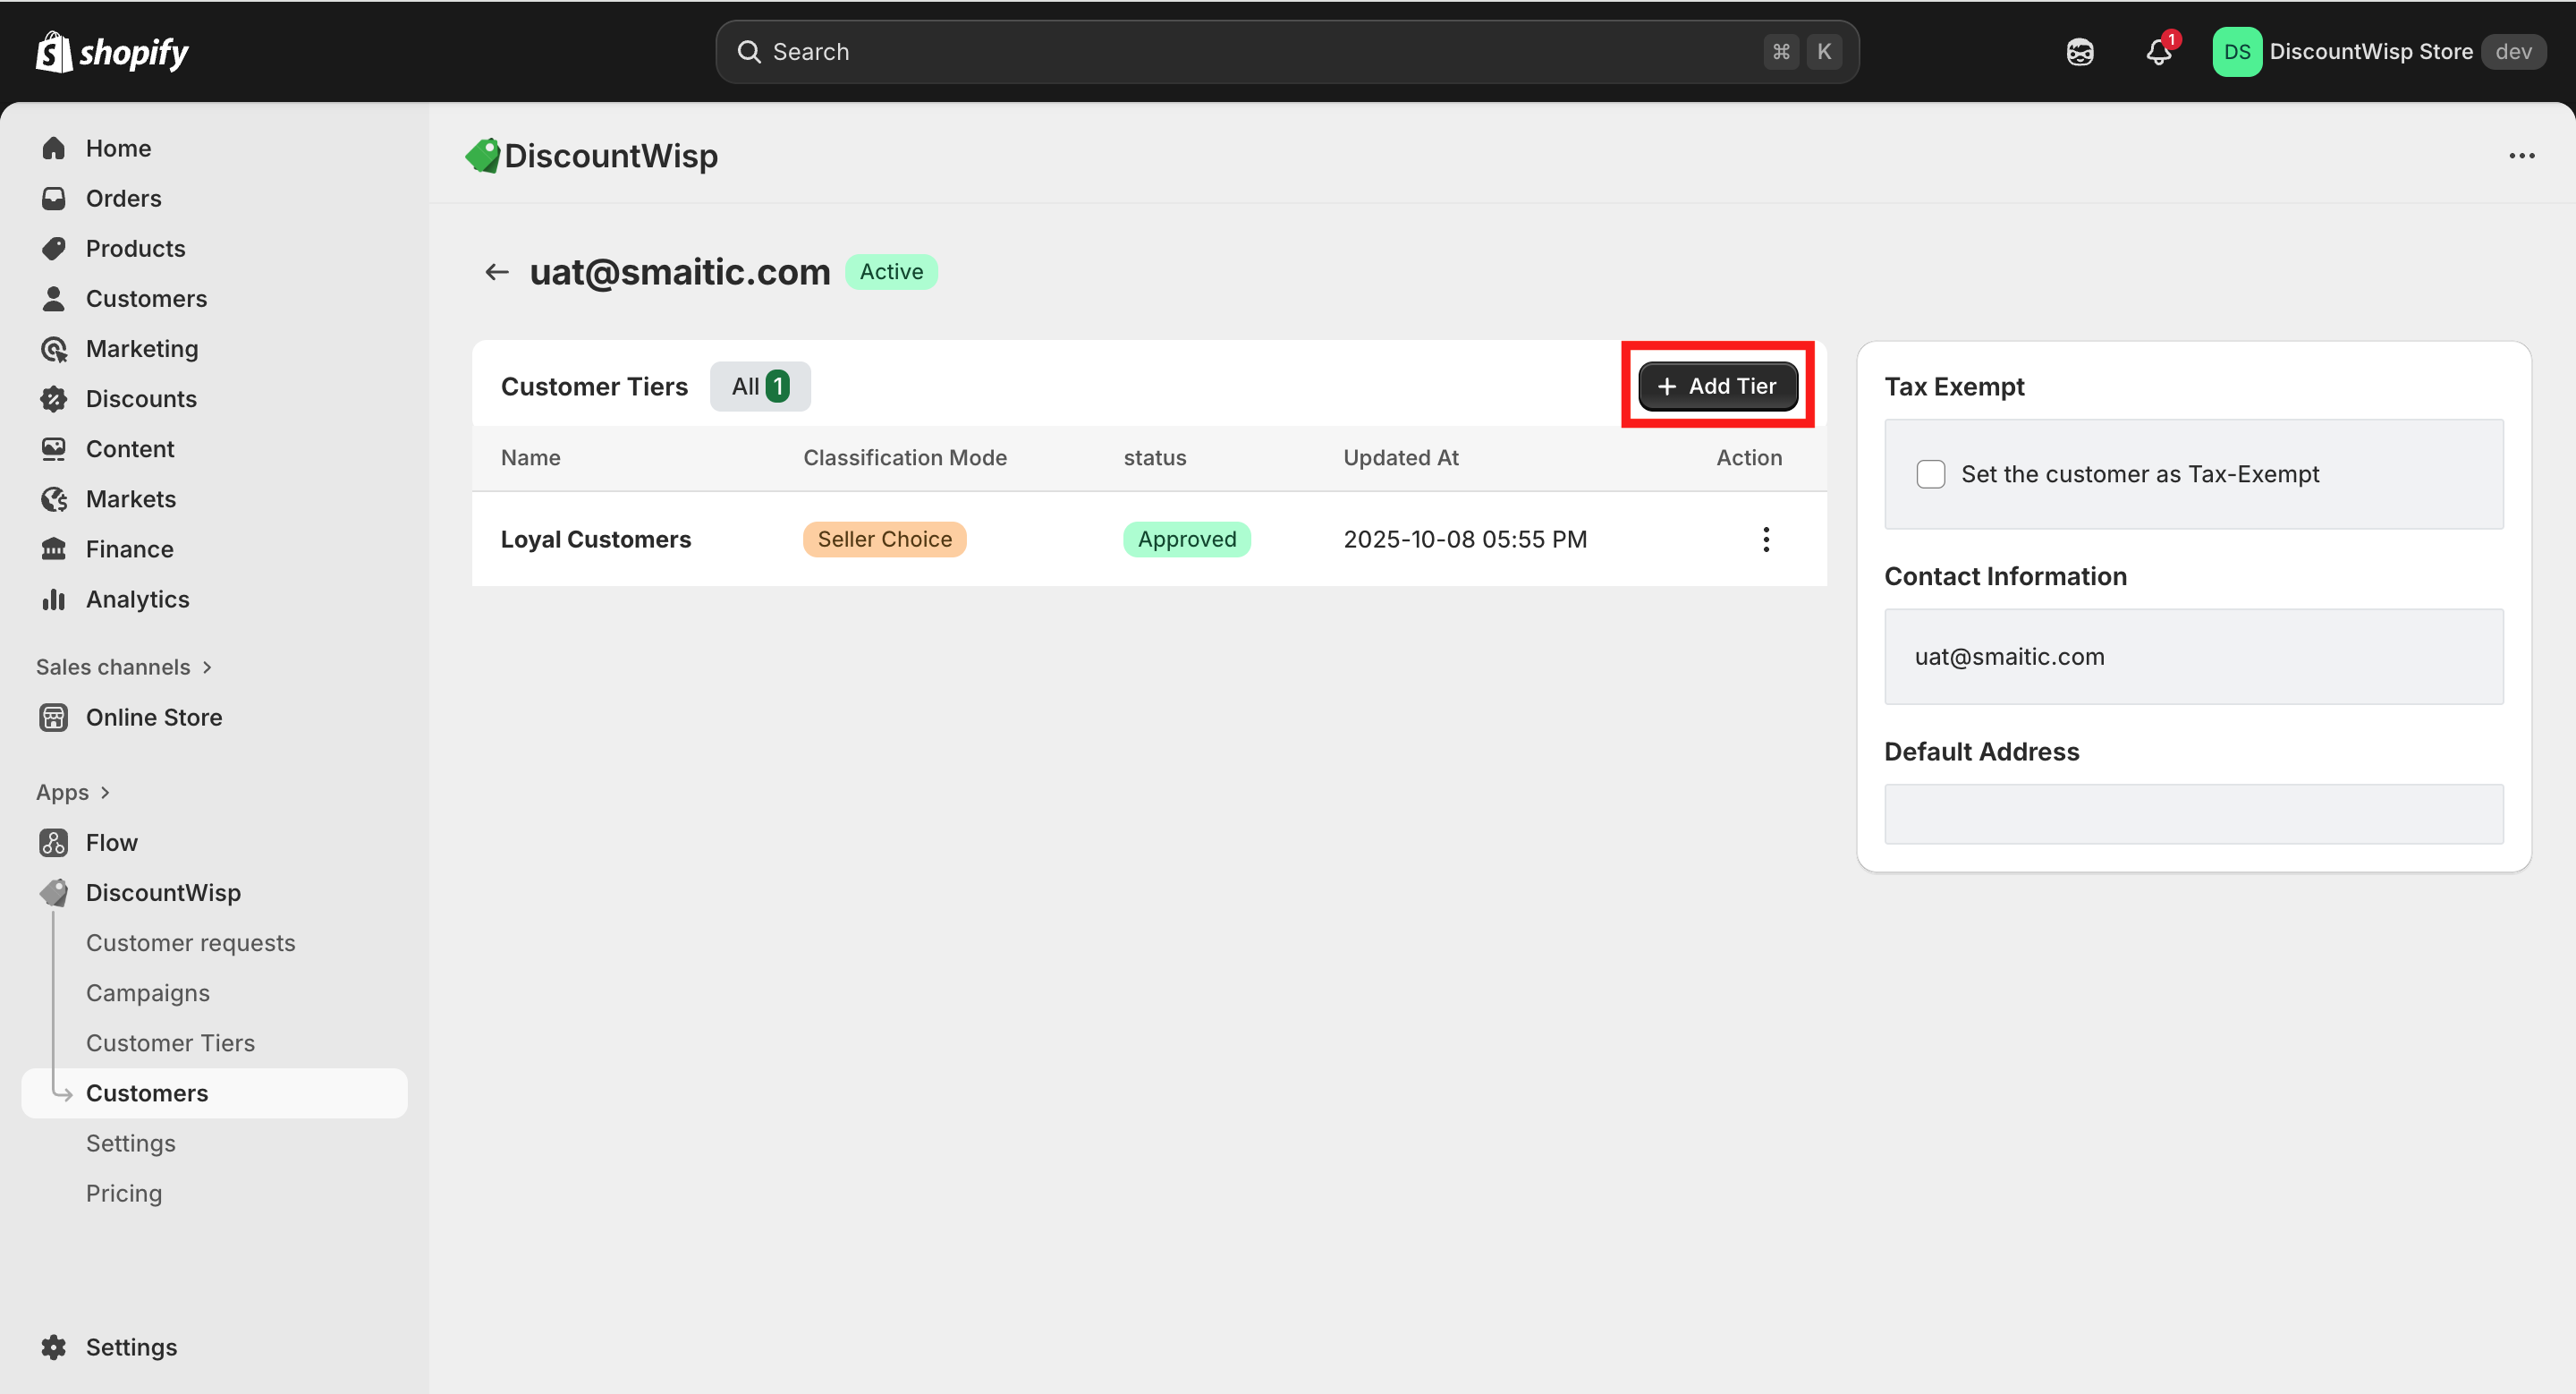
Click on "Add Tier" and select the desired tier for the customer.
Assigning Tiers through Customer-Initiated Requests
DiscountWisp also supports a self-service classification request flow through its storefront extension, where customers can request tier assignment by submitting relevant details.
After the tier classification request has been received, customers can be assigned to tiers using two primary methods:
1. Criteria-Based Assignment
Customers are automatically assigned to the most appropriate tier based on:
-
Order history
-
Monthly spend
-
Purchase frequency
-
Type of customer (individual or business)
This automation ensures high-intent buyers are rewarded with appropriate pricing without manual review.
2. Customer Claim via Tier Classification Request
Customers can also submit a request to be classified into a specific tier. This can be:
-
Auto-approved based on matching criteria
-
Manually reviewed by the store for verification before assignment
Merchants can configure DiscountWisp to either trust customer claims (for faster tiering) or opt for more controlled approvals.
Once assigned, tiers are automatically tagged in Shopify, and stored within the customer profile for future campaign eligibility and analytics.
Using Tiers in Campaigns
When creating a DiscountWisp campaign, you can select one or more tiers to target.

This enables:
-
Precision Campaigns
Example: Only B2B customers in Tier A get 10% off during the "Autumn Sale".
-
Layered Discount Strategies
Example:
-
Tier A → 10% off
-
Tier B → 5% off
-
Tier C → no discount
This targeting ensures the right customers get the right offers — boosting conversion without over-discounting.
-
Together, tier assignment logic and campaign targeting form the backbone of DiscountWisp’s automated personalized discount engine, giving you full control over how you segment and reward your customer base.
All your tiers — their names, statuses, regions, and modes — are visible in the Customer Tiers summary table. This gives you a real-time overview of how your segmentation is structured and what discount logic is in place.
Creating & Managing Discount Campaigns
Discount campaigns are the foundation of how DiscountWisp enables precision discounting for your Shopify store. Here’s how to set up and manage them effectively.
Creating a New Campaign
To get started:
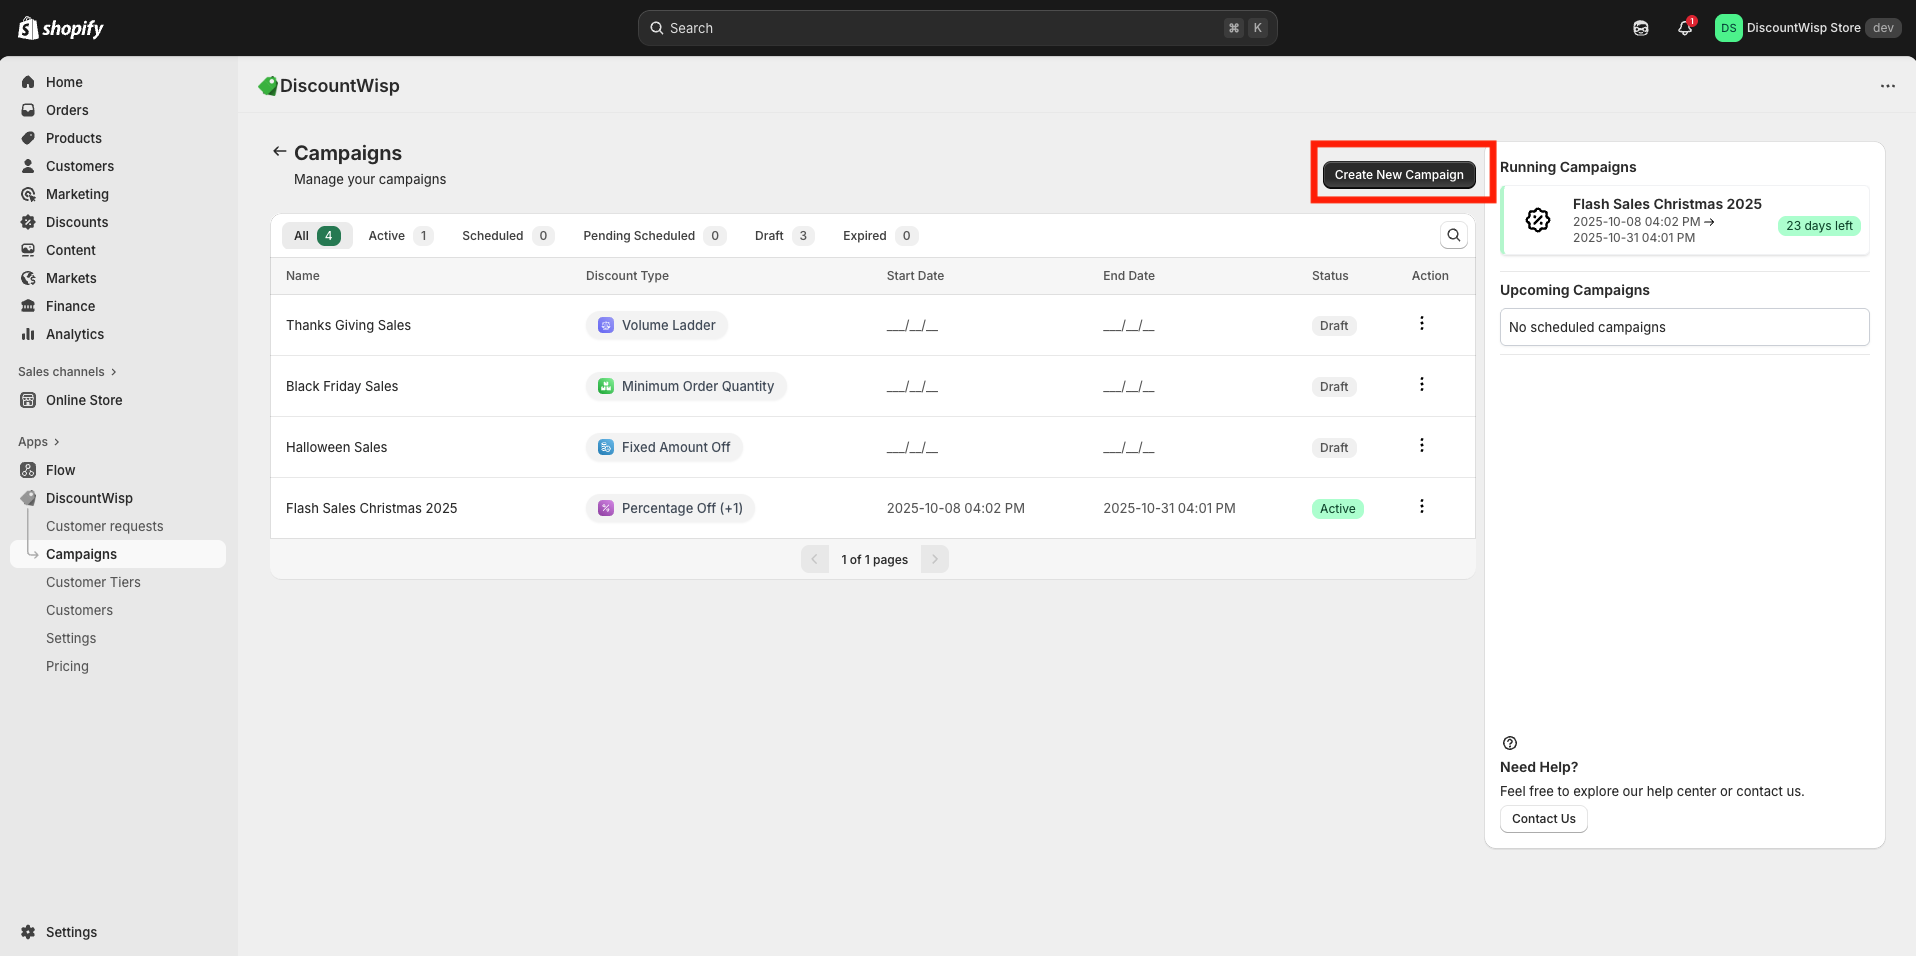
- Click “Create New Campaign” from your Dashboard or Campaigns page.
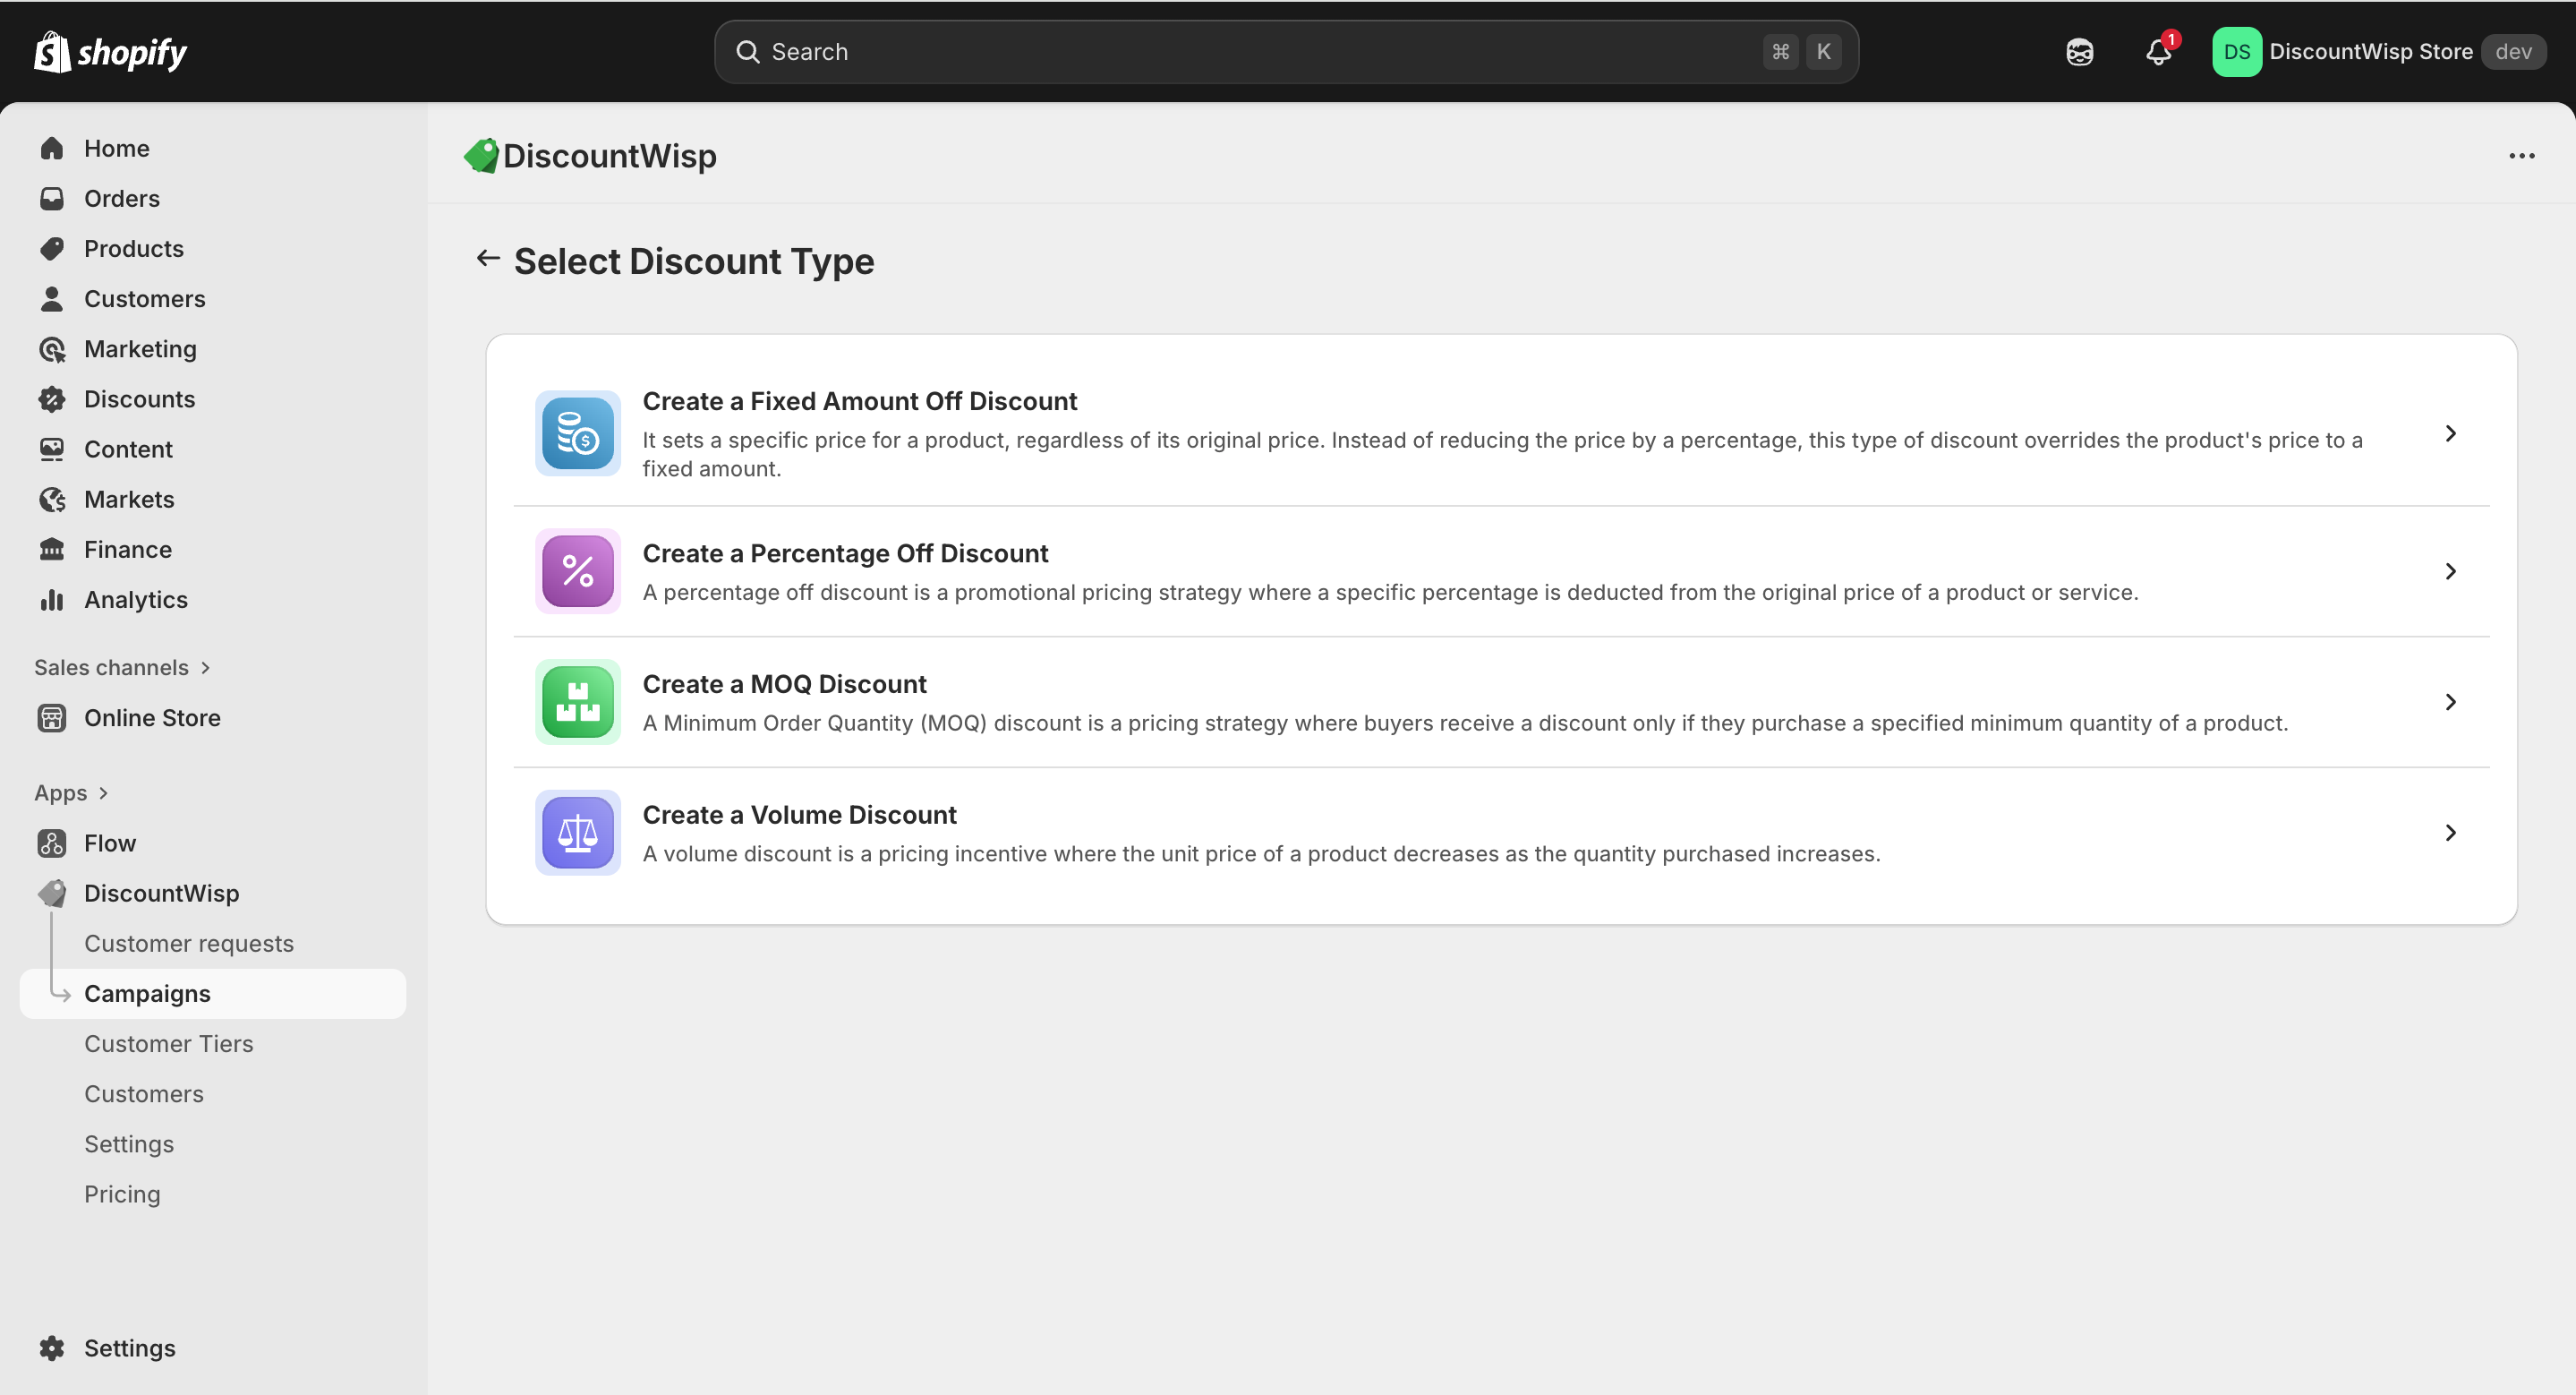
- Choose a Discount Type:
-
Fixed Amount Off (e.g., $10 off)
-
Percentage Discount (e.g., 15% off)
-
MOQ Discount (Minimum Order Quantity-based)
-
Volume Ladder Discount (with quantity thresholds)
-
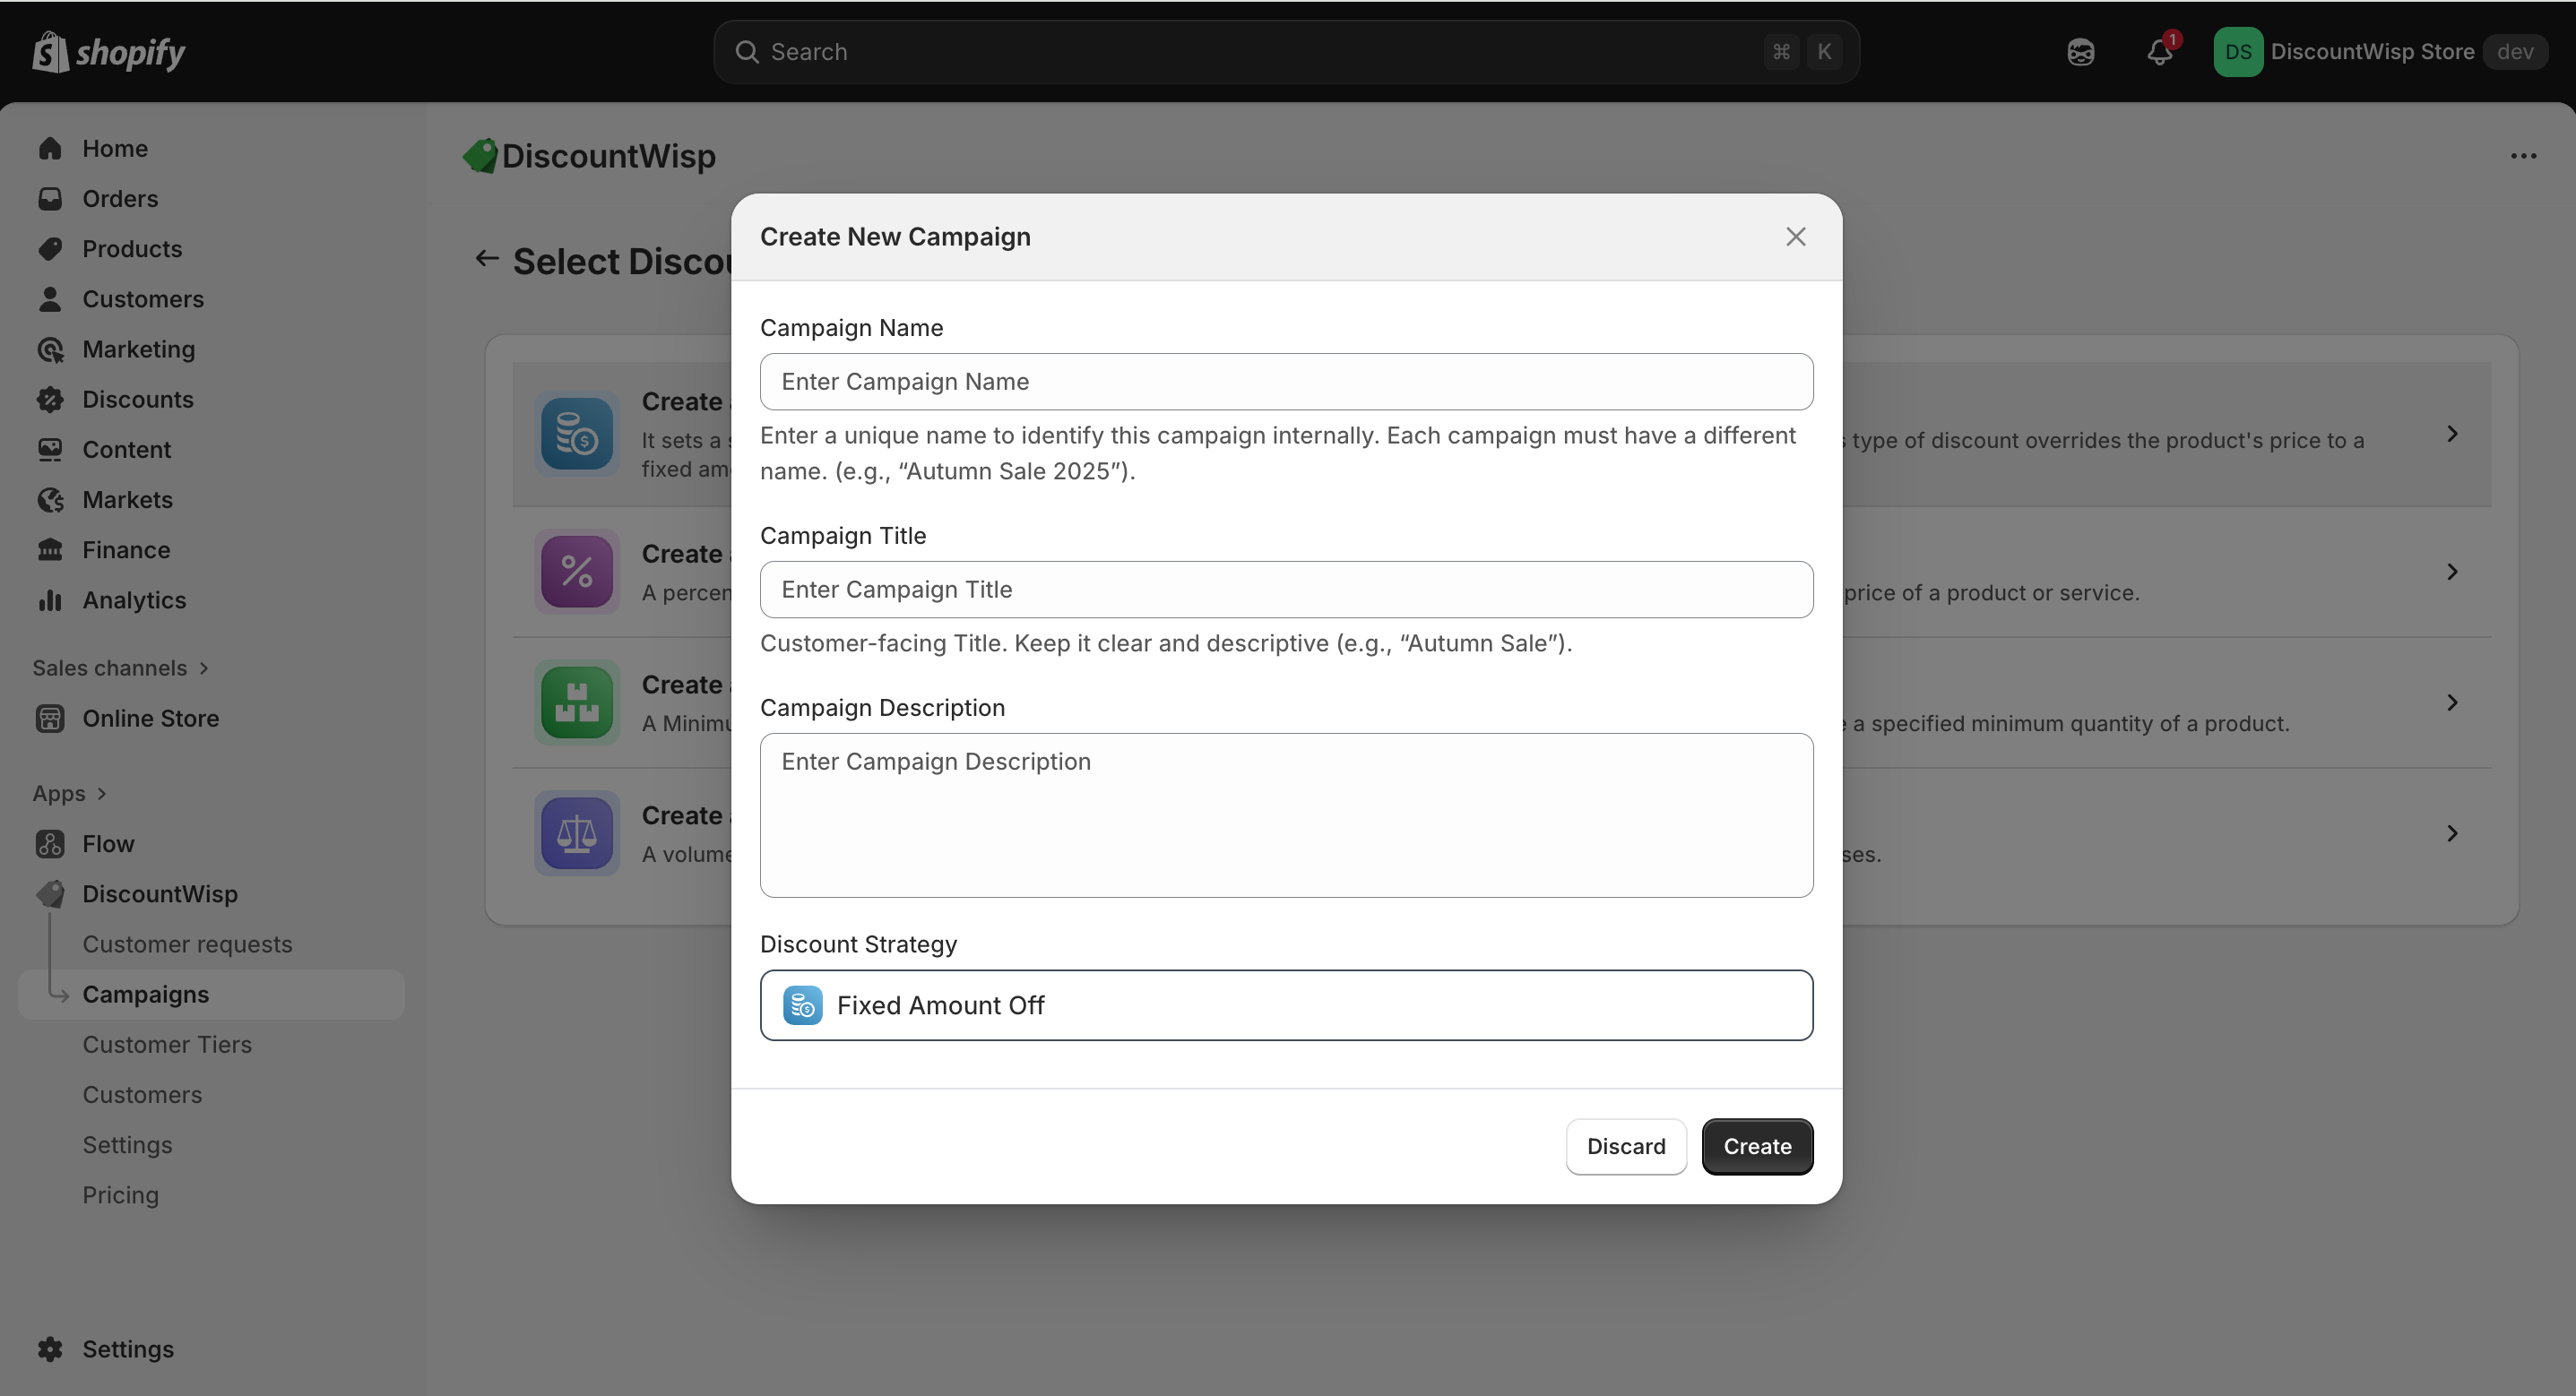
Then, name your campaign, add a descriptive title, and explain the offer clearly. Once saved, the campaign remains in Draft state until published.
Use campaigns for seasonal promotions, B2B pricing, loyalty programs, clearance events, or flash sales.
Setting Up Discount Rules
Each campaign supports one or multiple discount rules - allowing you to apply different strategies across products and customer segments.
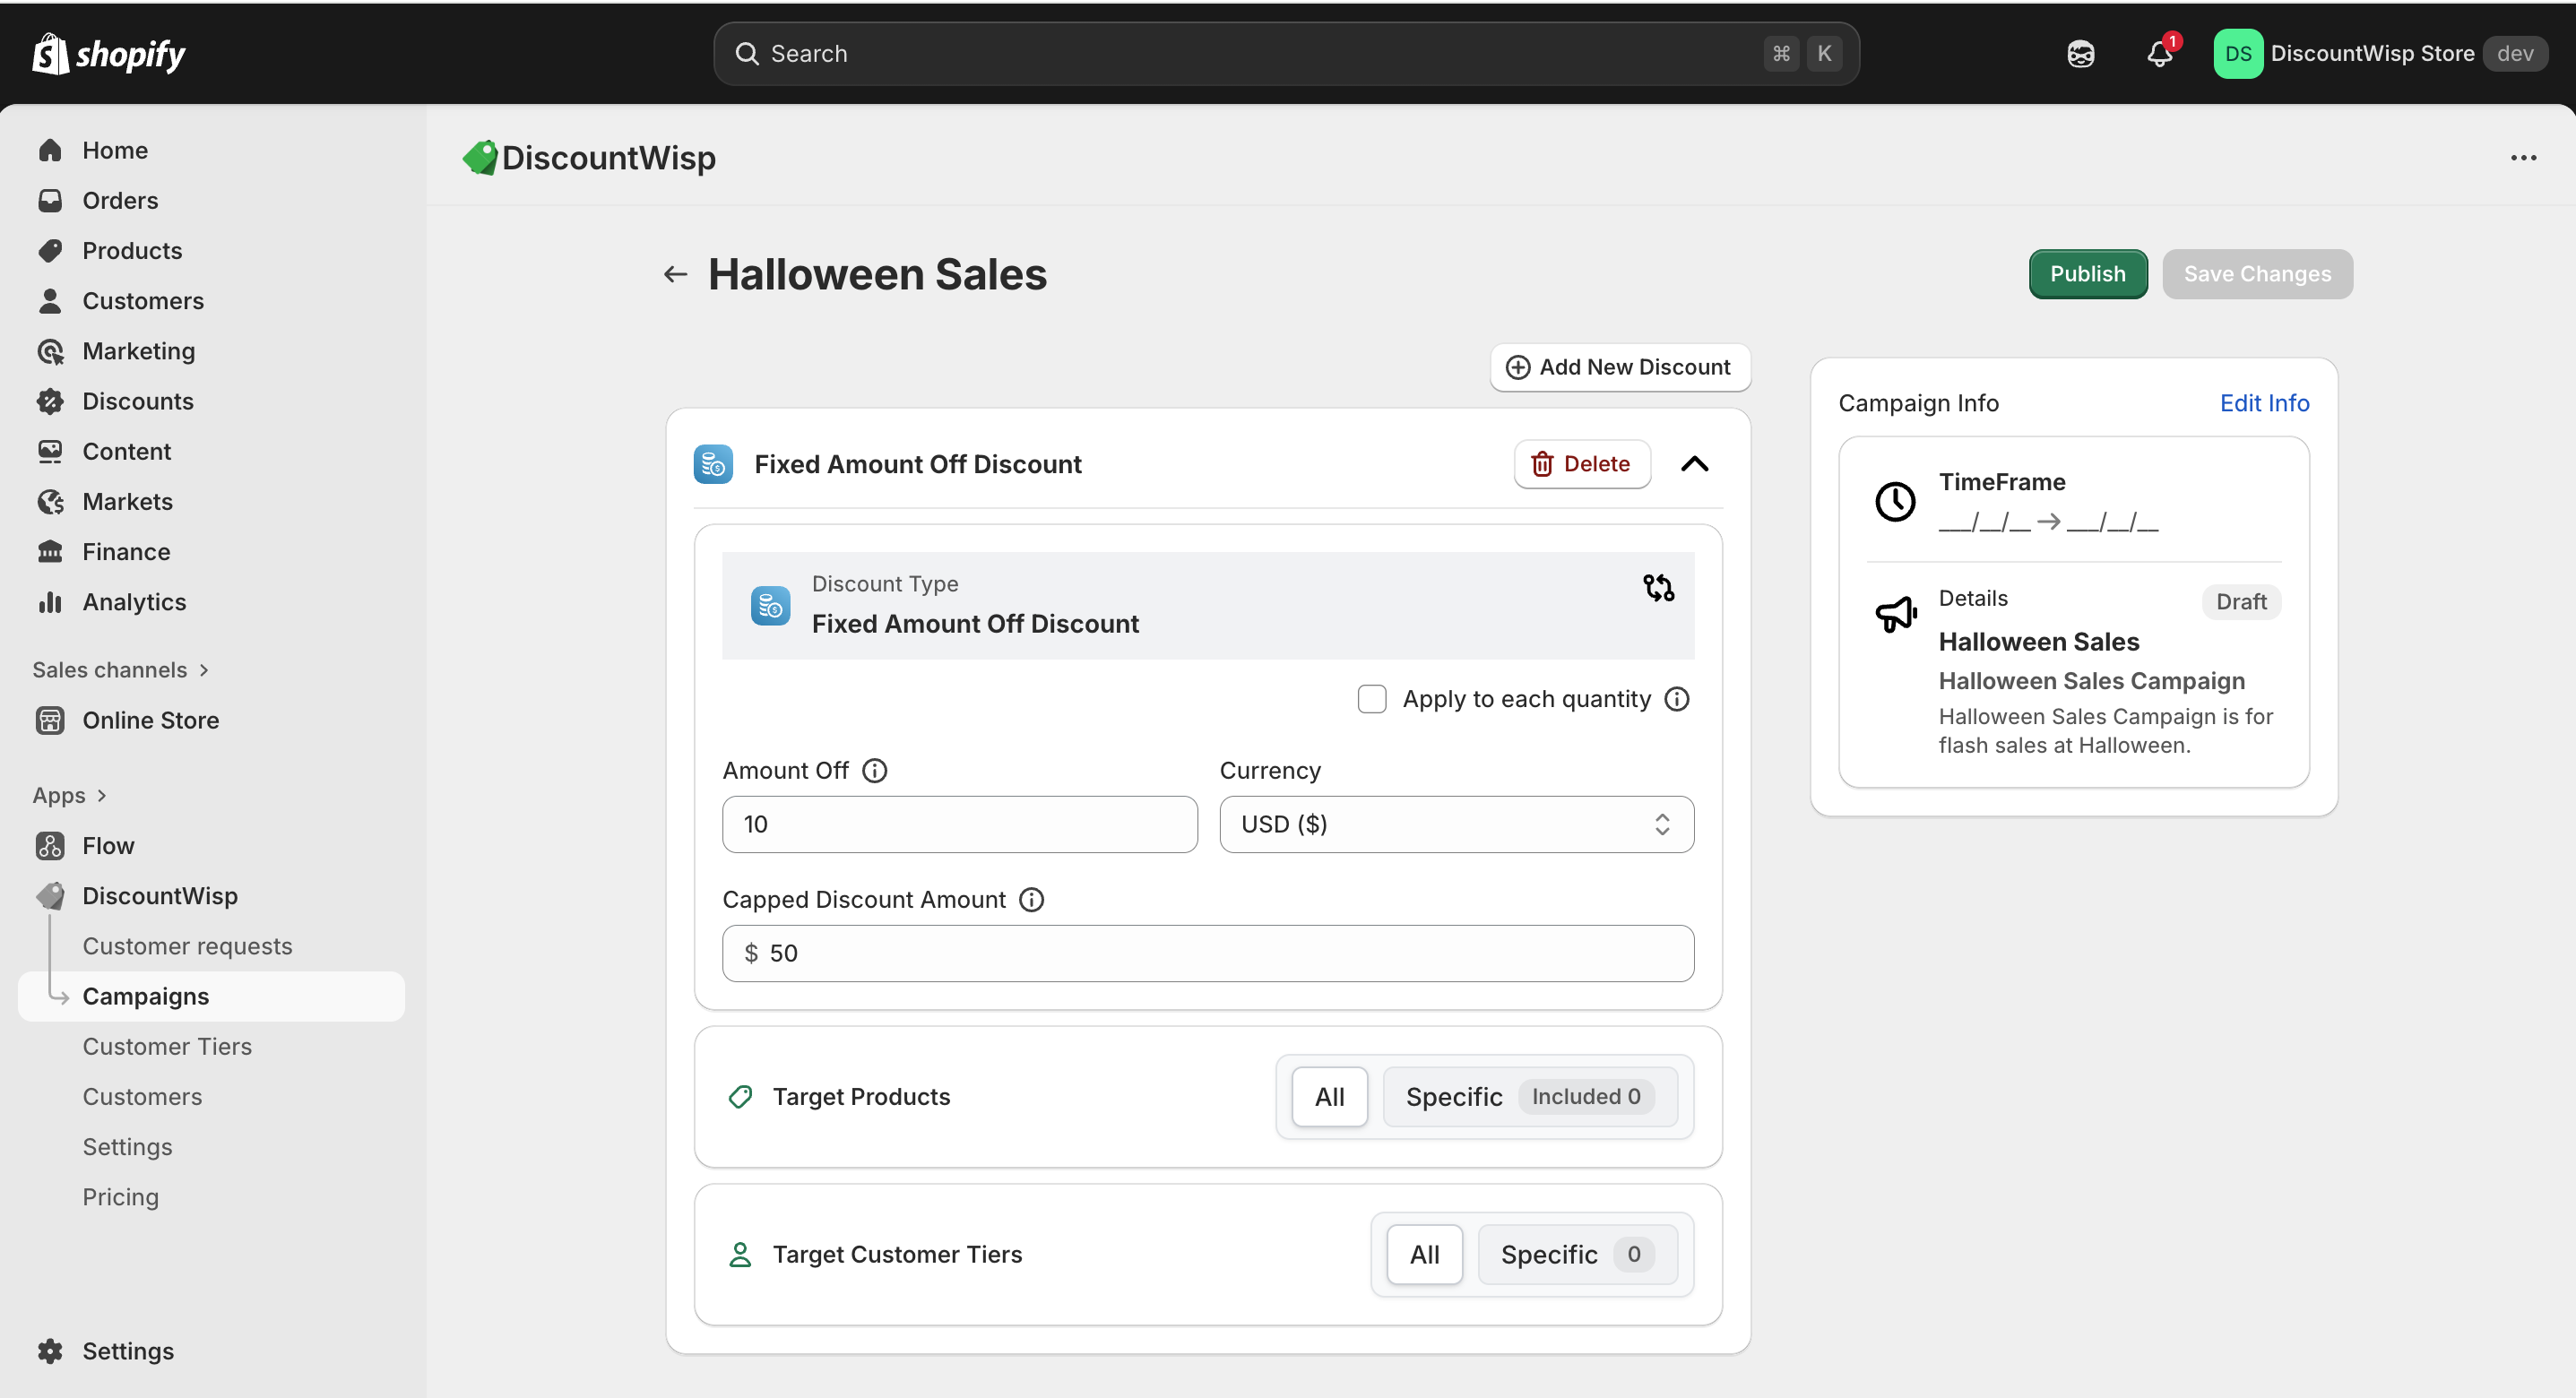
Fixed Amount Off Discount
- The Fixed Amount Off Discount allows you to subtract a specific dollar value from the product price when the discount rule applies.
- For example, a discount of $10 off will reduce the product or cart price by $10, regardless of the original price.
- This discount type is simple, predictable, and easy for customers to understand — making it highly effective for:
- Clearance Sales
- Flat-rate Promotions
- B2C Flash Sales
- Per-unit wholesale pricing
- You can apply this discount to specific products, collections, or across the store. It's especially useful when you want to offer a fixed monetary incentive without percentage calculations.
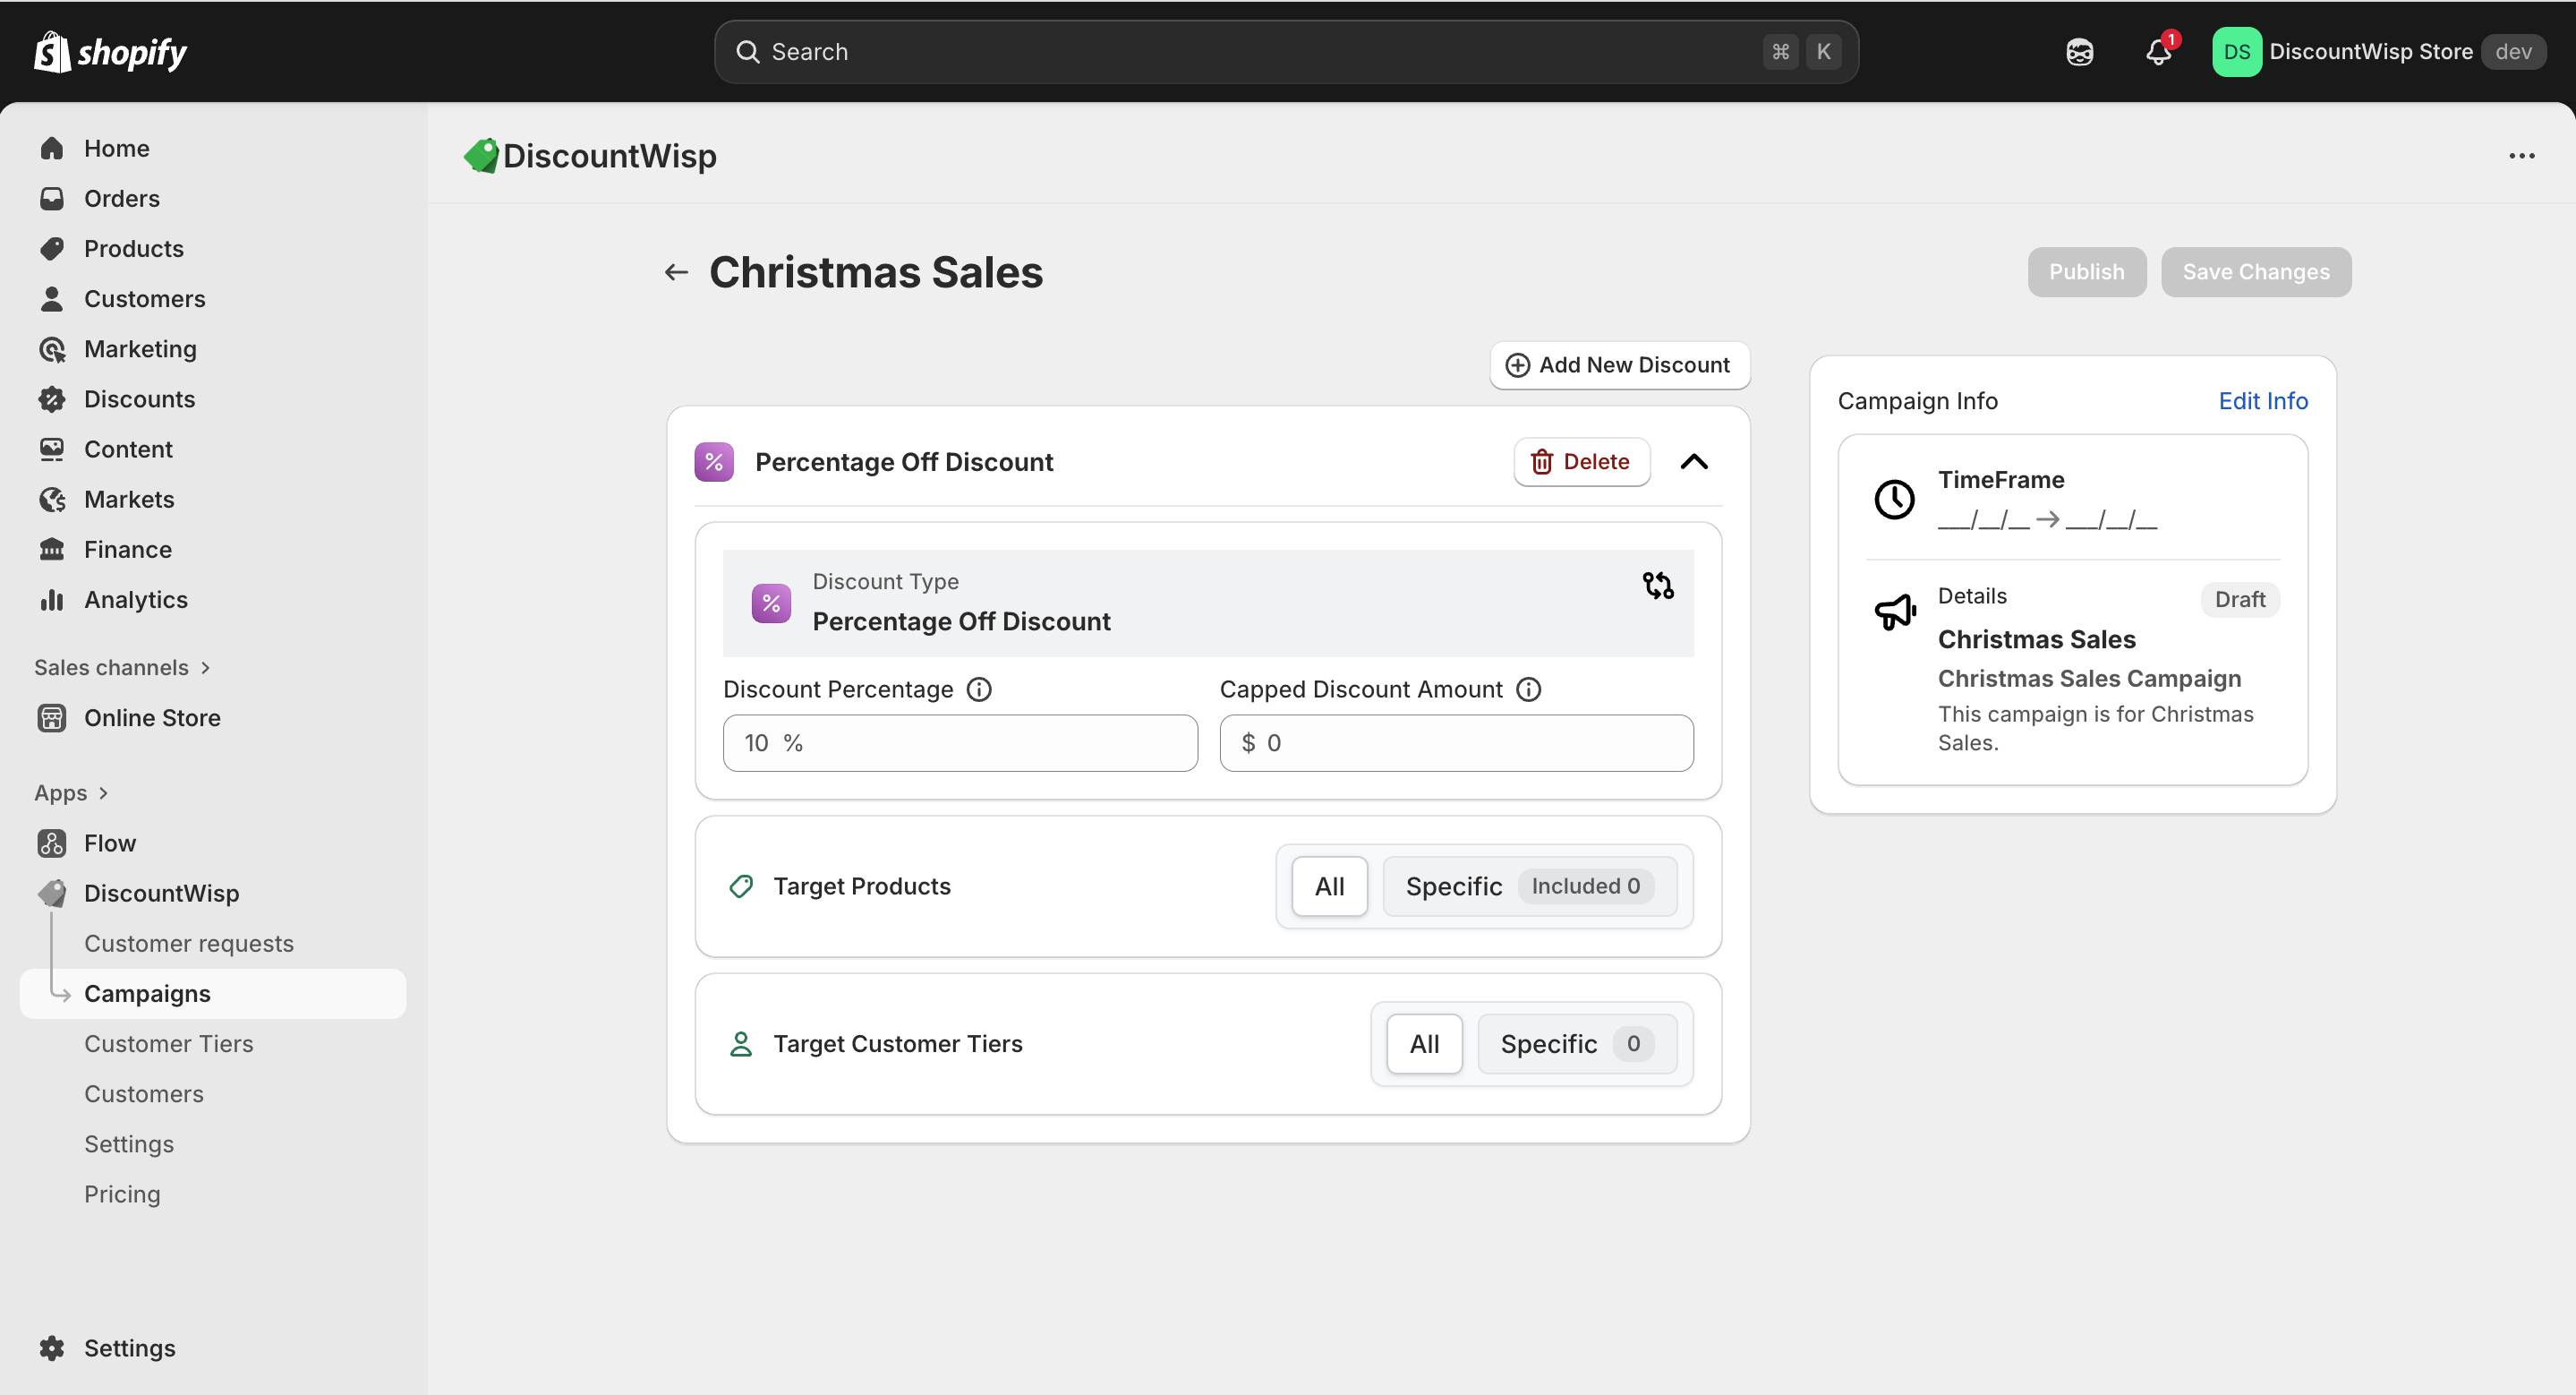
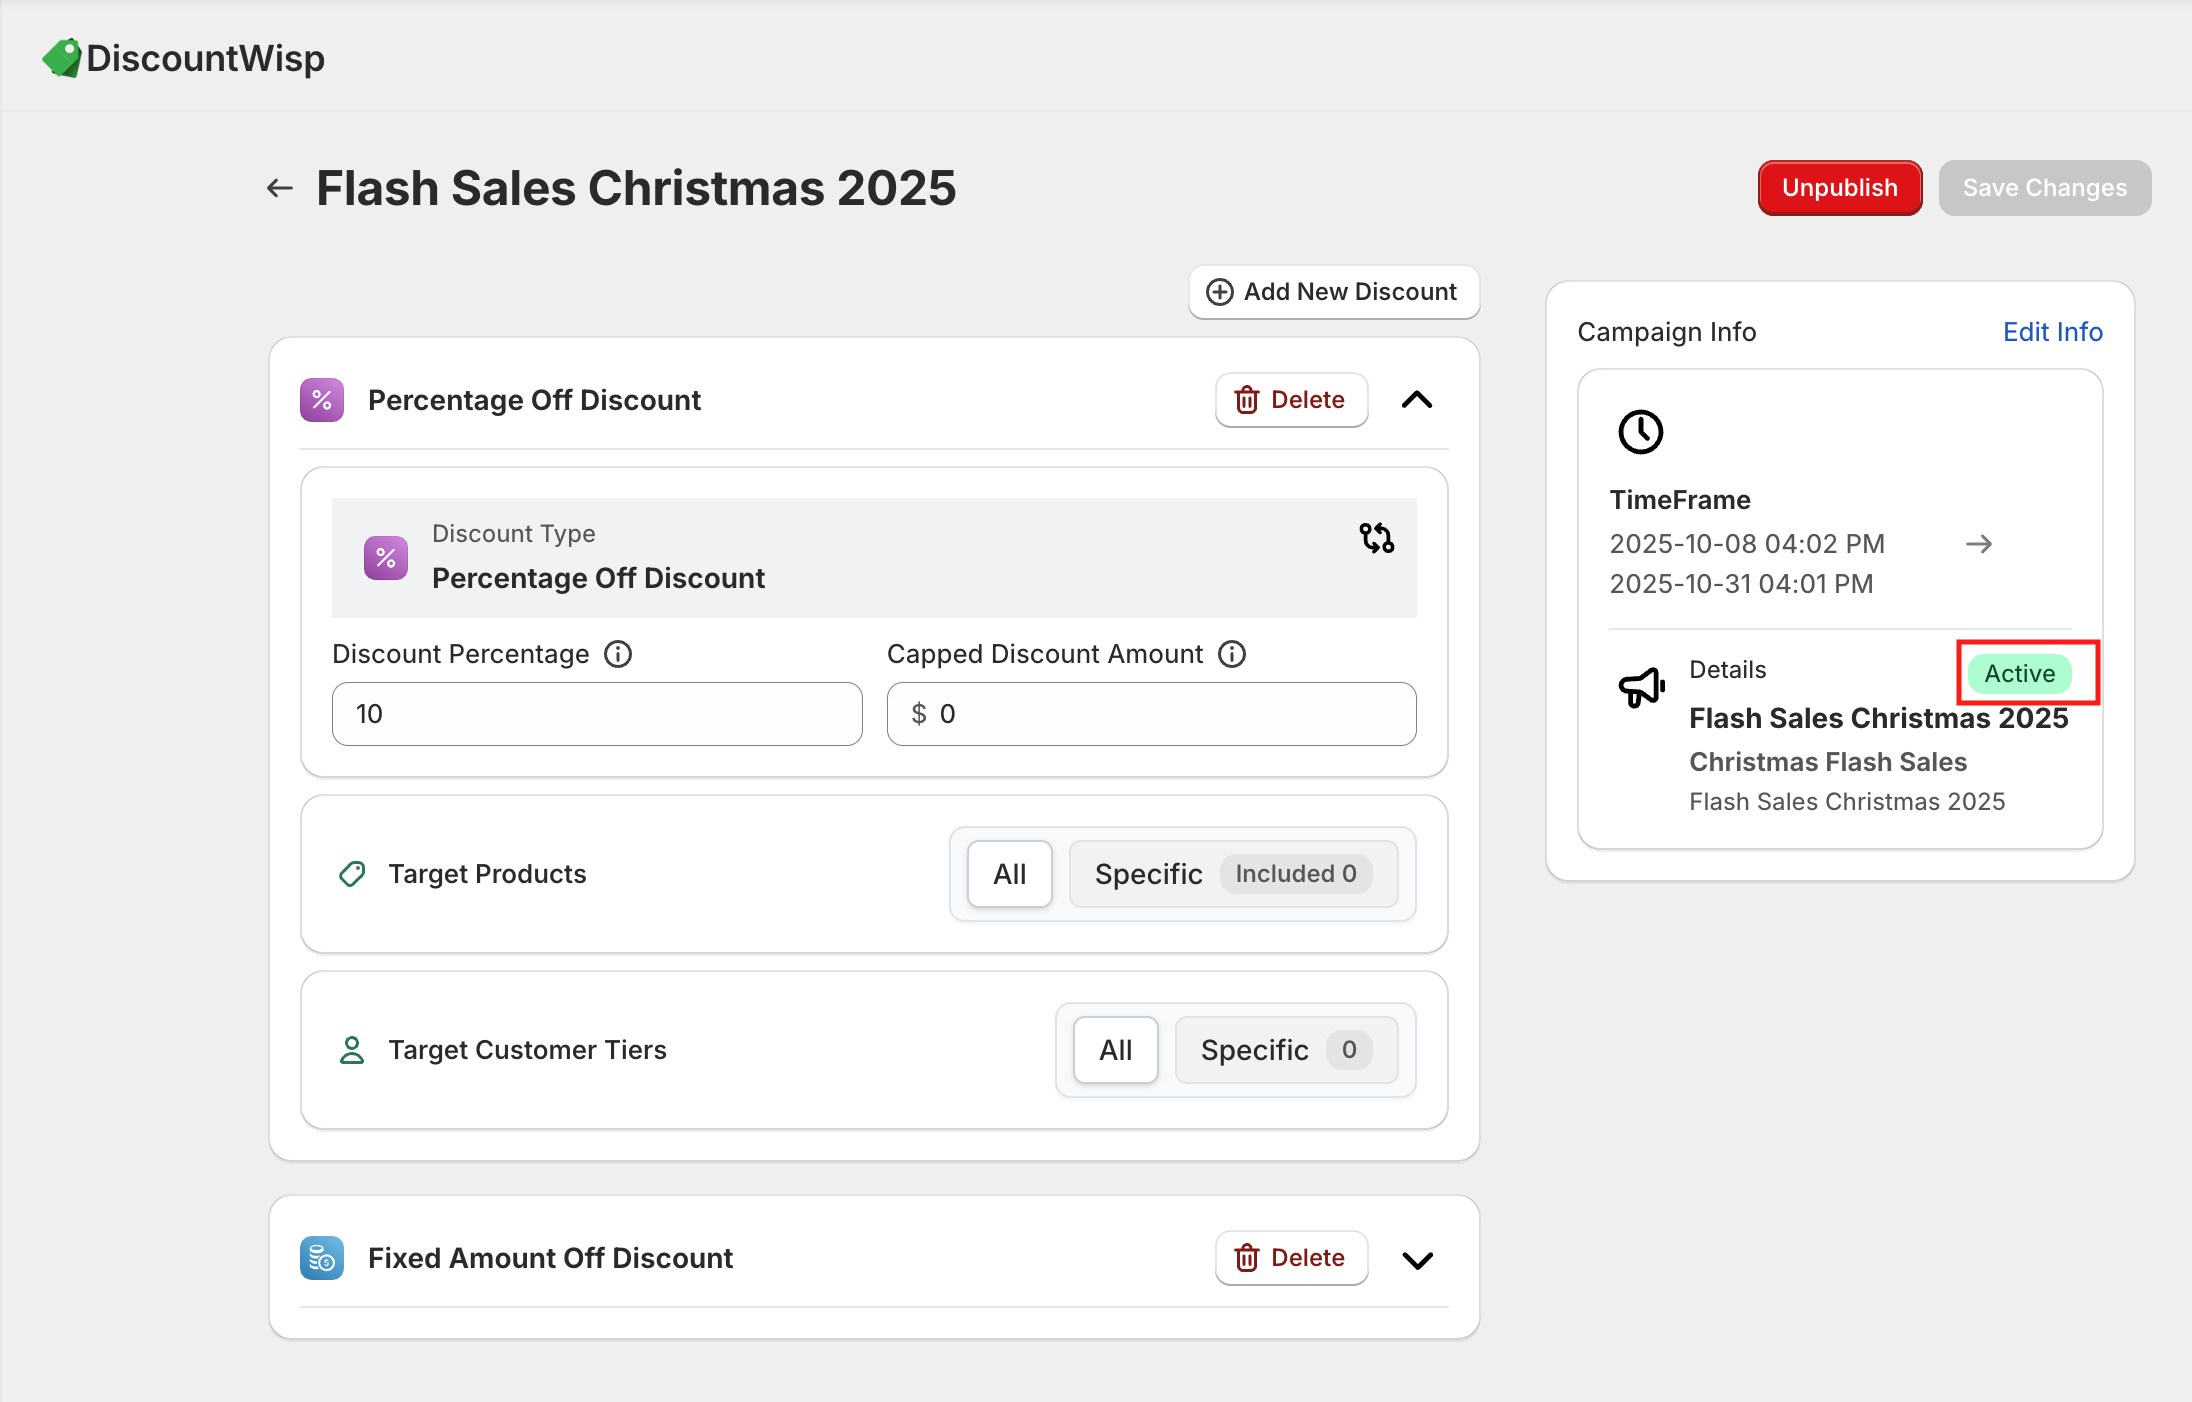
Percentage Off Discount
- The Percentage Off Discount enables you to apply a fixed percentage reduction to the product or order total. For example, a 20% discount will reduce the price of a $100 product to $80.
- To keep things under control, you can also set a Cap Amount, which limits the maximum discount value — ideal when you're offering percentage discounts on high-value products.
- This type of discount is best suited for:
- Site-wide Sales
- Seasonal Campaigns
- Limited-time Offers
- New Product Launch Promotions
- It scales with the order value, making it a great tool to incentivize higher spending while still controlling discount exposure.
MOQ Discount
- The MOQ Discount allows you to offer incentives to customers who purchase in bulk by setting a minimum quantity requirement to unlock a discount.
- MOQ is the baseline quantity a customer must order to qualify for the discount.
- You can configure this using either Percentage off discount (e.g., 10% off) or Fixed amount off (e.g., $20 off).
- To make the rule more flexible, you can define a grace quantity, which acts as a small buffer below the MOQ threshold. For example, if your MOQ is set to 50 units and the grace quantity is 5, customers ordering at least 45 units will still qualify for the discount. This helps accommodate slight variations in purchasing behavior without strictly disqualifying near-threshold orders.
- To keep things under control, you can also set a Cap Amount, which limits the maximum discount value.
- Ideal for wholesale customers, volume incentives, or bulk-buy promotions where you want to reward higher purchase quantities while still being lenient toward close-to-threshold buyers.

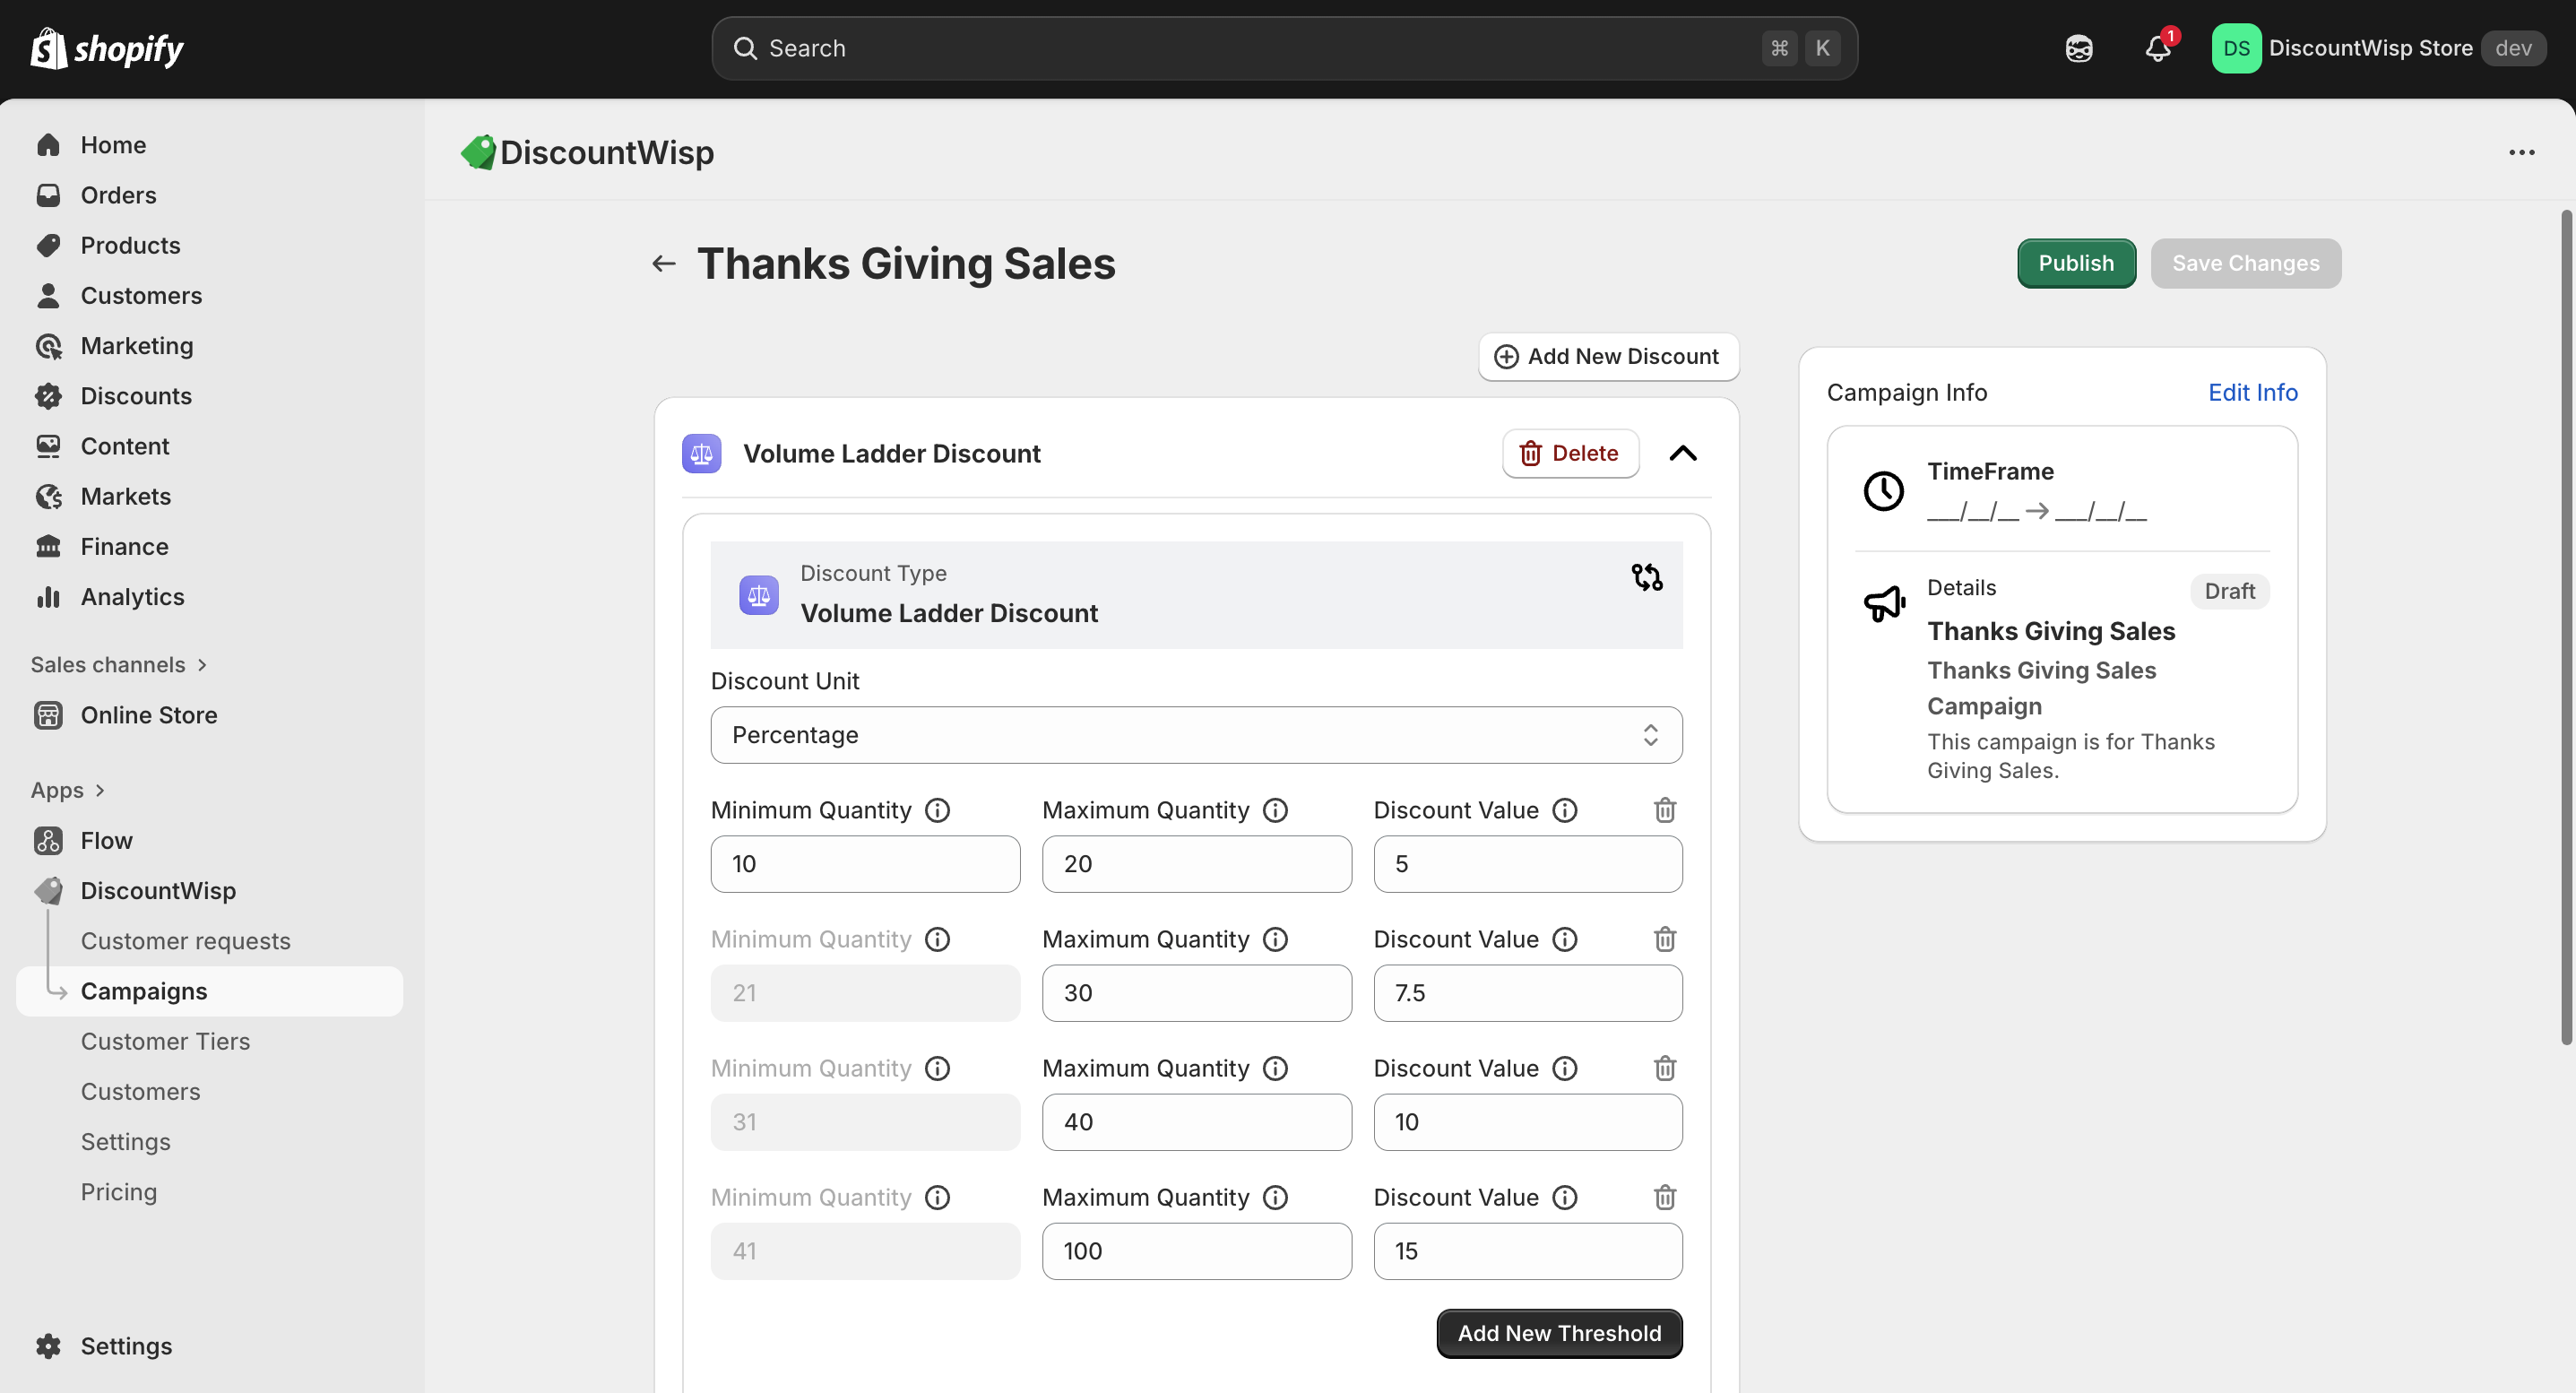
Volume Ladder Discount
- The Volume Ladder Discount lets you define multiple quantity-based thresholds with increasing discount incentives.
- For example:
- Buy 10 units → Get 5% off
- Buy 50 units → Get 10% off
- Buy 100 units → Get 15% off
- Each threshold tier applies a larger discount as the purchase quantity increases, encouraging customers to buy more.
- You can configure this using either Percentage off discount (e.g., 10% off) or Fixed amount off (e.g., $20 off).
- To keep things under control, you can also set a Cap Amount, which limits the maximum discount value.
- This is ideal for:
- B2B orders with tiered pricing
- Wholesale incentives
- Inventory clearance through bulk sales
- It’s one of the most powerful tools for increasing Average Order Volume (AOV) and incentivizing larger cart sizes while maintaining control over margins.
Each rule can be reused across campaigns, applied to multiple products or collections, and scoped to different customer segments.
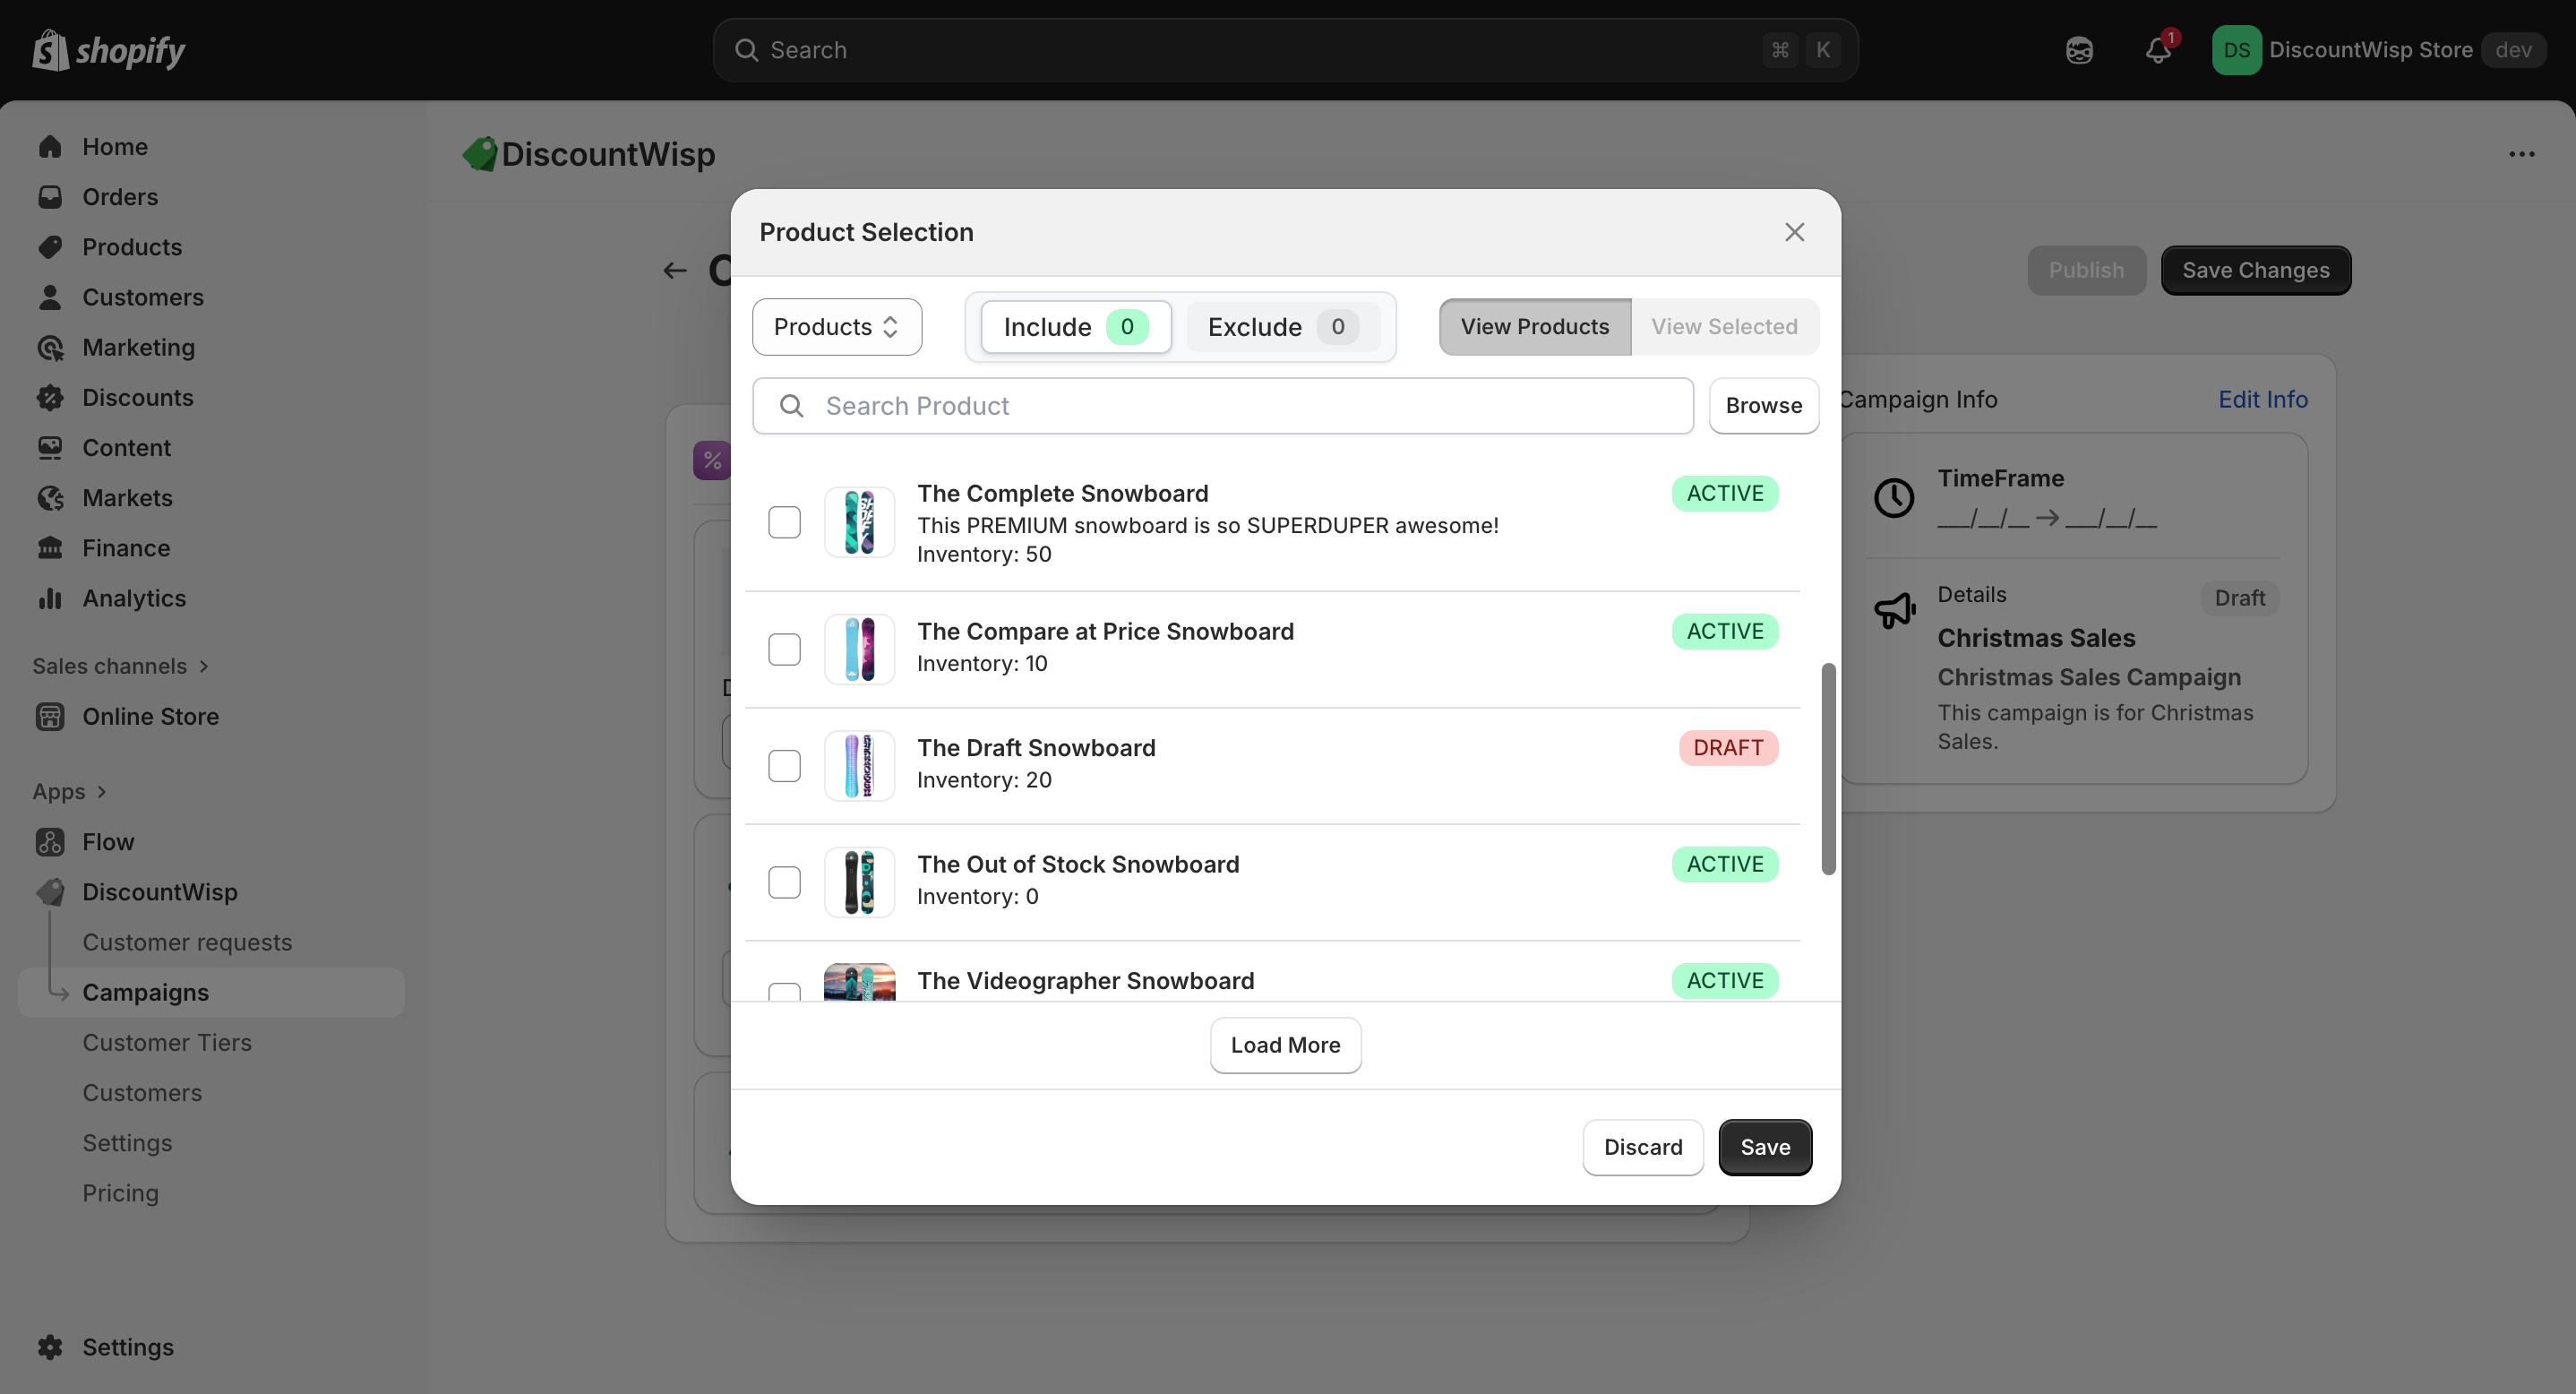
Selecting Products or Collections for Discount Targeting
DiscountWisp gives you full control over where your discount campaigns apply. When configuring a campaign, you can precisely define the scope of products using the following options:
-
Individual Products: Select specific SKUs to apply discounts to individual items.
-
Product Collections: Apply discounts to entire collections for broader promotions.
-
Include/Exclude Logic: Refine your targeting by explicitly including or excluding certain products or collections, ensuring complete flexibility.
This flexible setup is perfect for:
-
Running seasonal campaigns on select product lines
-
Promoting fast-moving SKUs
-
Excluding new arrivals or low-margin products
By using these tools, you can design targeted discount campaigns without duplicating products or collections, keeping your store clean and your campaigns focused.
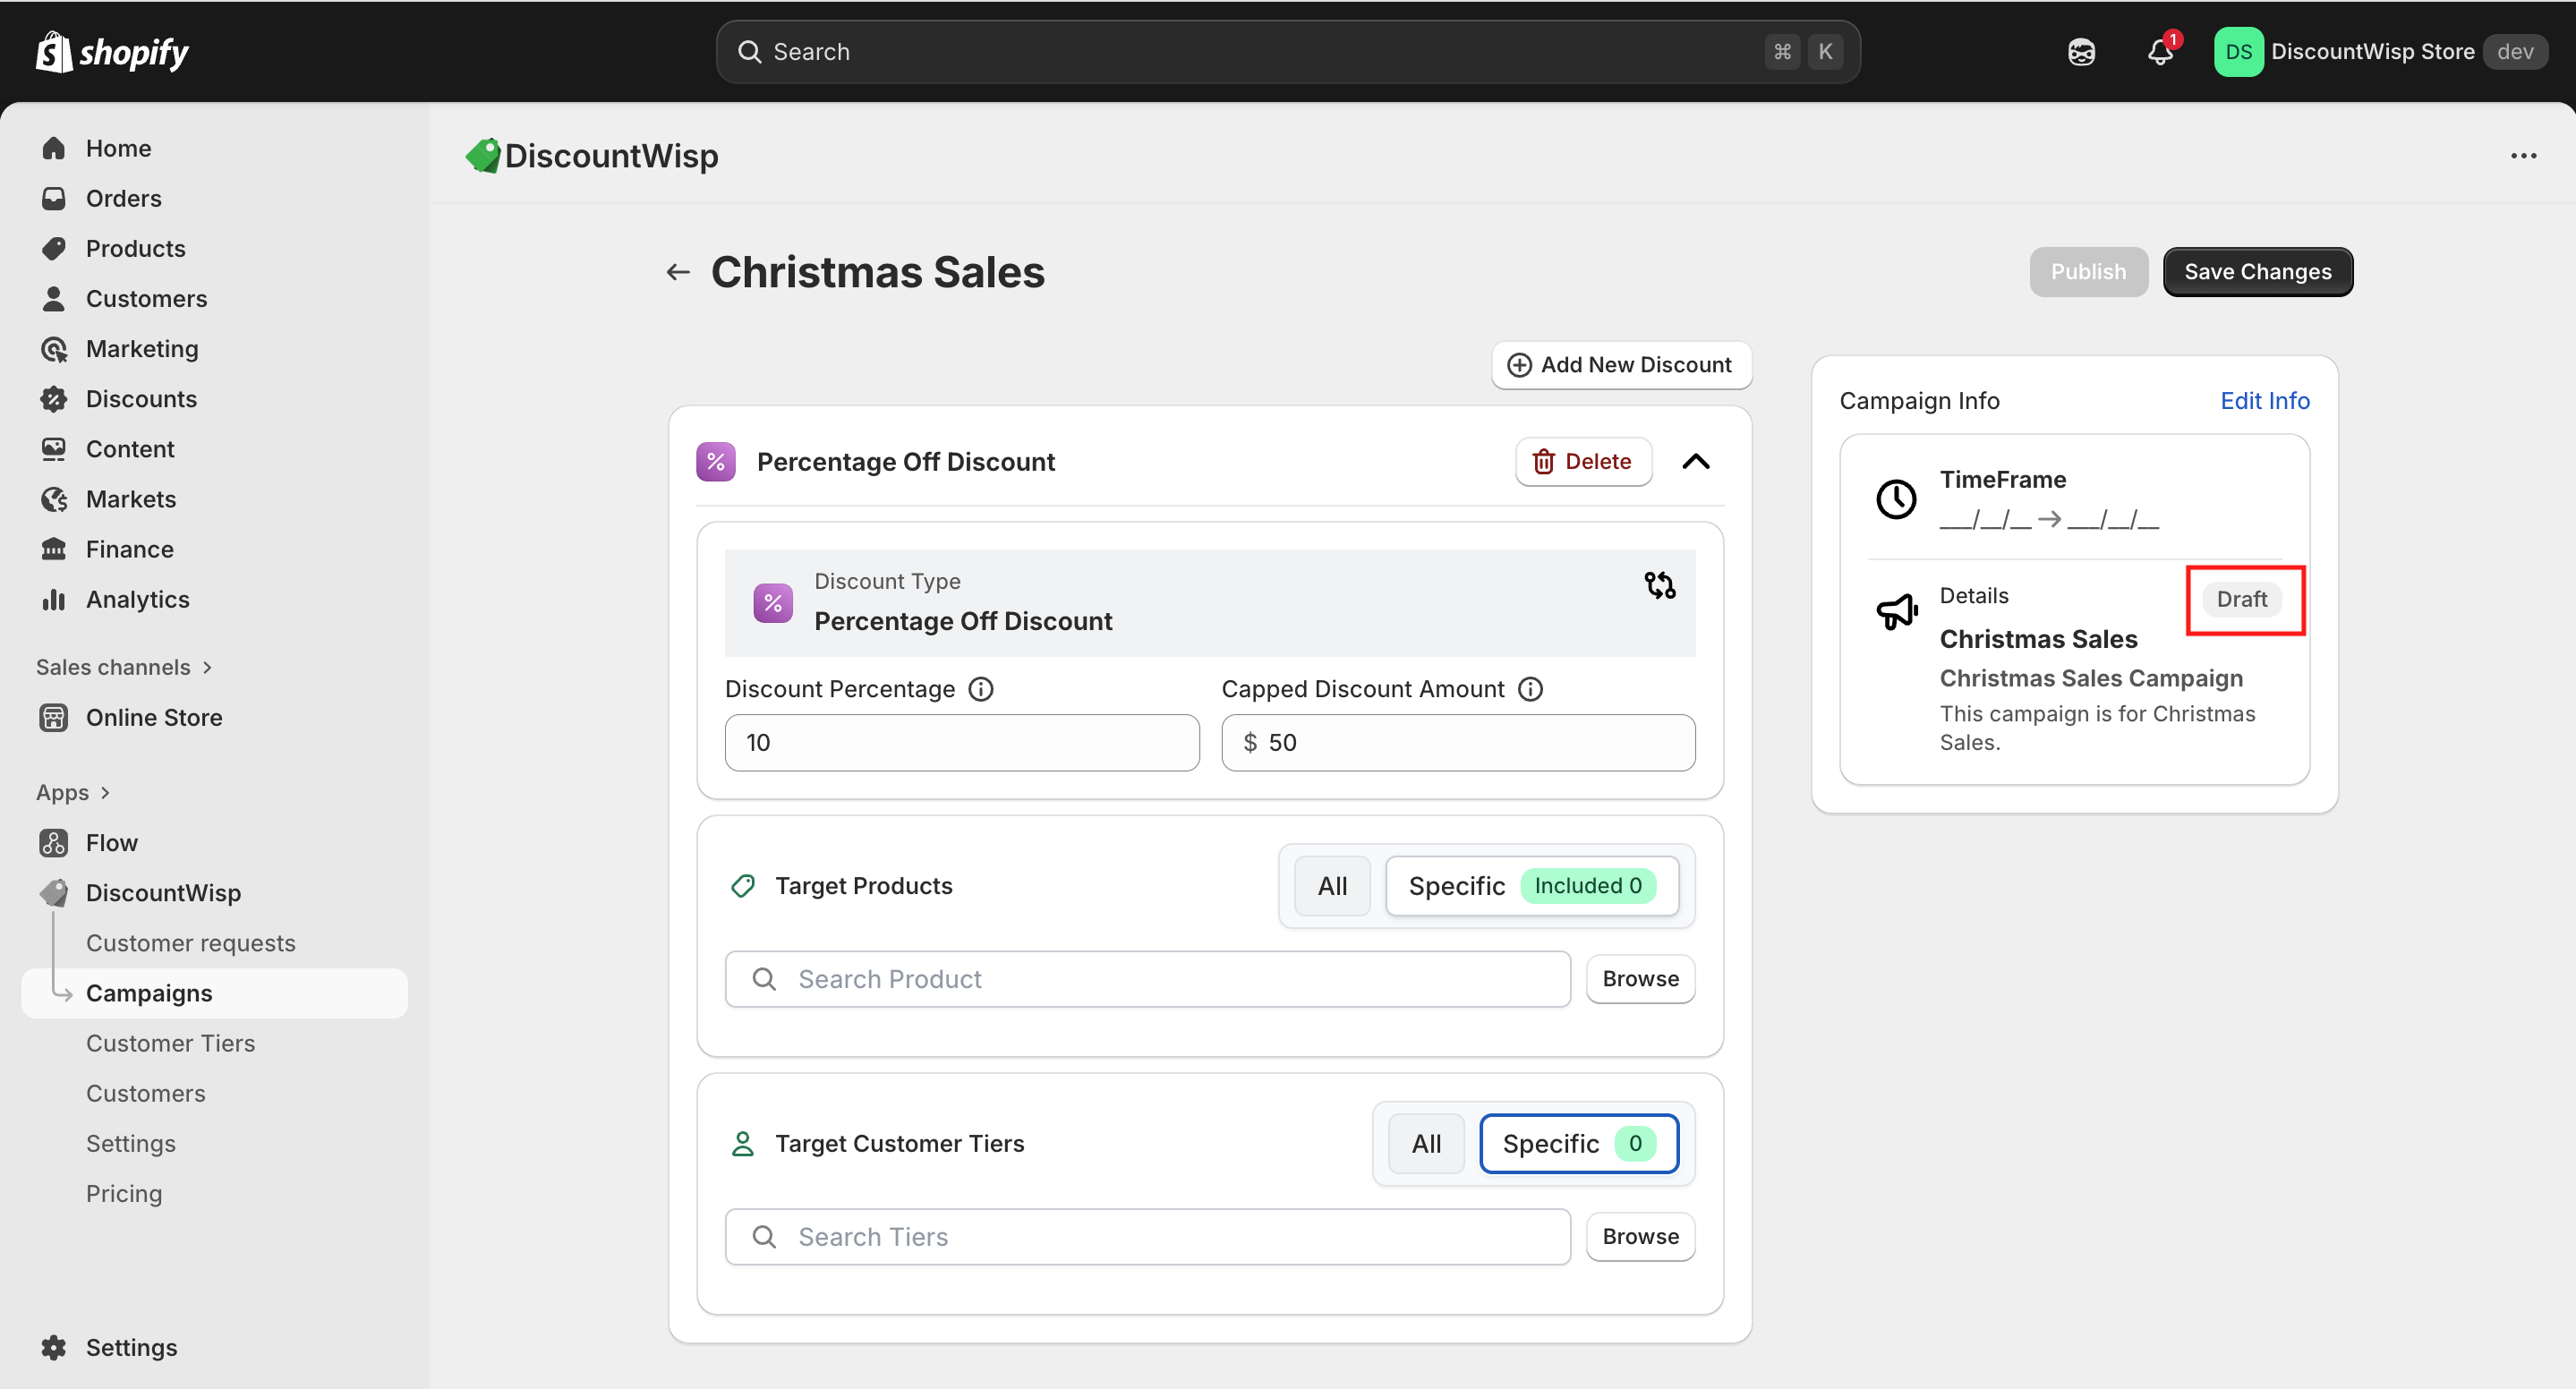
Selecting Customer Tiers
DiscountWisp empowers you to run highly targeted campaigns by applying discount rules to specific Customer Tiers. This ensures the right offers reach the right audience, improving both relevance and conversion.
Target by Tier
-
Apply discounts to one or multiple predefined customer tiers.
-
Example tiers: Wholesale Buyers, VIP Customers, First-time Buyers.
-
Customers not assigned to the selected tiers will not see or receive the discount.
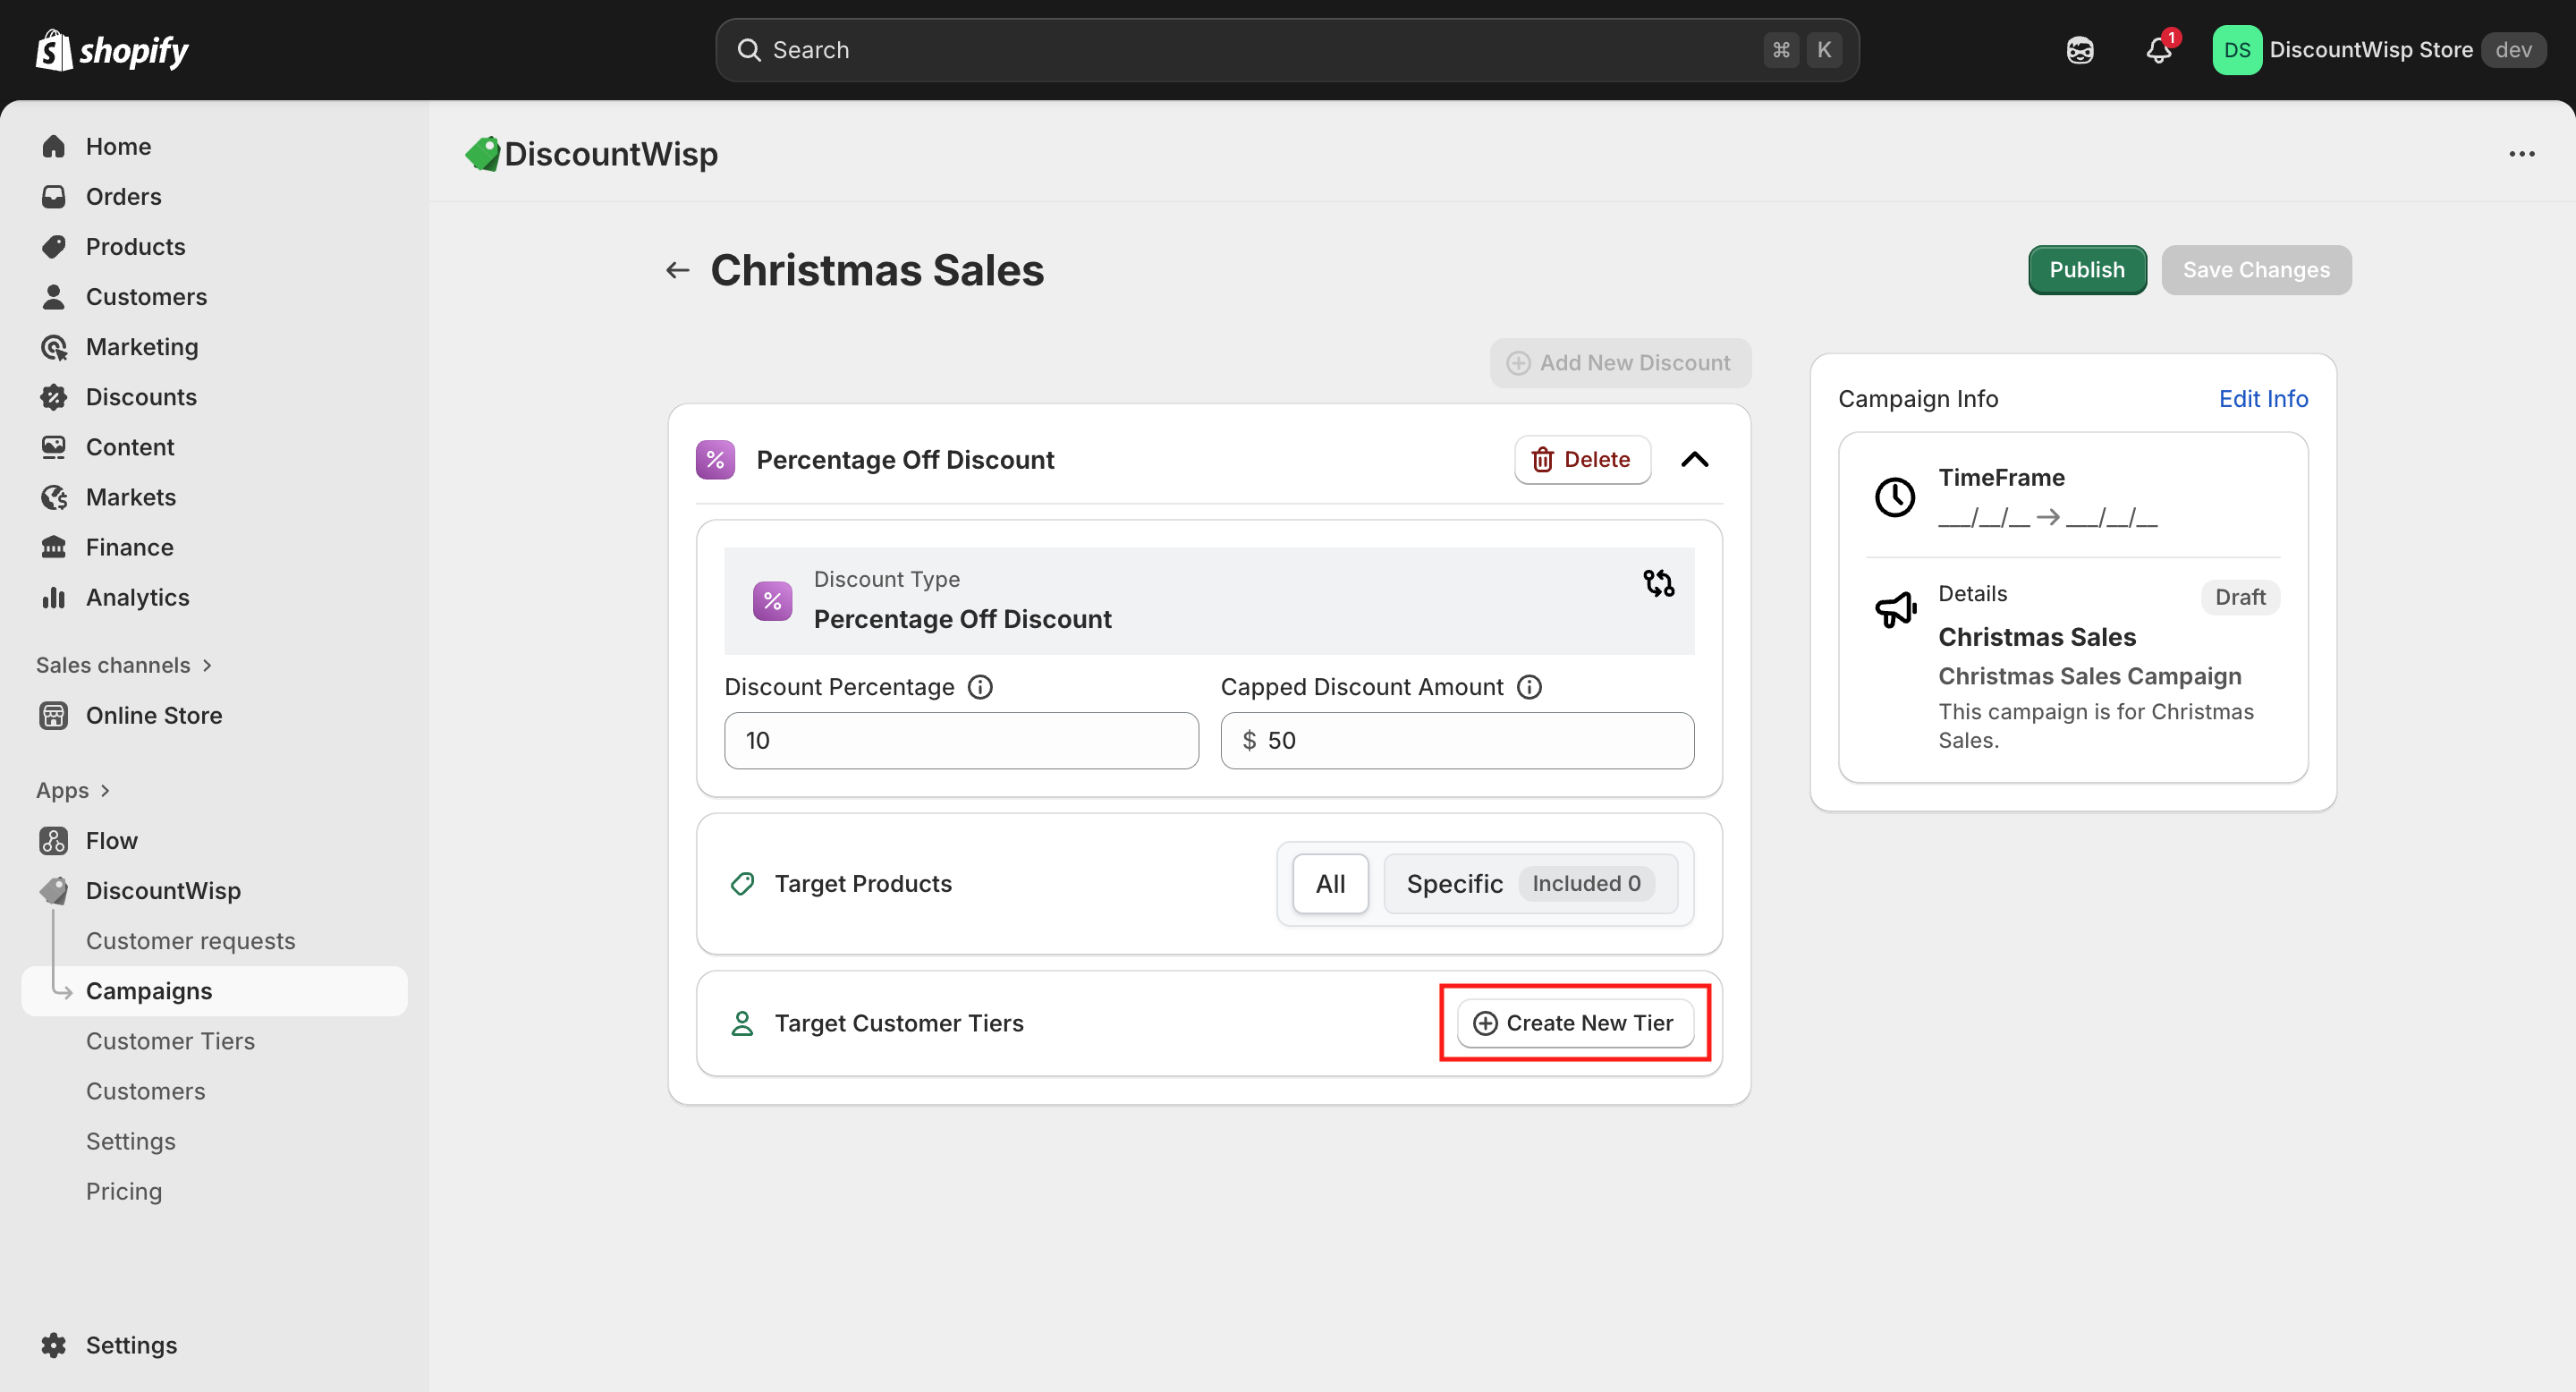
Create New Tiers on the Fly
-
No need to preconfigure everything — you can create new customer tiers right from the campaign setup screen if you have not created customer tiers already.
-
Define who should qualify for a new tier and immediately apply relevant discounts.
This approach supports personalized pricing strategies and helps distinguish between different customer segments — ensuring better control over your promotions and profitability.
Adding Additional Discount Rules
DiscountWisp allows you to define multiple discount rules within a single campaign, enabling you to run layered and strategic promotions from one unified setup.
Why Add Multiple Rules?
Each rule can target a different:
-
Customer Tier (e.g., Tier A, Tier B)
-
Discount Type (e.g., Fixed Amount, Percentage, MOQ, Volume Ladder)
-
Product or Collection
This flexibility gives you precision control and reduces the need to create separate campaigns for every customer group or sales strategy.
For example, within a single campaign, you can add:
-
A 10% Percentage Discount for Tier A customers.
-
A $5 Fixed Amount Off for Tier B customers.
-
A MOQ Discount for high-volume buyers, incentivizing bulk purchases.
Benefits:
-
Simplifies management of complex pricing strategies.
-
Keeps your dashboard clean and organized.
-
Helps deliver personalized discounts without duplication.
tipAll discount rules operate independently within the same campaign and automatically apply to eligible customers based on the conditions set. When multiple rules apply, DiscountWisp ensures the best possible discount is applied.
Use this feature to create powerful, tiered offers that align with your customer segmentation and sales goals — all from a single campaign interface.
Publishing Campaign: Draft vs Published state
Every campaign in DiscountWisp moves through two key stages — Draft and Published — giving you full control before going live.
Draft Mode
-
When you first create a campaign, it is saved in Draft state.
-
In this mode, all configurations — discount rules, product targeting, customer tiers, etc. are saved but inactive.
-
Draft mode is your safe space to review, edit, and refine campaigns without impacting your storefront.
-
You can revisit drafts anytime and make updates before launching.
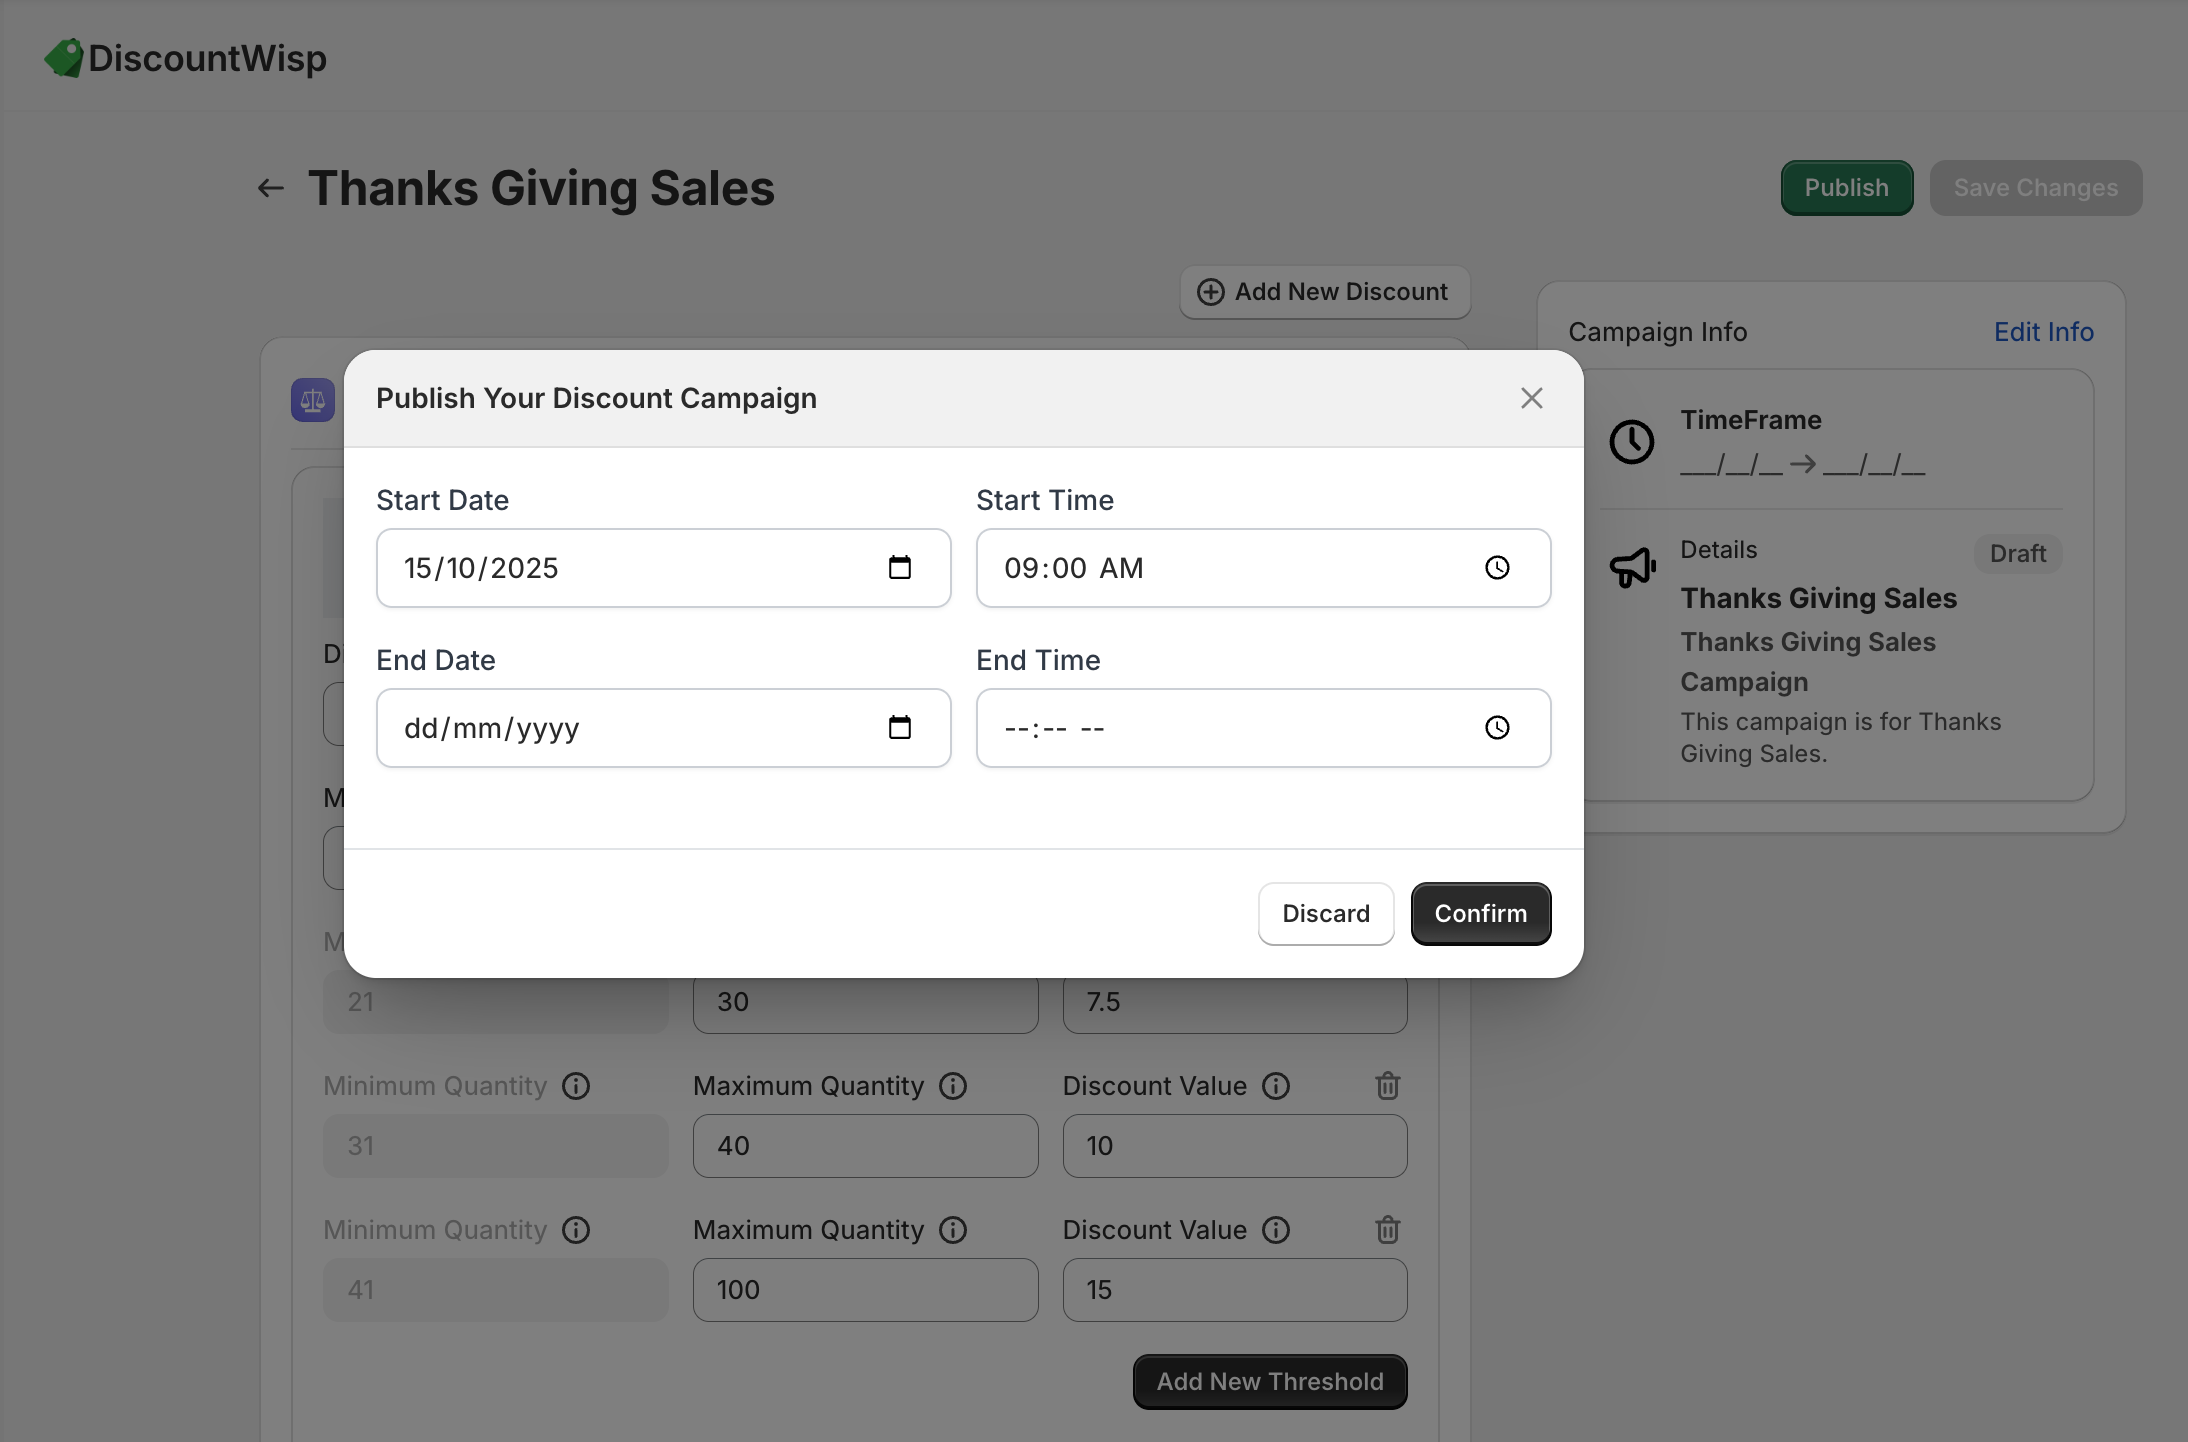
Publishing Campaign
When you're ready to activate your campaign, you'll need to decide whether it's for a fixed period or an ongoing promotion:
-
For a campaign with a fixed timeframe: Set both the Start Date and End Date. This is perfect for seasonal sales, flash deals, or promotional events like Black Friday, Christmas or Diwali.
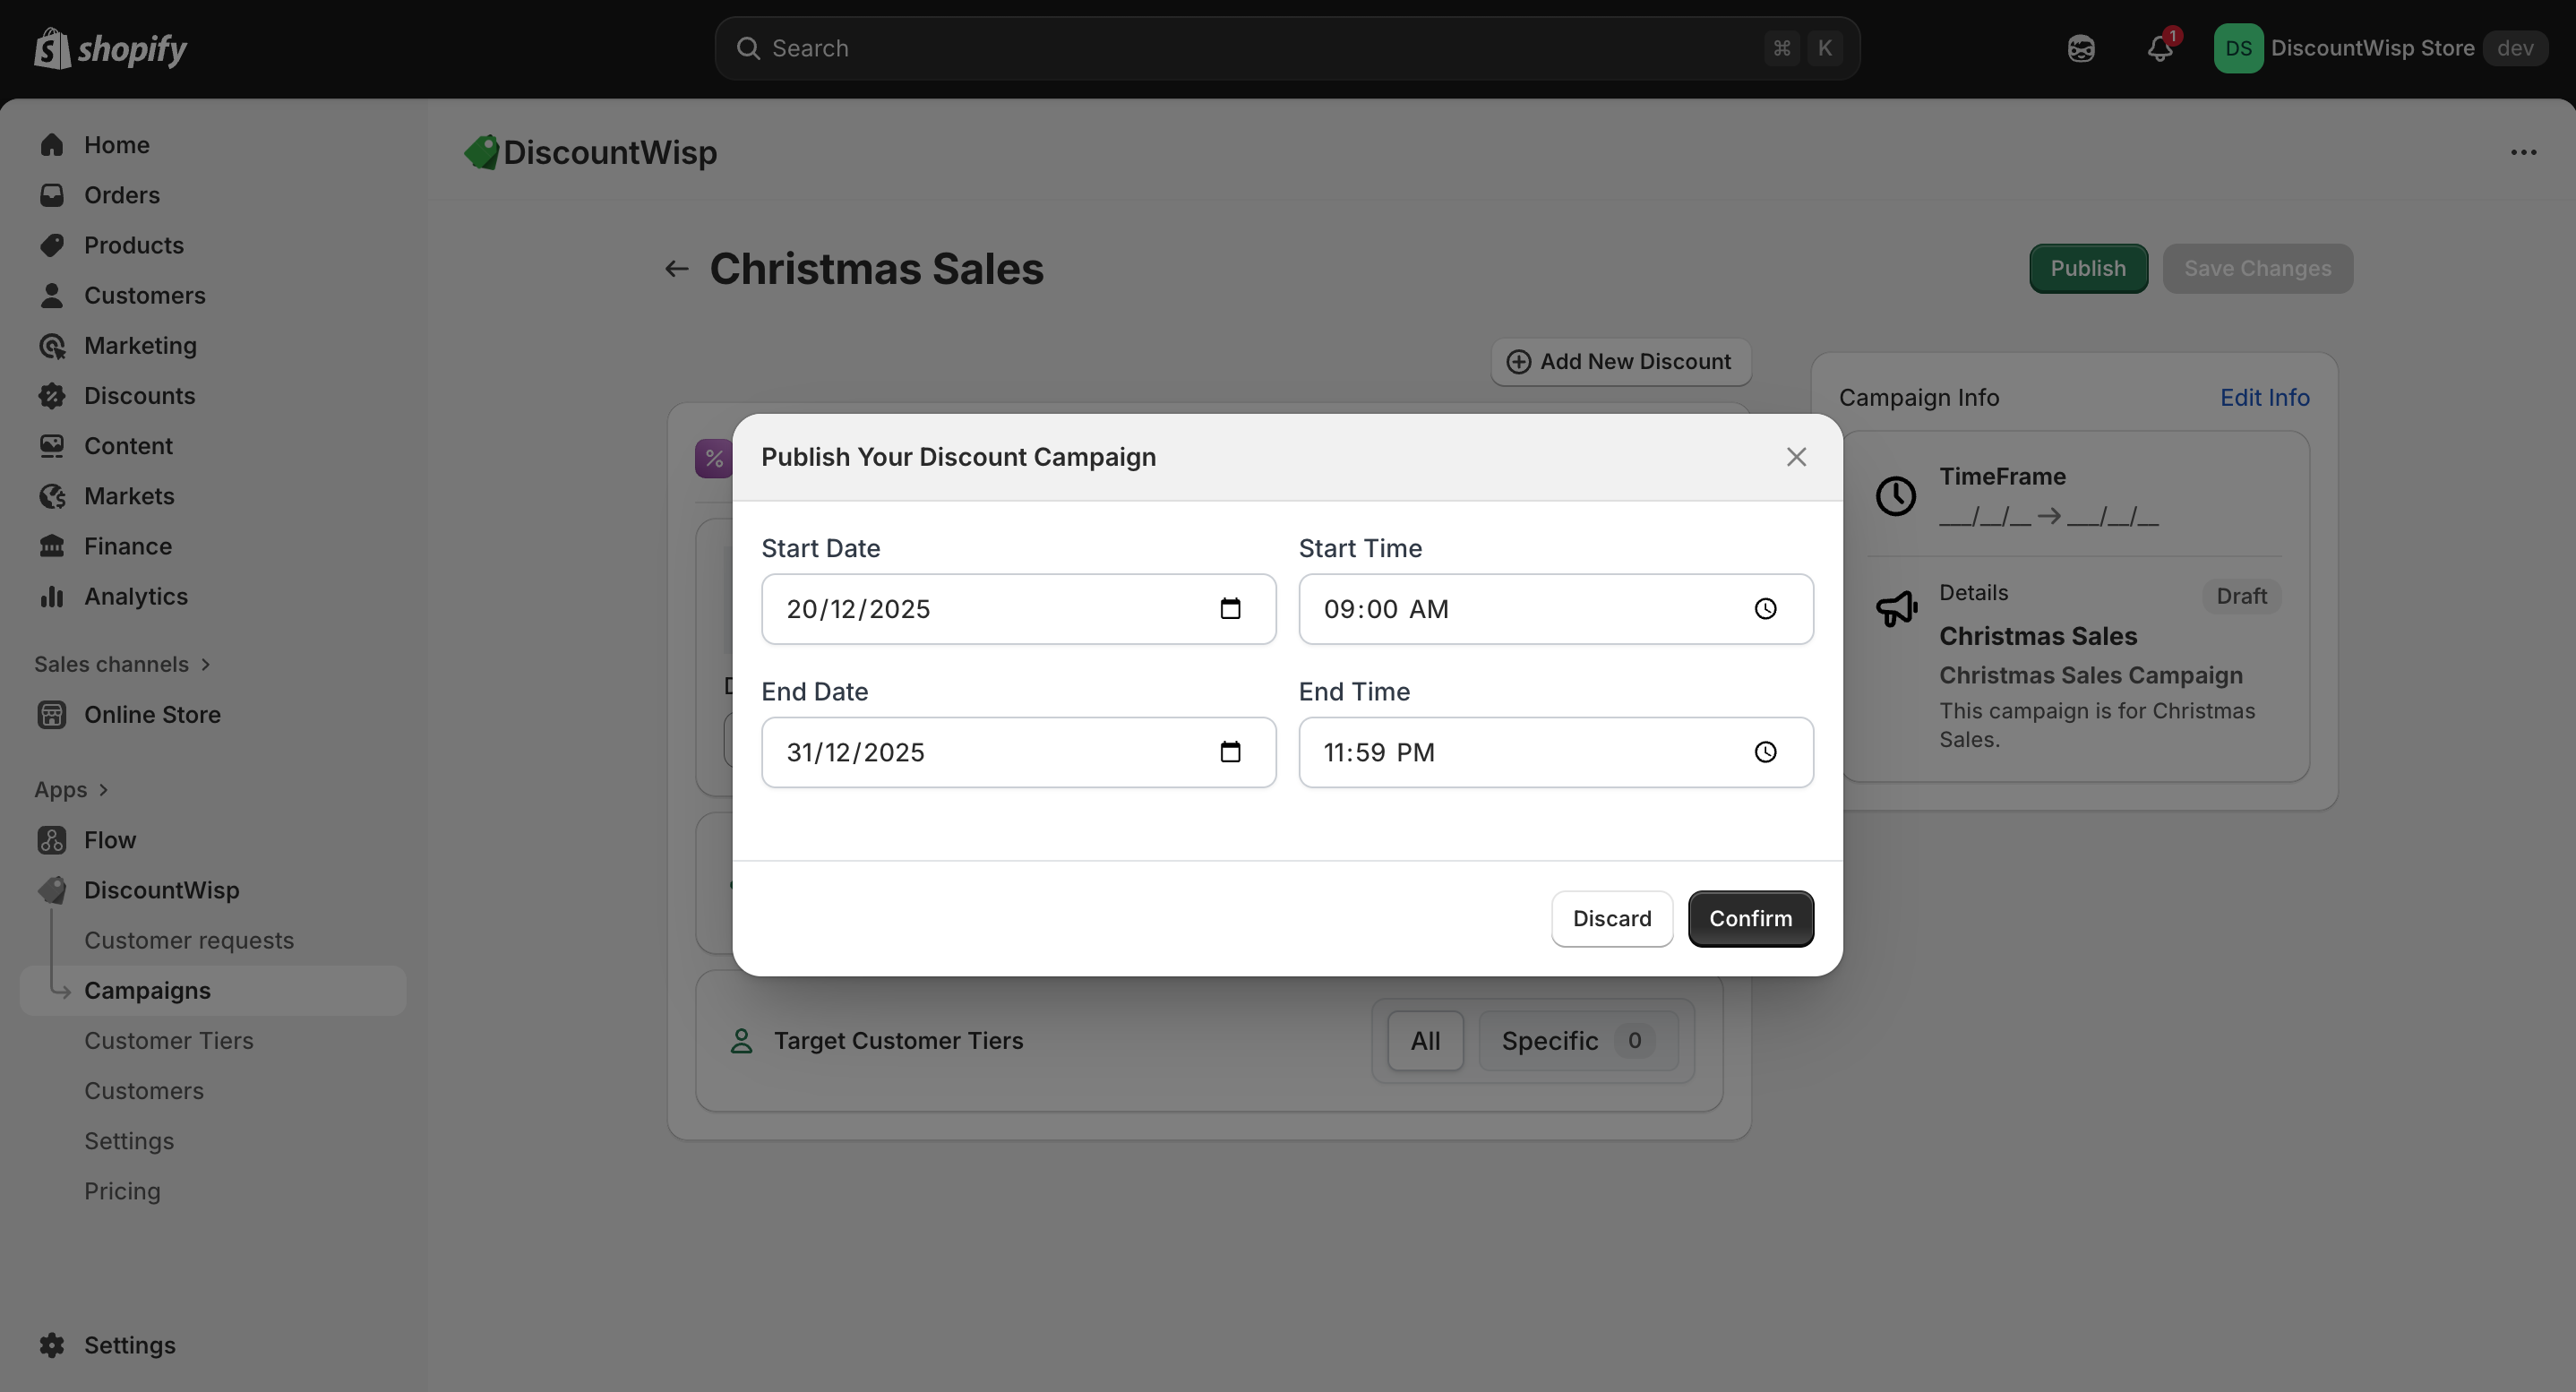
-
For an ongoing (perpetual) campaign: Simply leave the End Date blank. This creates a continuous discount campaign — ideal for long-term B2B pricing or evergreen B2C offers.
 note
noteAlways plan your perpetual campaign thoughtfully, as it will be your default discount logic unless superseded by active date-based campaigns with higher priority.
-
Review your configuration: Confirm your discount rules, eligible products or collections, and assigned customer tiers.
-
Click Publish: The campaign will begin applying discounts immediately to all eligible customers and products based on the defined logic.
Use perpetual campaigns for foundational pricing strategies, and scheduled campaigns for high-impact promotional pushes — all seamlessly managed within DiscountWisp.
Published campaigns will instantly begin applying discount logic to eligible products and customers.
Published Mode
-
Once you're confident in your campaign setup, you can move it to Published state by selecting the start and end date. Perpetual Discount Campaigns do not need end date to be configured, you can keep it blank.
-
Published campaigns become active and visible on the storefront based on their scheduled timeline. Until the scheduled date, the campaign stays in "Scheduled" state.
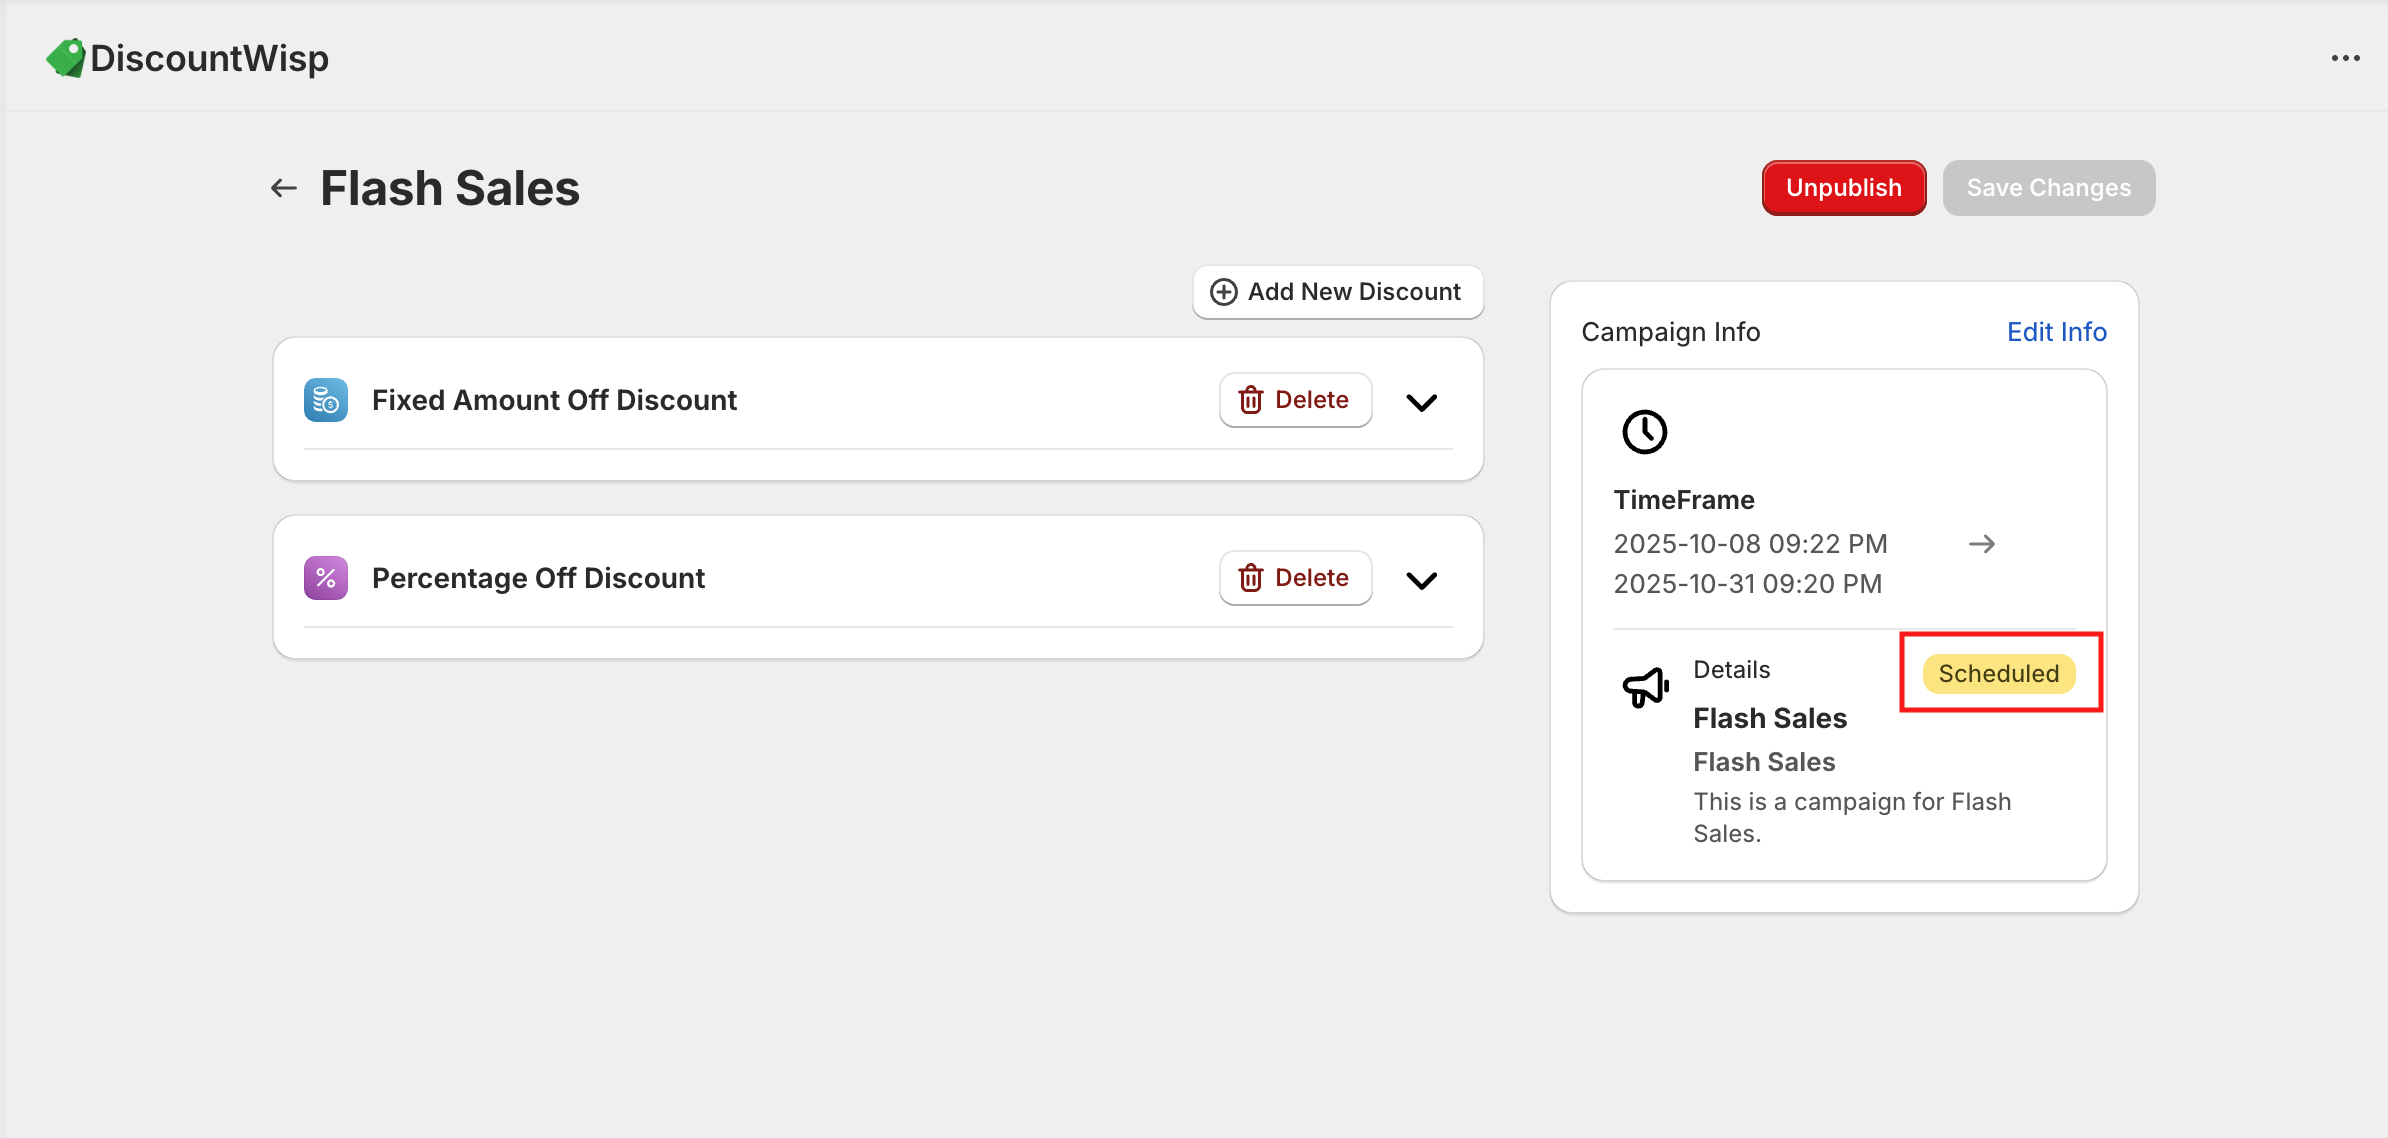
- All eligible customers and products will automatically receive the discount rules defined when the campaign gets published and becomes active on the scheduled date.
- You can unpublish the campaign if you desire to change the campaign details or cancel the planned campaign. Once unpublished, the campaign will switch to expired state which cannot be used any further.
This two-stage system helps ensure accuracy, prevent misfires, and gives you flexibility in planning, scheduling, and testing your campaigns.
Editing & Versioning Campaigns
DiscountWisp ensures that your pricing and discount history remain accurate and audit-friendly — even when changes are made to published campaigns.
When you edit a campaign that has already been published, the system doesn't simply overwrite the old configuration. Instead, it automatically versions the campaign to maintain a clean record of past and current logic.
Editing a Live Campaign
- The existing live campaign is archived and labeled as a past version with status "Expired", retaining all the original settings, discount rules, dates, and targeting logic.
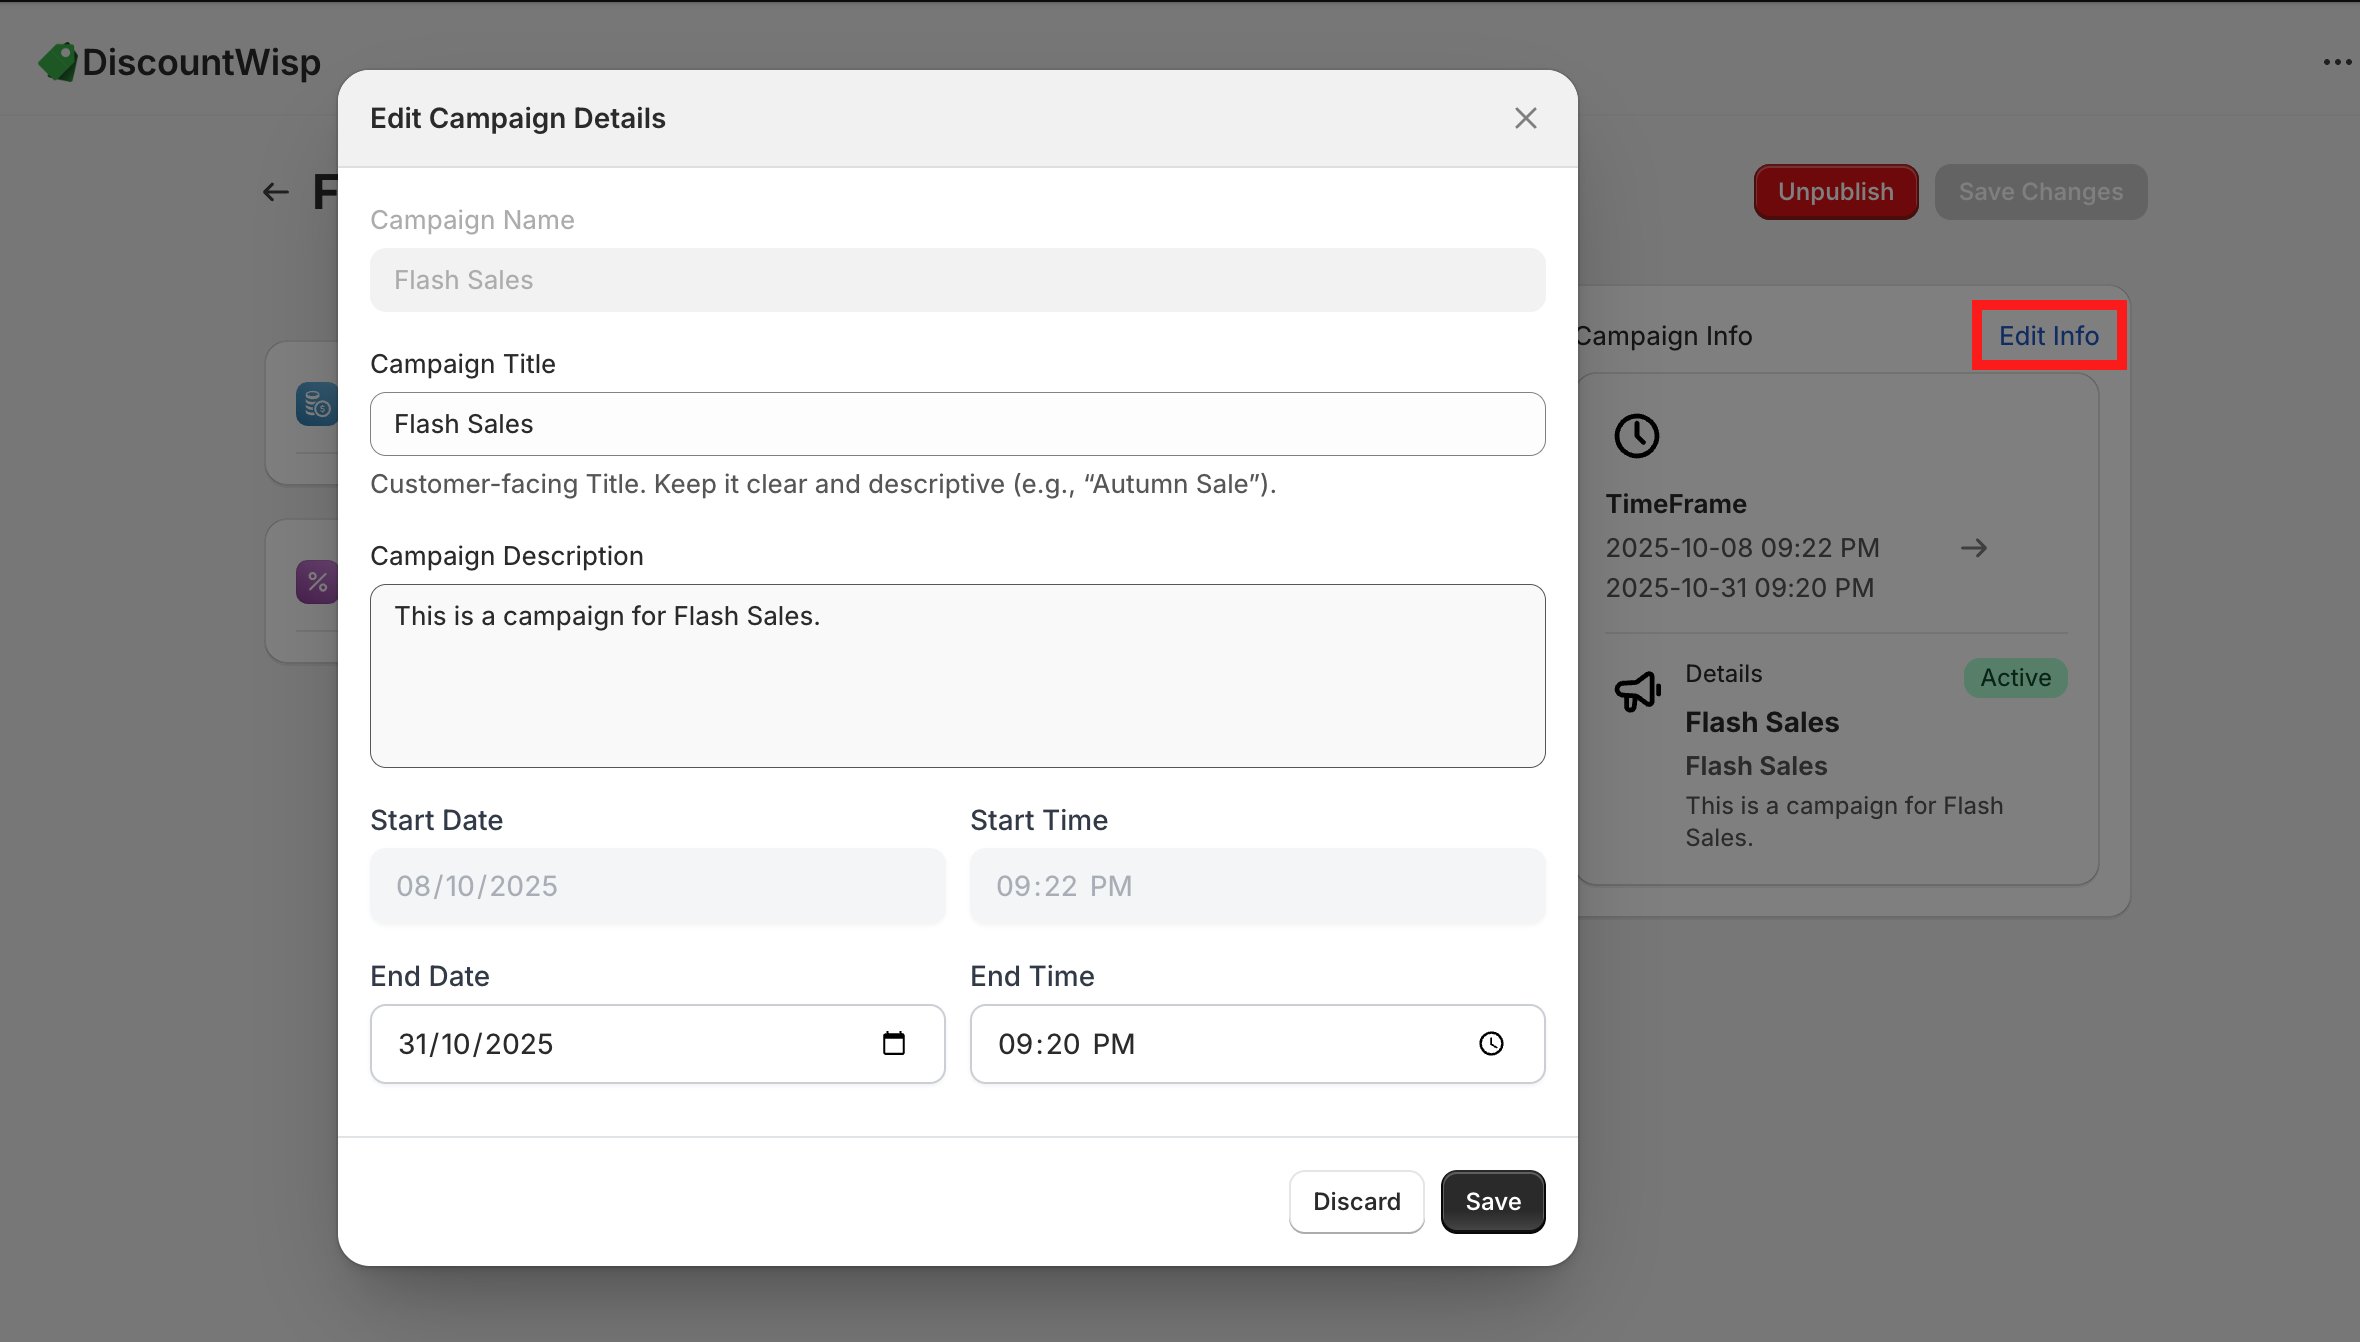
- A new version of the campaign is created with your latest updates. This version becomes the new active campaign once published.
This smart versioning allows:
-
Historical accuracy in reporting and analytics (e.g., knowing what discount applied on a specific date).
-
Seamless transitions between campaign strategies, especially during promotional events or pricing updates.
-
Rollback capability, allowing you to reference or even recreate past campaigns if needed.
Editing Draft Campaigns
If the campaign is still in Draft state (i.e., not yet published), you can edit everything freely — discount rules, product scope, customer tiers, and scheduling — without triggering versioning. Drafts are your sandbox for planning and iterating until you're ready to go live.
Key Benefits of Campaign Versioning
-
No disruption to storefront discounting while changes are being made.
-
Audit-ready structure for compliance or internal reviews.
-
Improved clarity for teams managing promotions over time.
This approach ensures that your store maintains a clean and traceable discount history, while also offering the flexibility to evolve your strategies without confusion or data loss.
Customer Requests Handling
Customer Tier Classification Request Summary
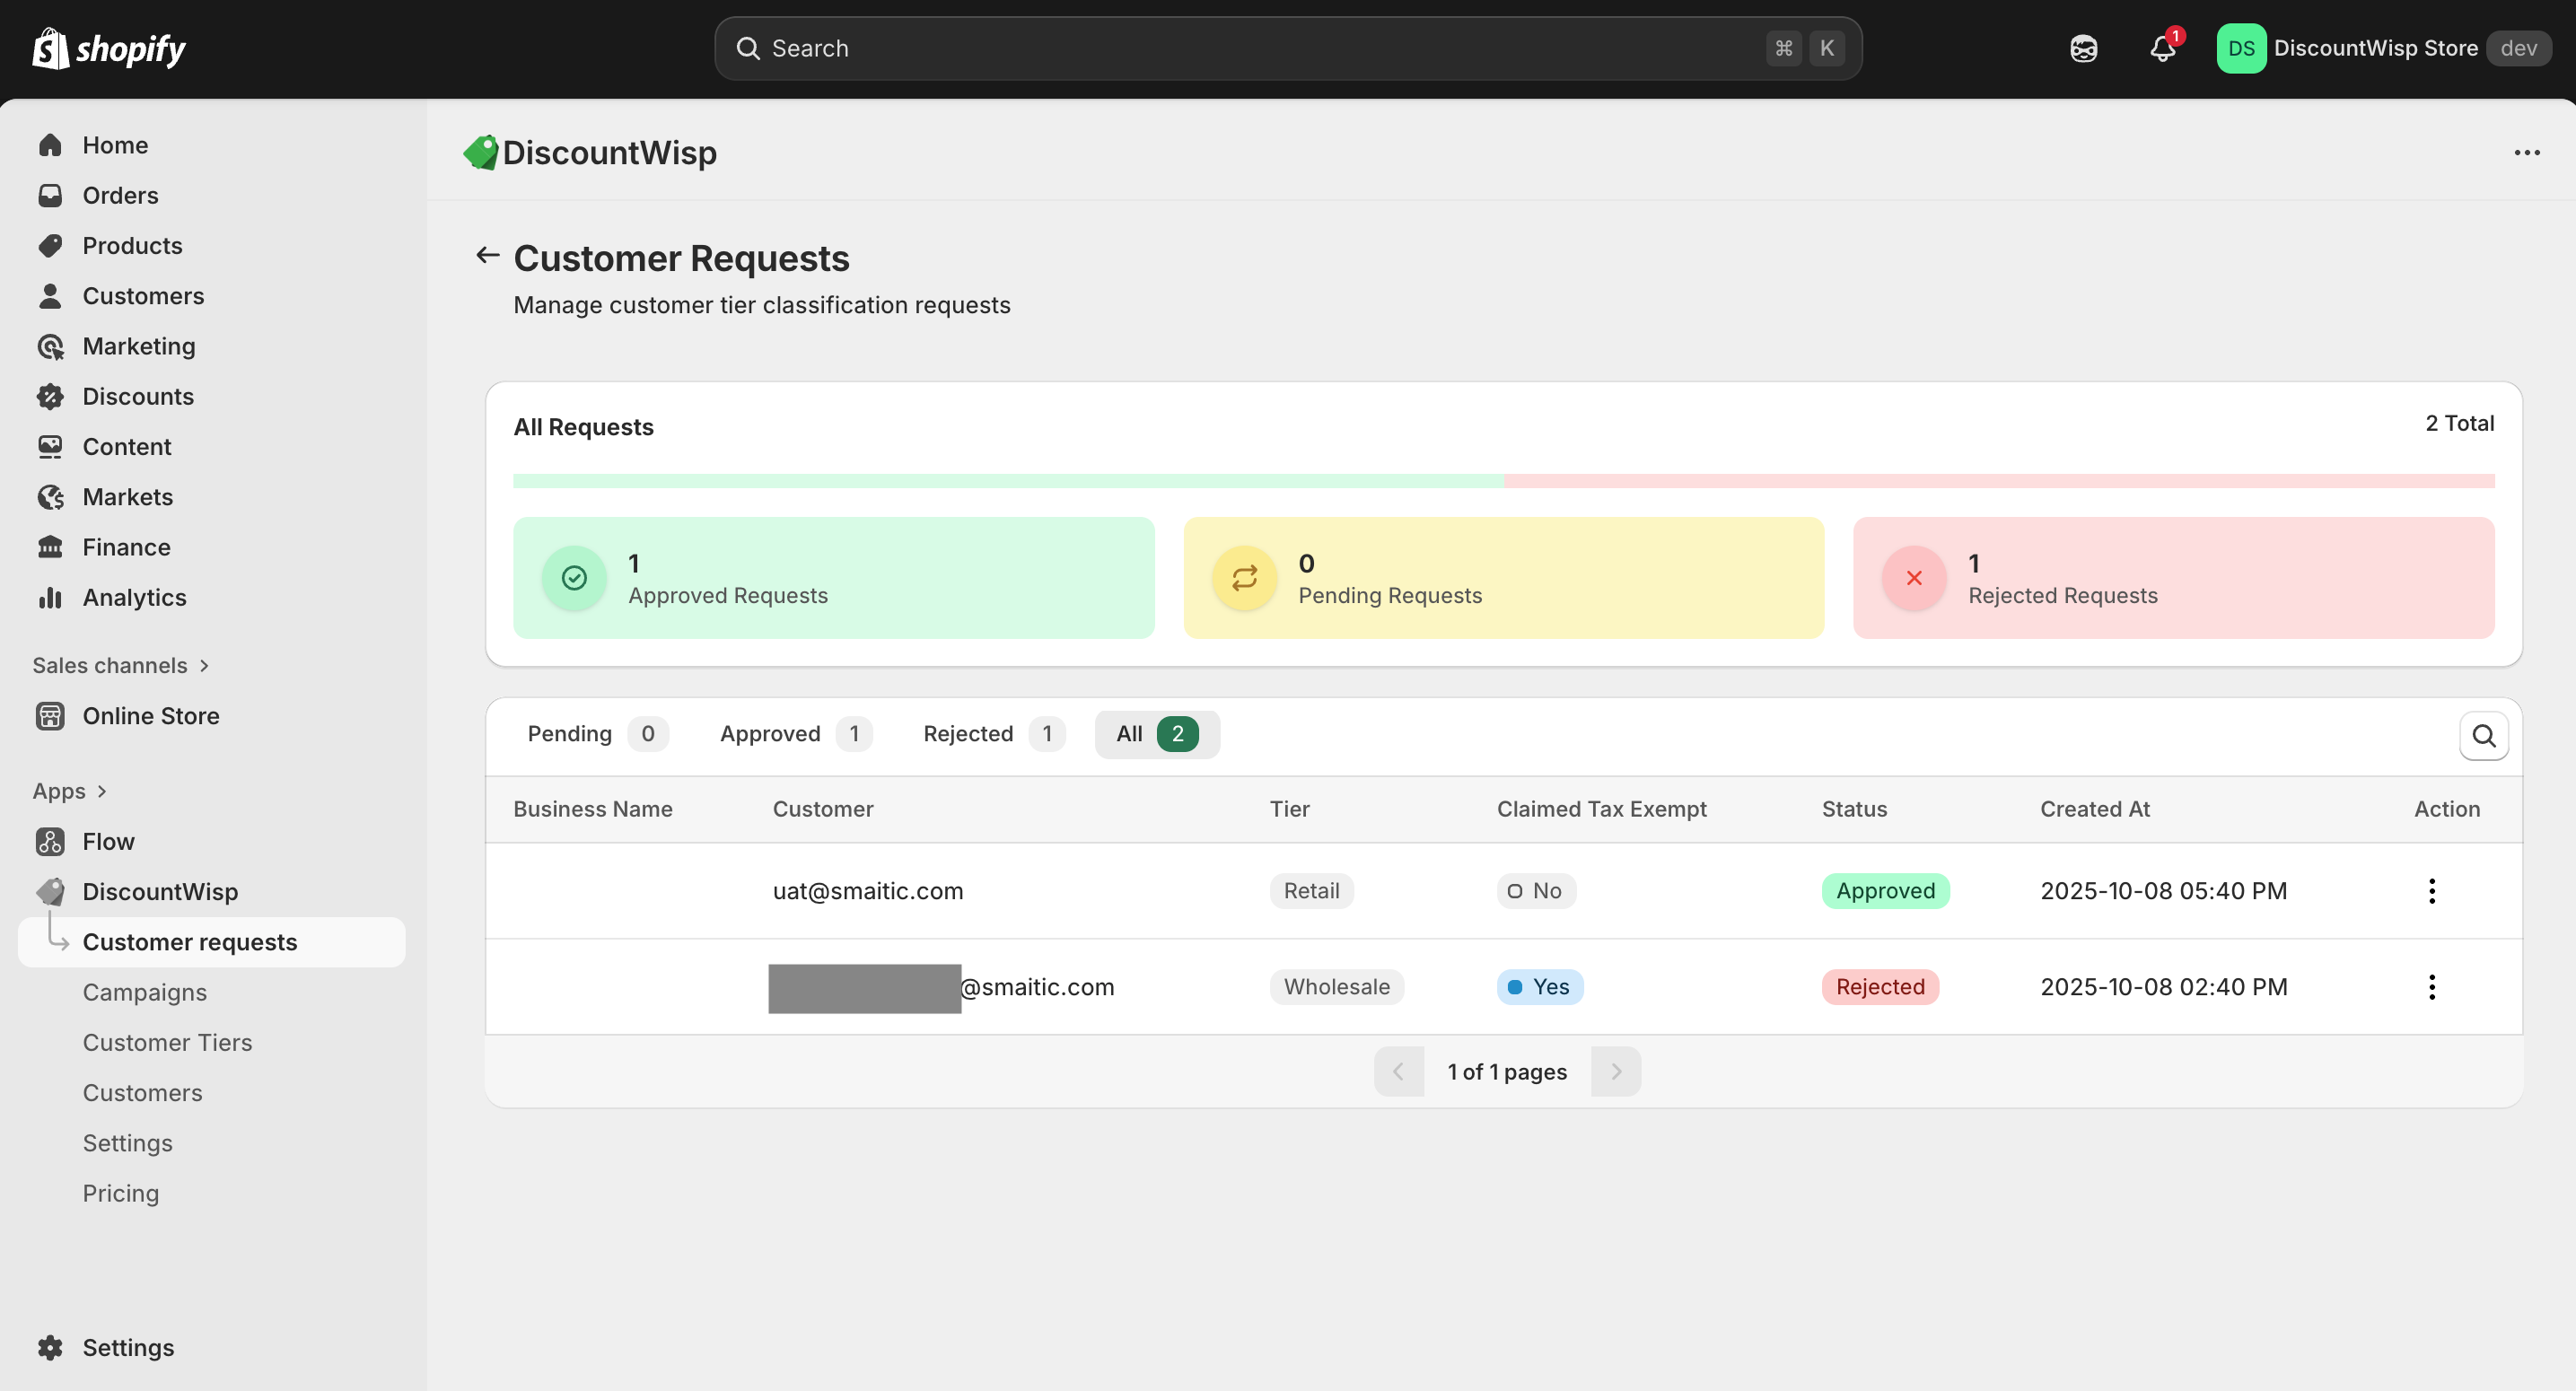
On the DiscountWisp Dashboard, you'll find a Customer Request Summary Table that provides a quick, organized view of all tier classification requests submitted by customers.
This summary table includes:
-
Status Tabs: Switch between All, Pending, Approved, and Rejected to filter requests by their current state.
-
Customer Details: Each row shows the requesting customer's name and email address.
-
Requested Tier: View the tier the customer is claiming (if applicable).
-
Tax Exemption Claim: View whether the customer has claimed as tax-exempt or not.
-
Submission Date: Track when the request was submitted.
-
Action Buttons: Quickly review full request details, approve or reject the request, or assign a tier manually.
This table acts as a central hub for managing incoming classification requests and makes it easier to track, filter, and act on them without navigating away from your dashboard.
Accessing the Customer Requests Page
Customers can request to be classified into a tier using the storefront form. From the app:
Customers can request to be classified into a specific customer tier using the storefront form provided by DiscountWisp. These requests are visible and manageable from your Shopify admin via the app.
To access:
-
Navigate to the DiscountWisp App in your Shopify Admin.
-
Go to the Customer Requests section.
On this page, you’ll see:
-
Summary Cards
Visual cards display the total count of requests, broken down by statuses:
-
Pending
-
Approved
-
Rejected
These cards provide a quick overview of your tier classification workflow status.
-
-
Request Summary Table
-
A detailed table listing all submitted customer classification requests.
-
Includes key customer request details such as:
-
Status Tabs: Switch between Pending, Approved, Rejected and All to filter requests by their current state.
-
Customer Details: Each row shows the requesting customer's name and email address.
-
Requested Tier: View the tier the customer is claiming (if applicable).
-
Tax Exemption Claim: View whether the customer has claimed as tax-exempt or not.
-
Submission Date: Track when the request was submitted.
-
Action Buttons: Quickly review full request details, approve or reject the request, or assign a tier manually.
-
-
-
Request Details Page
Clicking on an individual request (or selecting View from the Actions menu) opens the Request Details Page, where you can review all the information submitted by the customer.
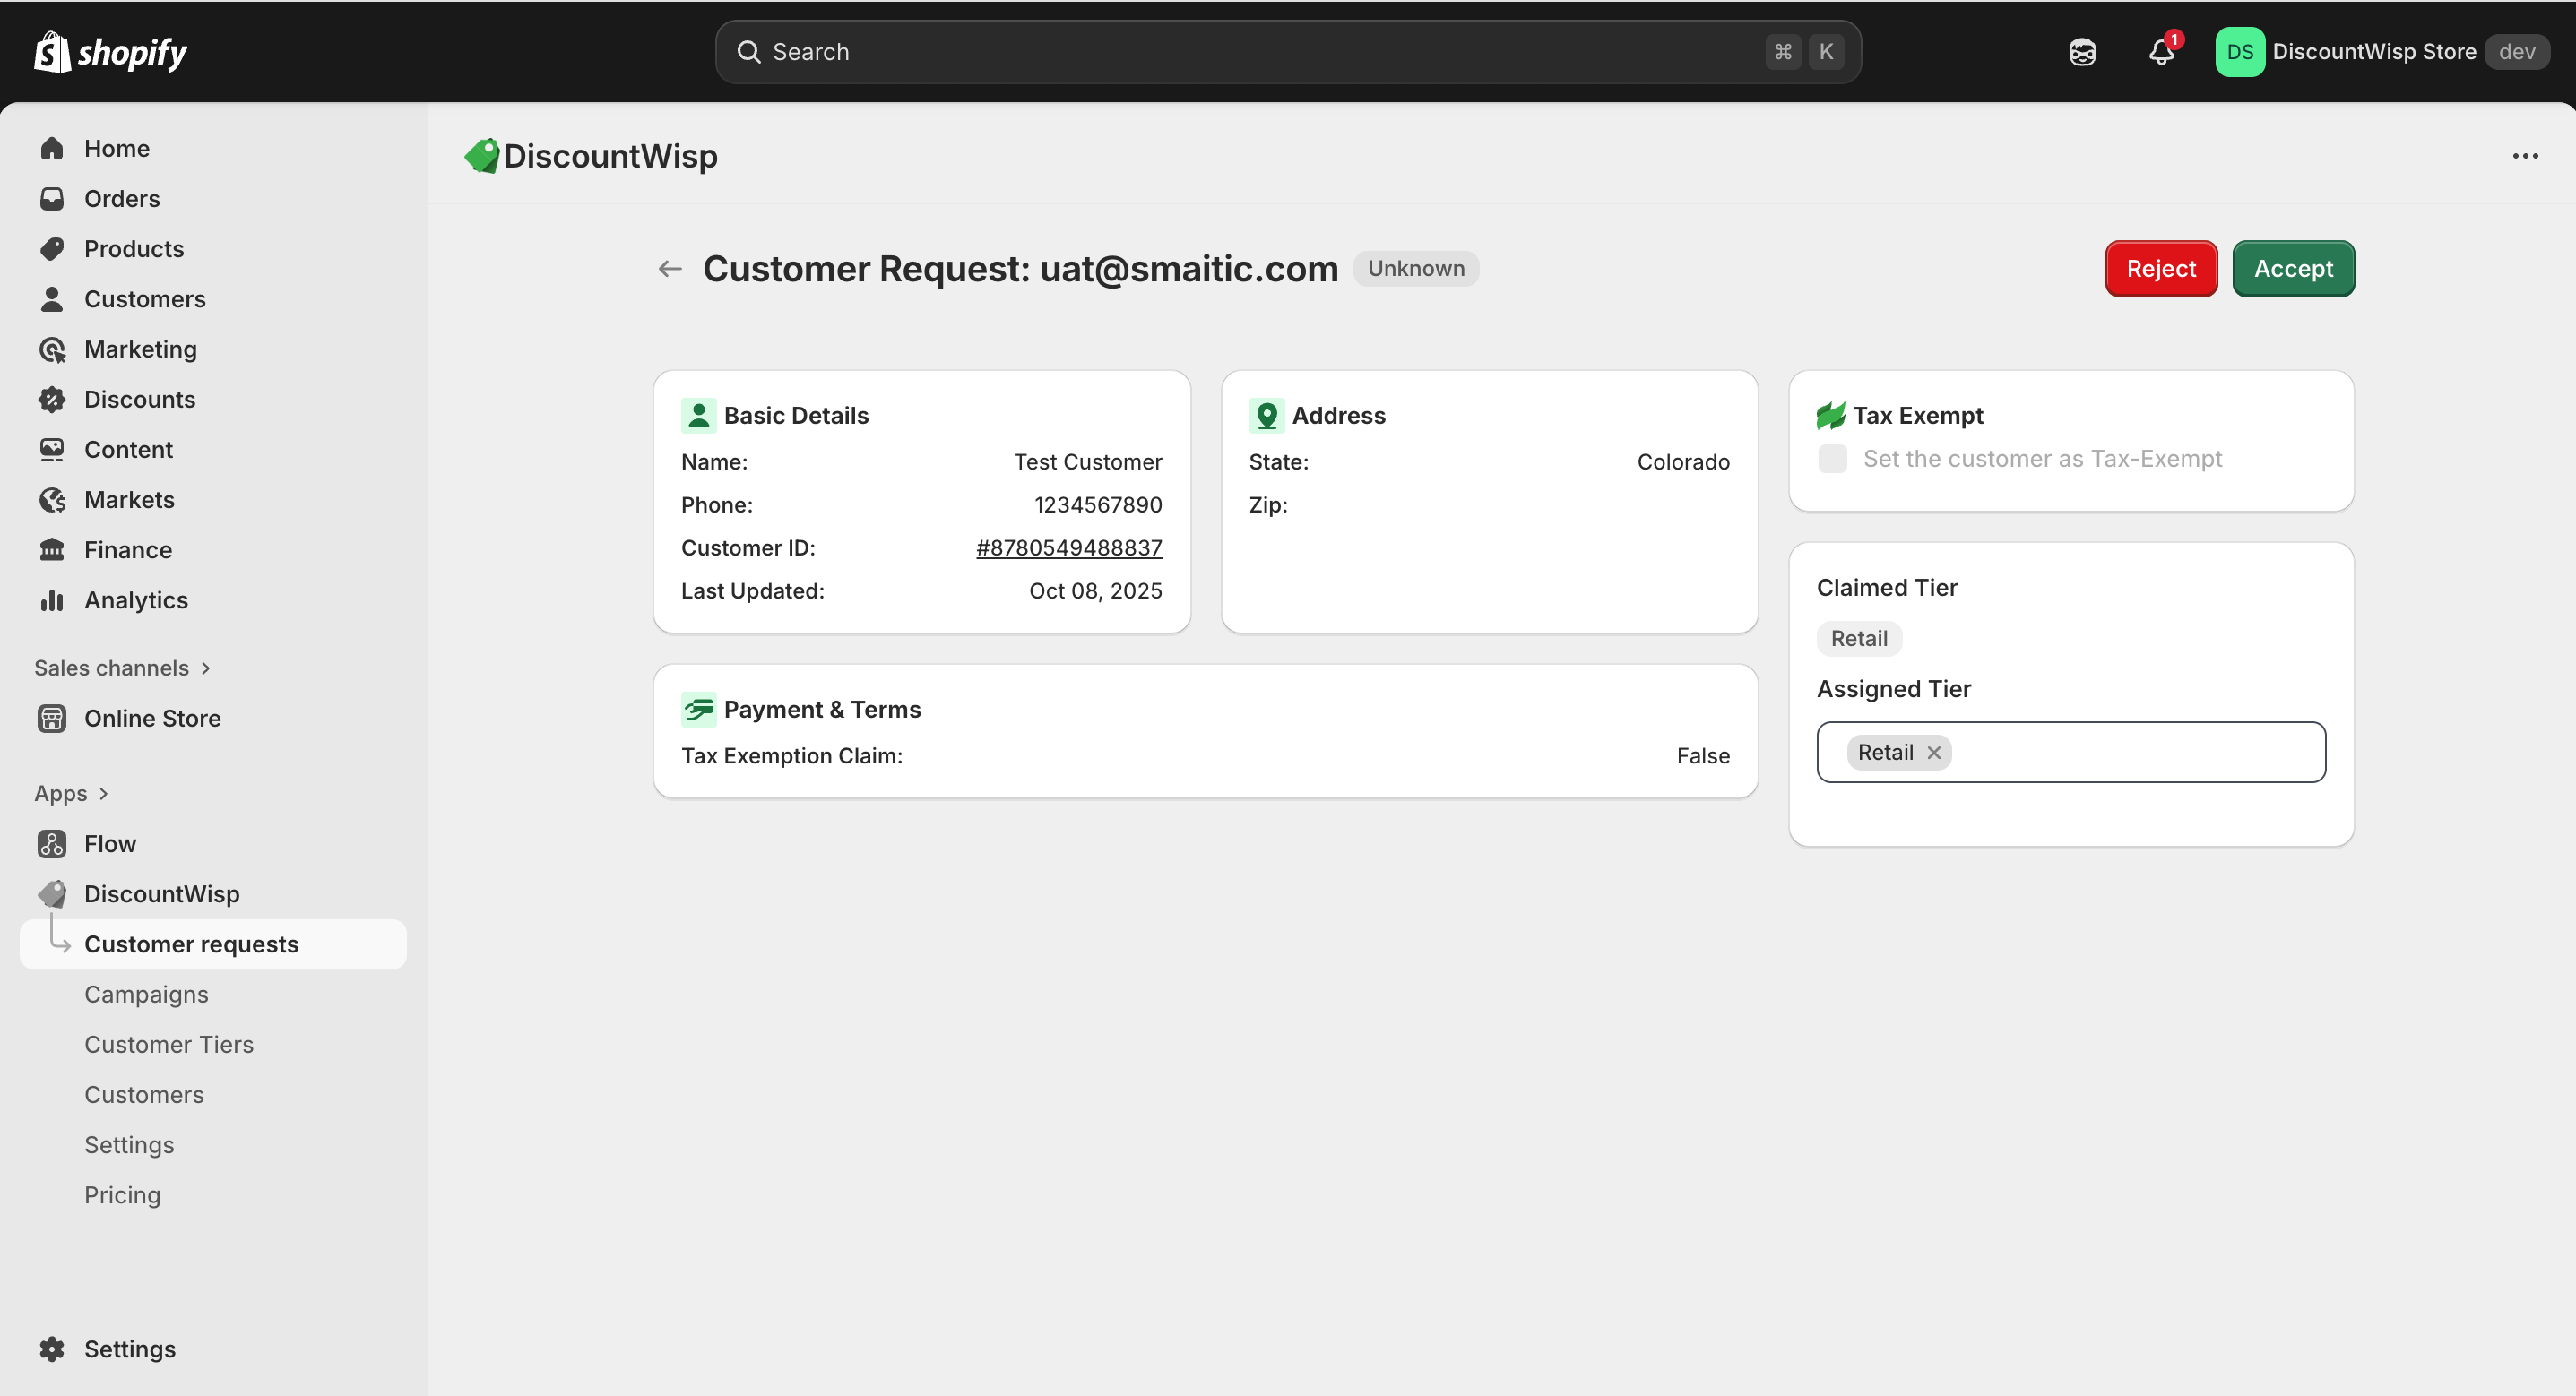
Here’s what you’ll find:
-
Full Form Submission: View every field filled by the customer, including contact details, business profile, estimated order volume, estimated monthly spend, and claimed tier (if any).
-
Supporting Documents: Access uploaded files such as reseller certificates, tax exemption forms, or business licenses directly within the request.
-
Review & Tier Assignment: Based on the provided data and documents, you can assess eligibility and assign the customer to an appropriate tier. If the request flow is configured for manual approval, this is where segmentation decisions are made.
-
From here, you can review full submissions, approve or reject requests, or manually assign tiers as needed — streamlining your customer segmentation process with just a few clicks.
Reviewing and Managing Customer Tier Classification Requests
When a customer submits a tier classification request via the storefront form, you’ll see it reflected both on the Dashboard Summary Table and the Customer Requests page.
To take action:
-
Navigate to the Customer Requests tab.
-
Click on the request to view the full submission details.
This opens the Request Details Page, where you can review all the information provided — including business/individual details, purchase expectations, and any uploaded documents. Based on this, you can decide to approve or reject the request.
Available Actions
- Approve: Assign the customer to their requested tier. This will automatically tag them in Shopify and activate any discount campaigns linked to that tier, enabling personalized pricing immediately.
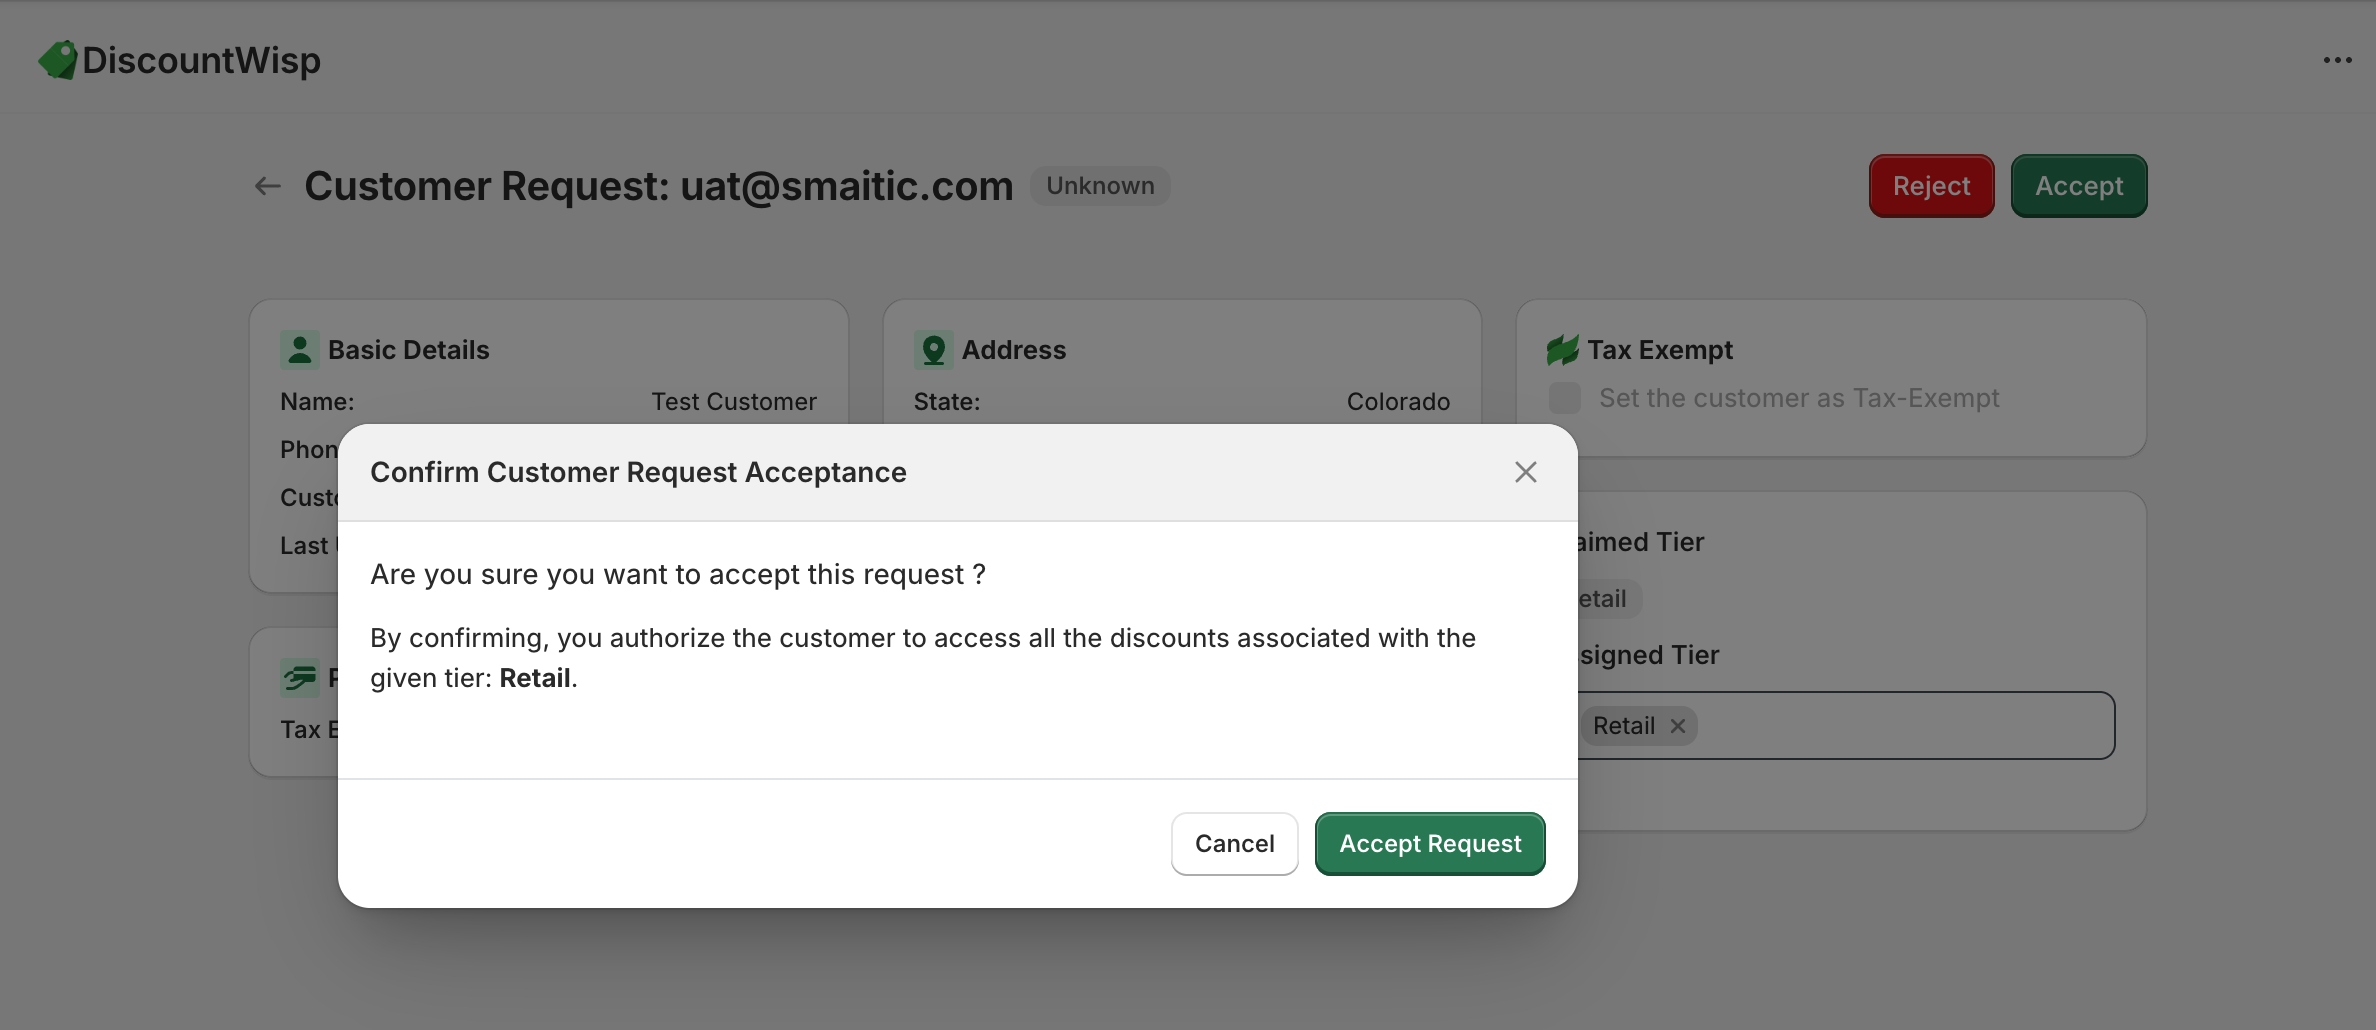
- Reject: Decline the request with a rejection note. This allows the customer to review and resubmit their classification request with more accurate or complete information.

Once approved and tier-assigned, the customer gains access to discounts defined to the assigned tier by your active DiscountWisp Campaigns.
Auto-Approval Logic
If your store has Auto Approval Mode enabled, DiscountWisp can handle requests automatically based on predefined rules:
-
Automatically assigns a customer to their claimed tier (submitted via the form)
-
Skips manual review, accelerating onboarding
-
Best suited for fast-growing stores or those with high customer classification volume.
Manual Assignment of Tiers
When Auto Mode is disabled, you’ll be in Manual Mode, which offers full control over tier classification:
-
Carefully review each request and all accompanying information
-
Assign the most appropriate tier based on:
-
Claimed tier
-
Customer type
-
Expected monthly spend or order volume
-
Purchase history (if applicable)
-
Manual mode ensures human oversight for better alignment with your store's policies.
Settings & Preferences
From the DiscountWisp Settings page, you can manage both how customer tier classification requests are handled and how communication emails are configured — all in one place.
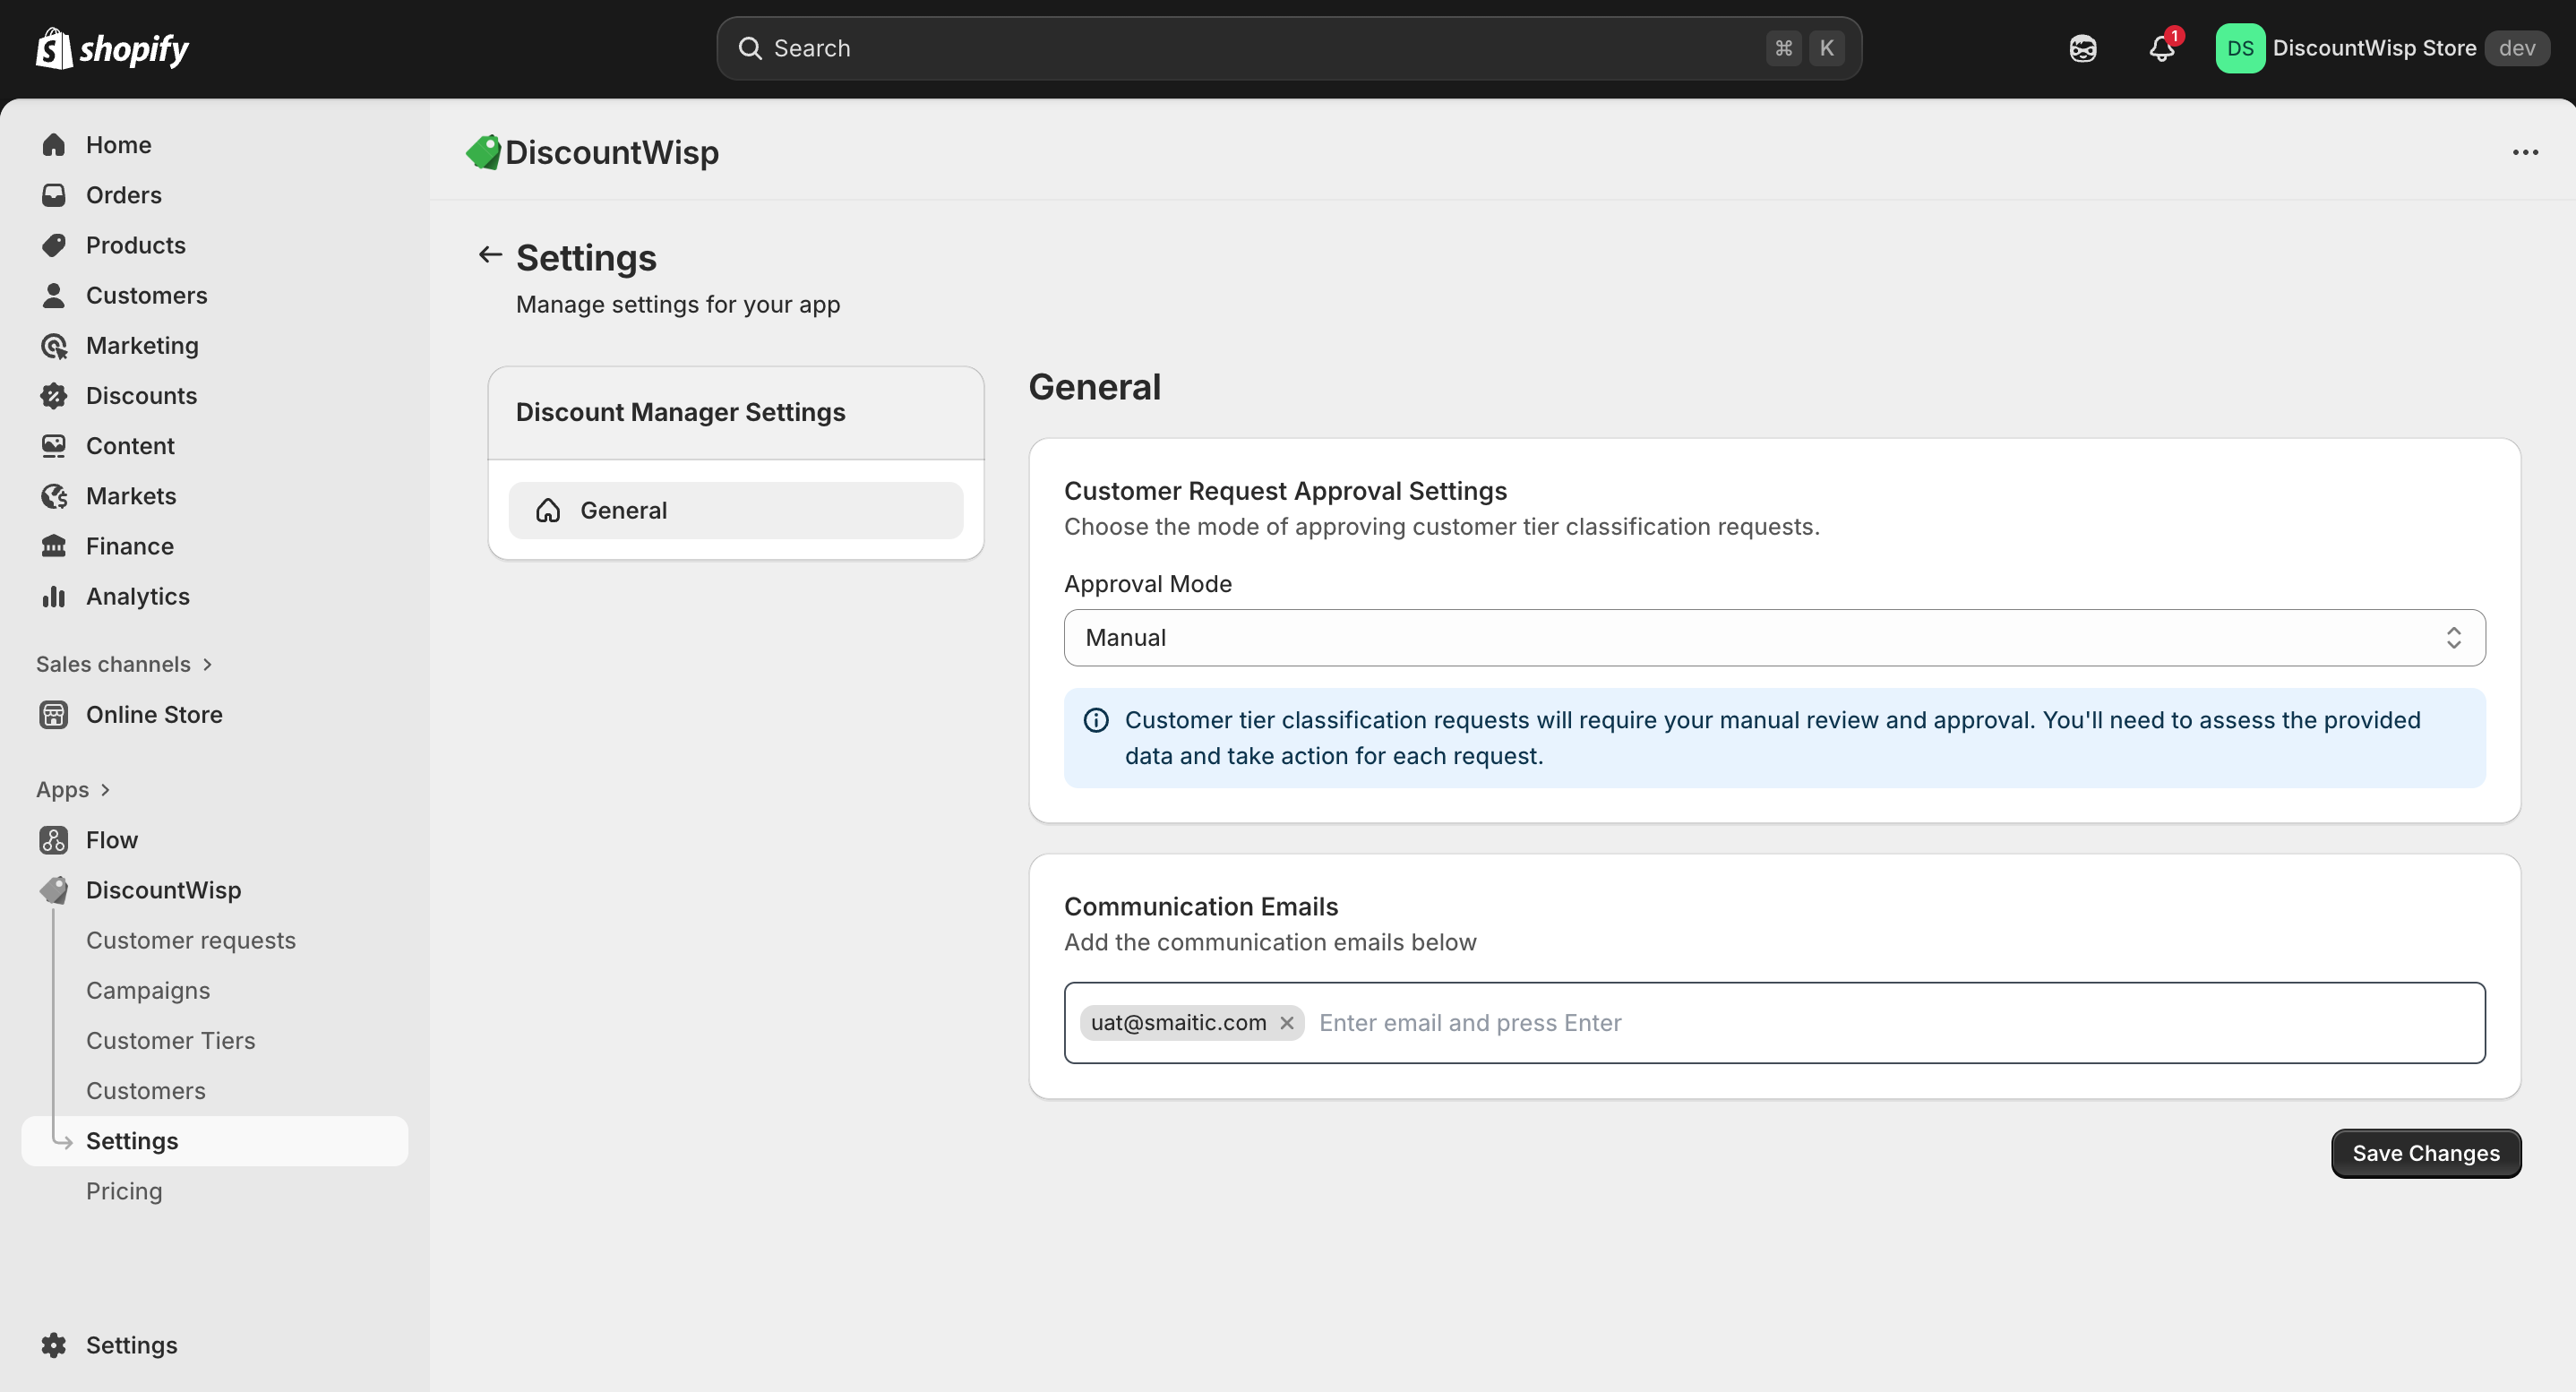
Enabling or Disabling Auto-Approval
From the Settings page, toggle between auto and manual approval for customer classification.
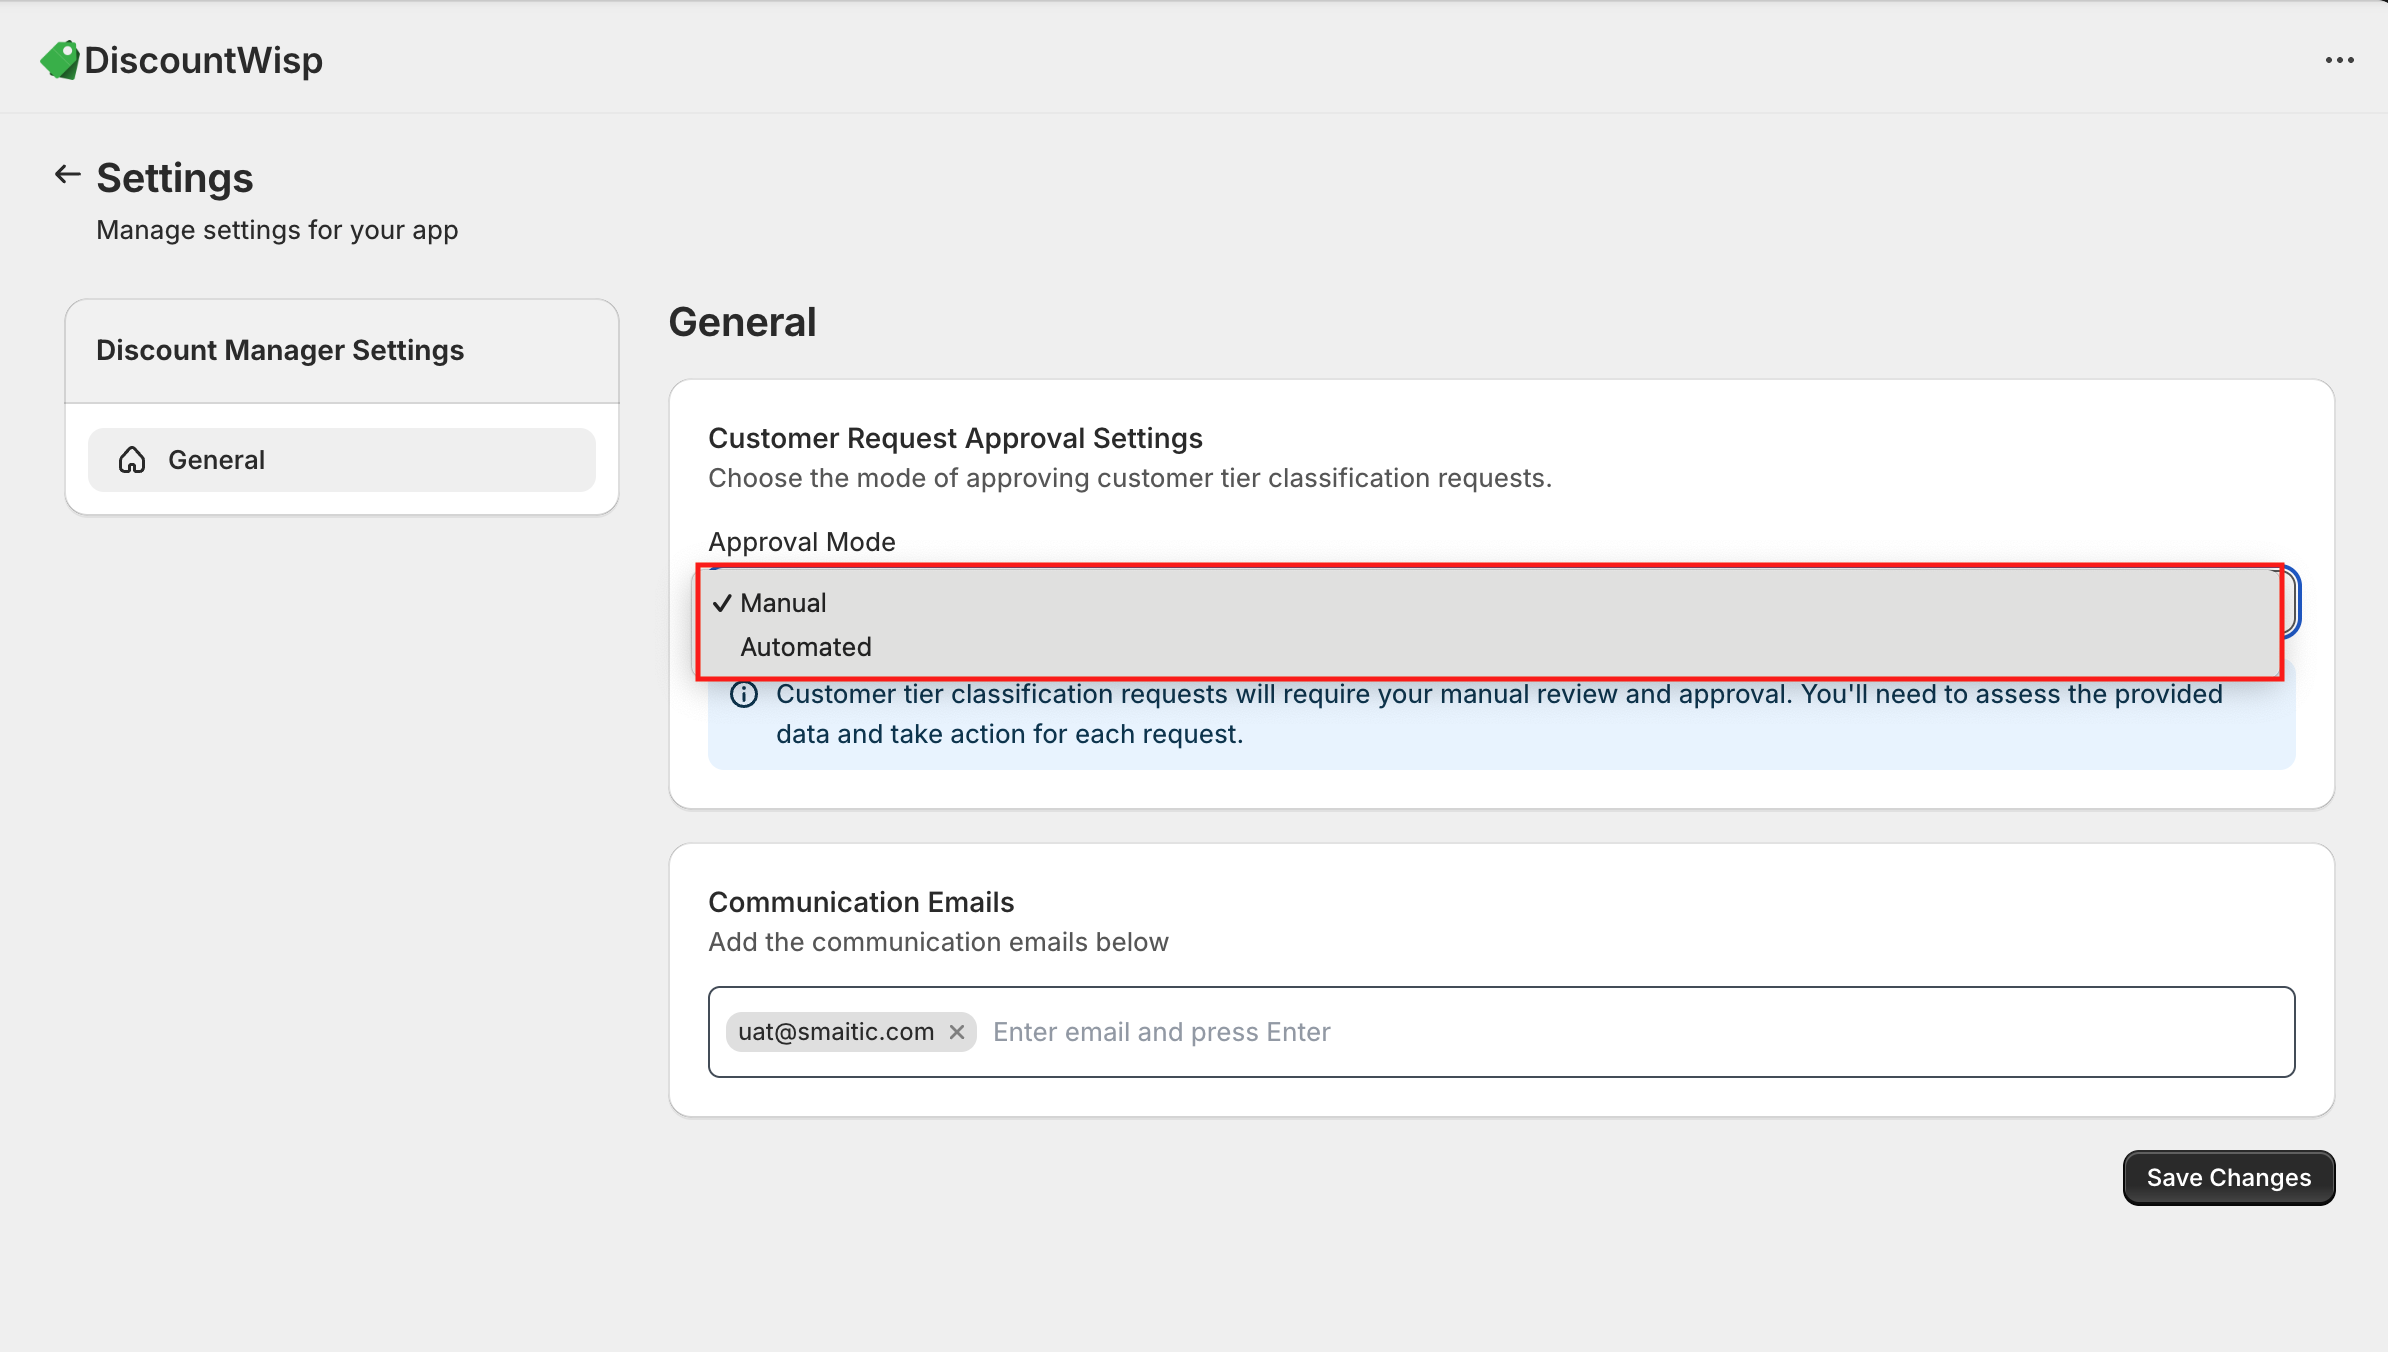
- Auto-Approval : Automatically classify customers into tiers based on their claims.
- Manual Approval : Review each request before approving, gives you full control.
Configuring Communication Emails
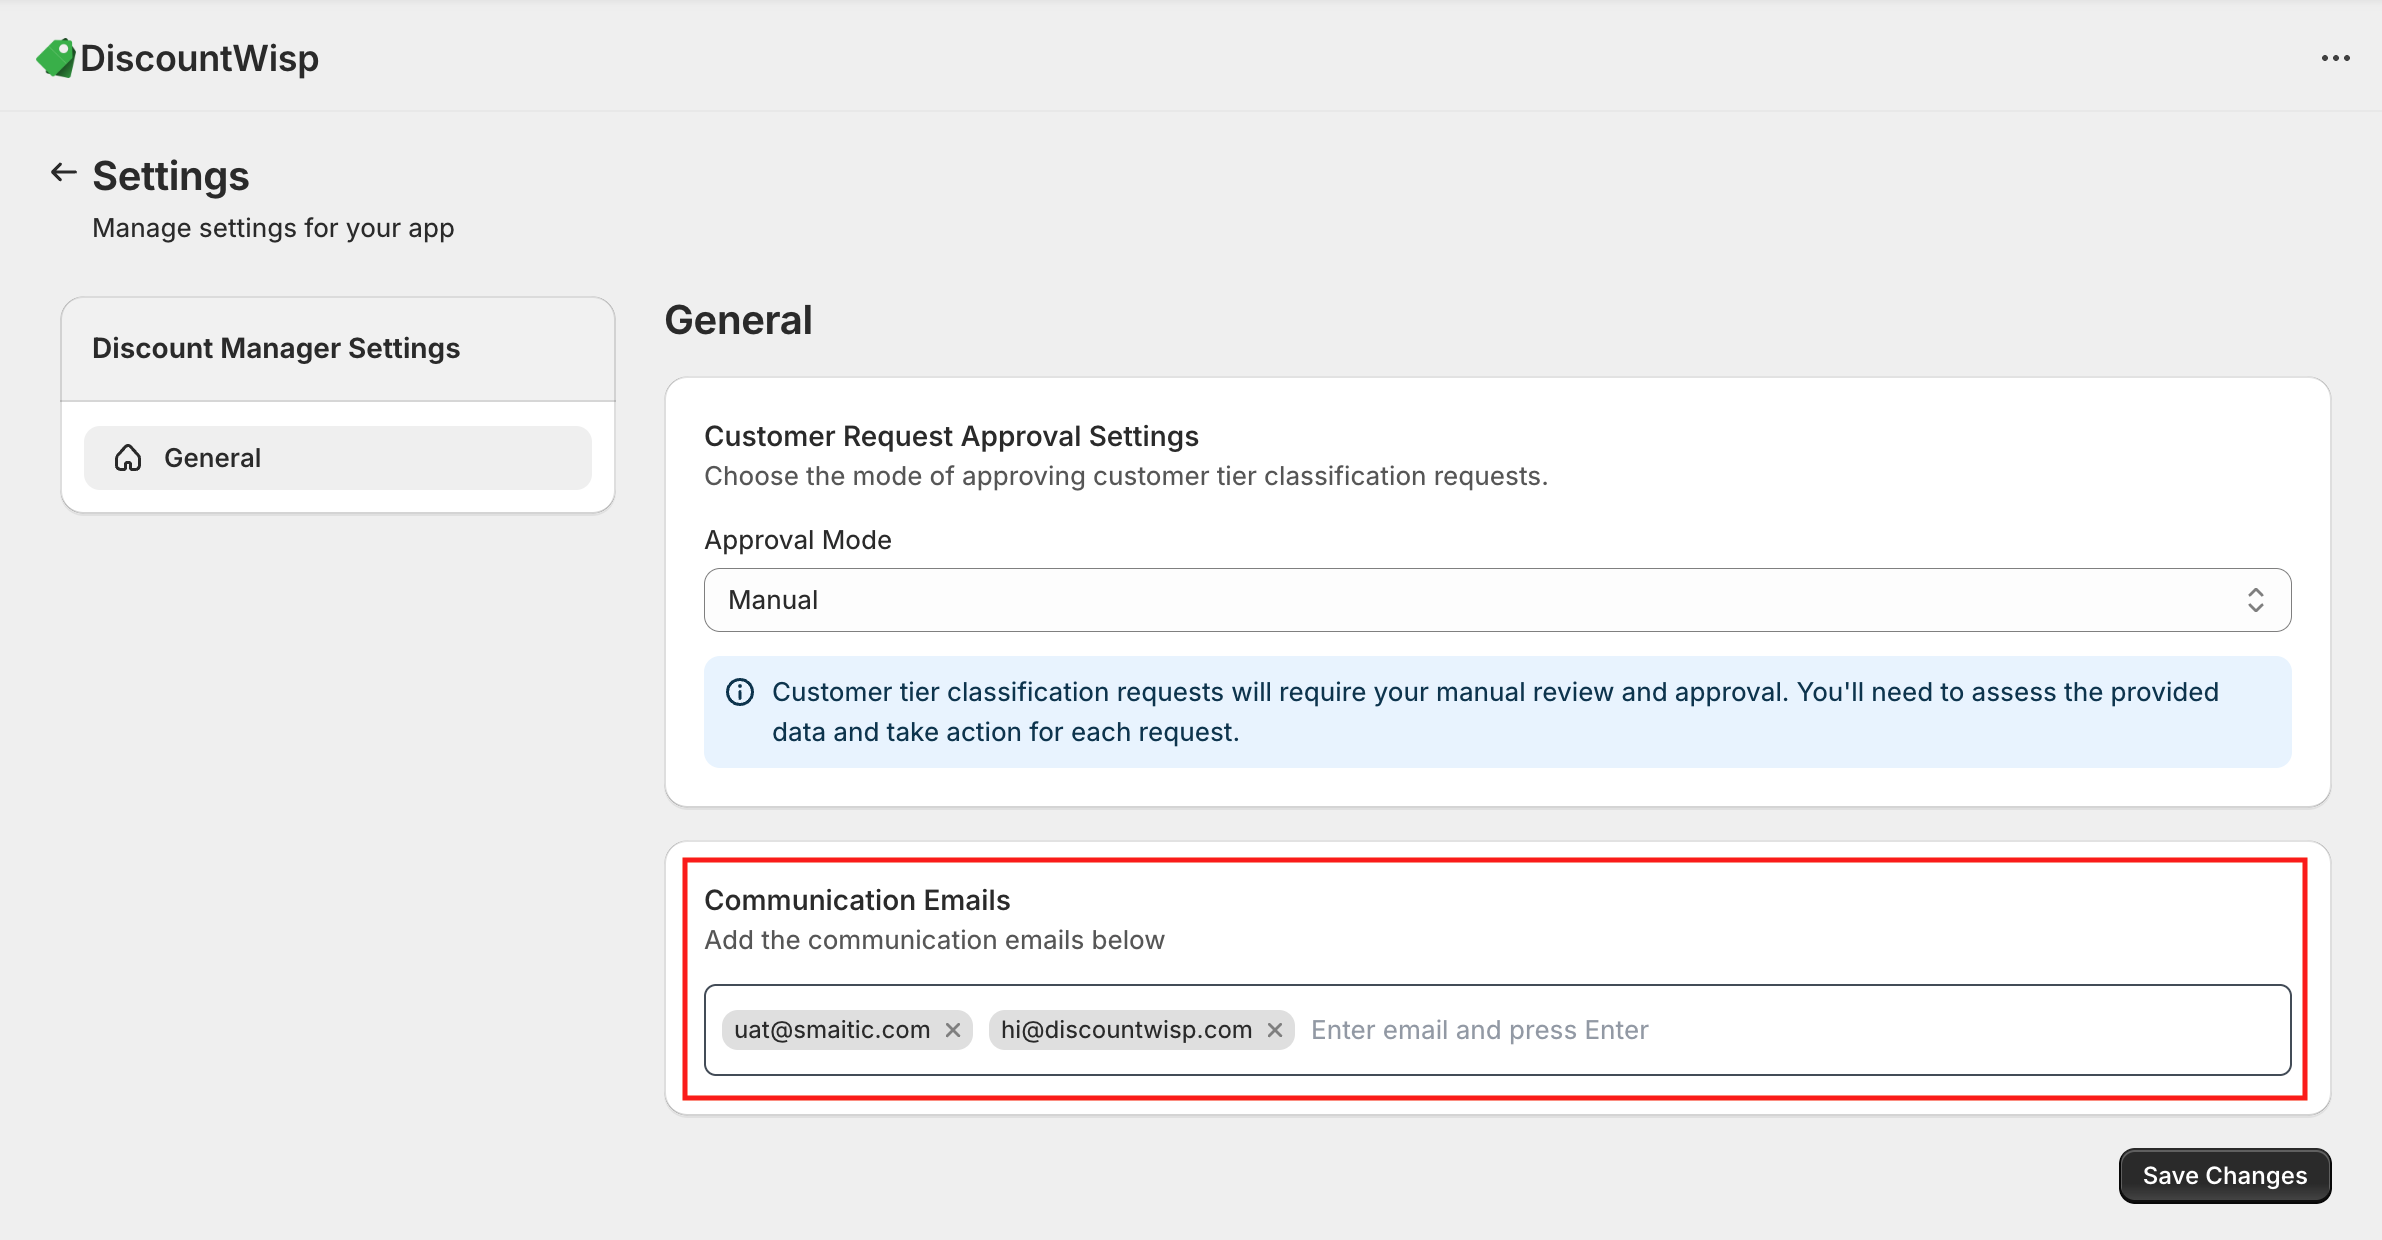
Set the email addresses that will be used for:
- Classification updates
- Tier approval/rejection updates
- App-generated notifications
- Store Support for Customers
By following this guide, you can tailor the DiscountWisp Shopify App to optimize discounts and deliver a seamless experience for both, your store and your customers. If you encounter any challenges or need assistance during the configuration process, don't hesitate to reach out to our Support Team for help. We're here to ensure your success with our app.