Customer Guide
Welcome! This guide is designed to help store customers understand how to request access to special discount tiers, how the approval process works, and how to view and apply eligible discounts when shopping from a store using DiscountWisp.
DiscountWisp is a powerful app used by Shopify merchants to offer tier-based discounts and personalized offers to their customers. This guide is to help you:
- Request access to exclusive discounts via tier classification
- Understand how the approval process works
- View and apply discounts while shopping
Let’s walk through every step of the customer experience.
Self Sign-In and Registration
Before accessing DiscountWisp and taking advantage of tier-based discounts, customers must be registered and logged into the Shopify store.
If you're visiting the store for the first time, you’ll need to sign up or log in using the store’s native customer account flow. Once logged in, you can:
-
Access any personalized discount offers based on your tier
-
Submit a Customer Tier Classification Request if you haven’t been assigned a tier yet
Discount-based pricing is only applied when you're logged into your account, and your classification has been approved.
Accessing DiscountWisp & Requesting Tier Classification
To unlock exclusive pricing and campaign-based discounts powered by DiscountWisp, customers must first be classified into an appropriate Customer Tier.
DiscountWisp allows Shopify merchants to offer targeted discounts based on customer types — such as wholesale buyers, high-volume purchasers, or VIP customers. In order to determine your eligibility for these discounts, you’ll need to submit a Tier Classification Request through the store's request form.
By filling out the tier classification request form, you're helping the store understand your purchasing intent, customer type, and expected order & monthly spend — all of which are used to assign you to the most suitable tier. Once approved, your assigned tier will automatically receive the applicable discounts across the store.
How Customers Can Find the Classification Form
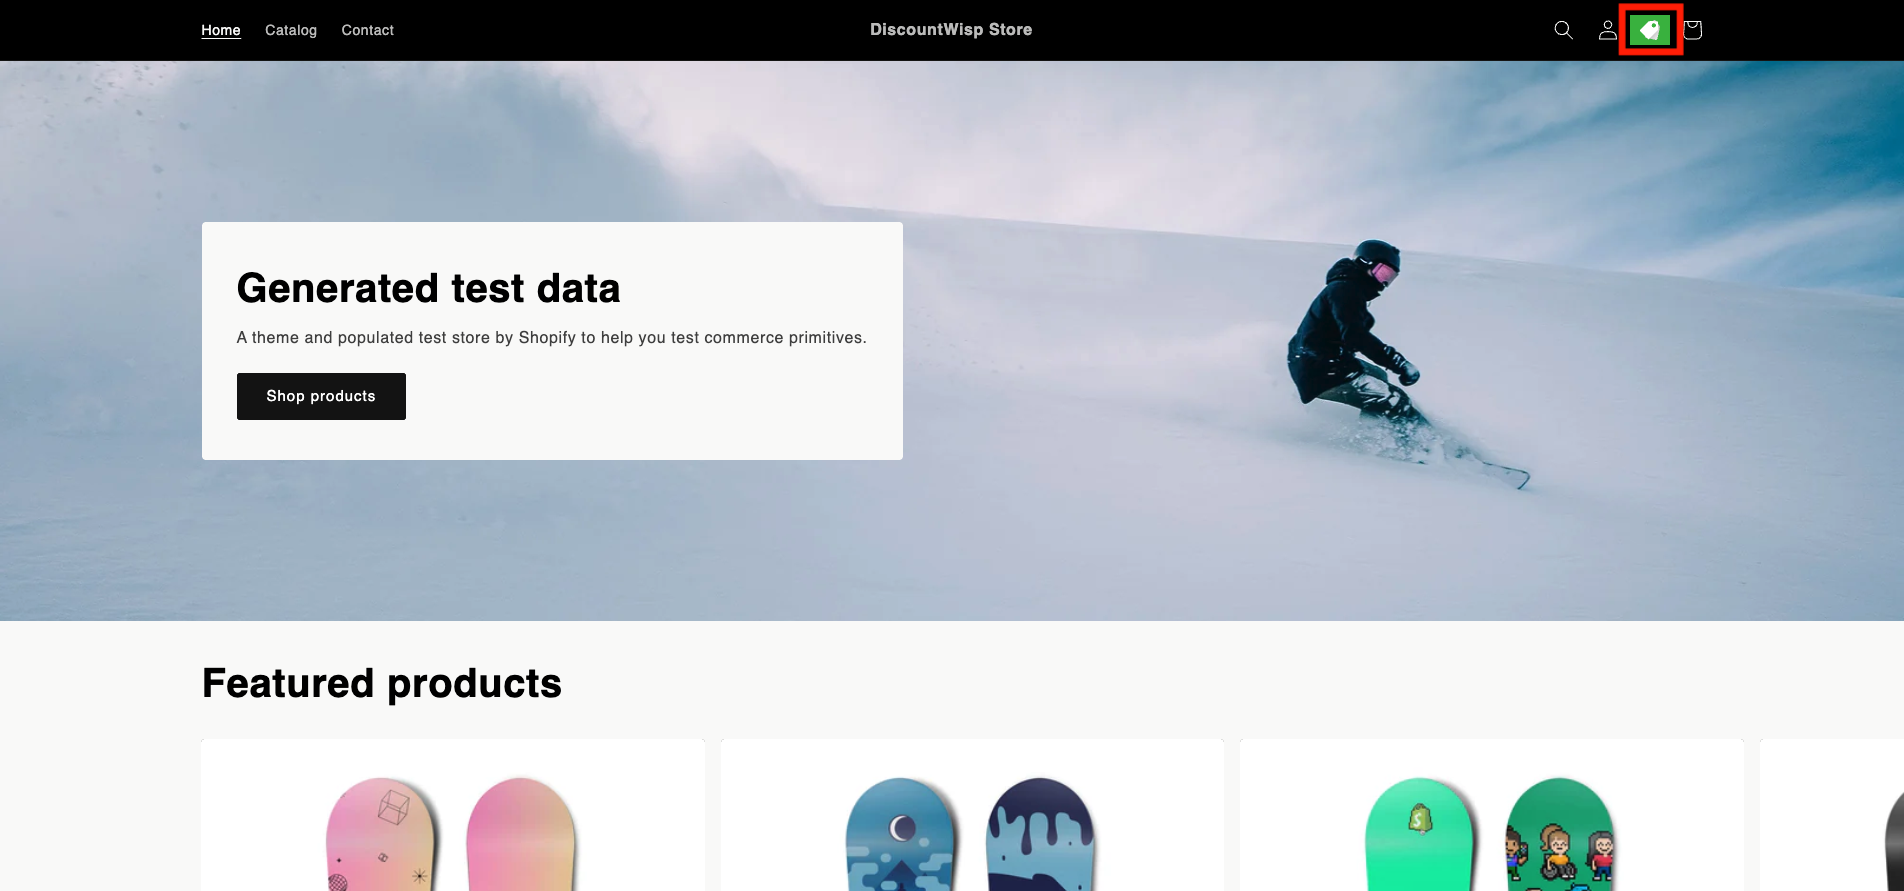
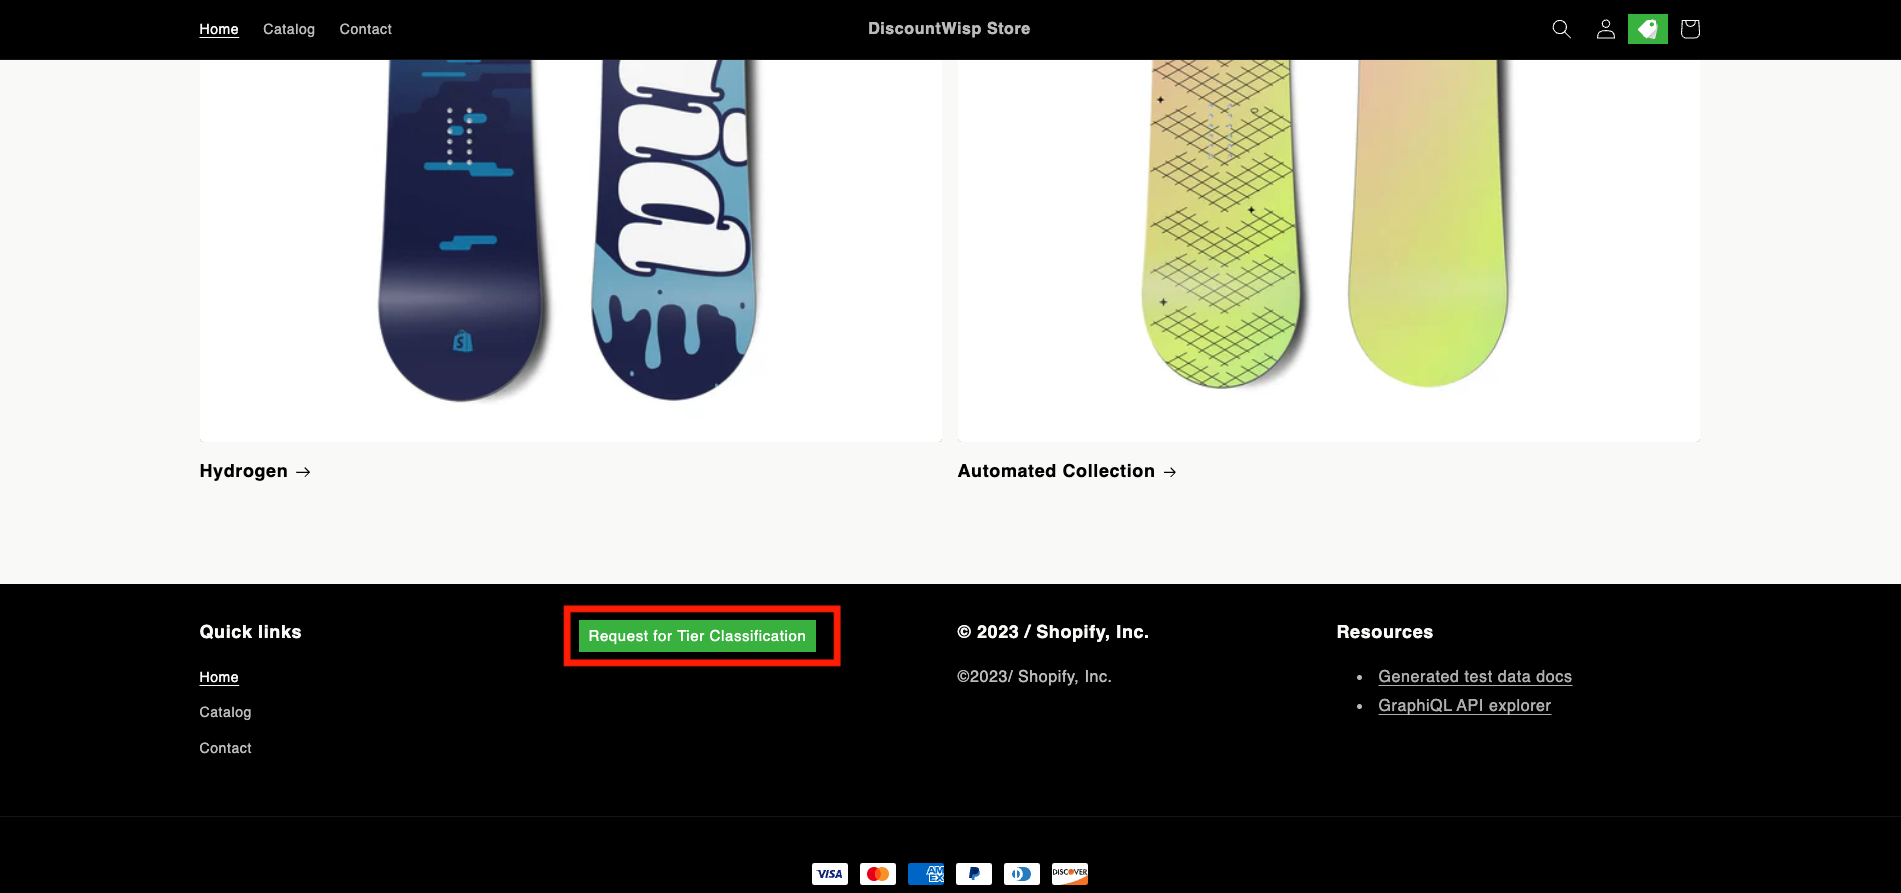
Merchants using DiscountWisp display the "Request for Tier Classification" option on their storefront. Customers can locate the classification request link in various formats:
-
Discount Icon : Often found in the header navigation bar.
-
Text Link : Commonly placed in the footer section of the site.
-
Featured Button : Can be found somewhere on the homepage, product pages, or any other section.
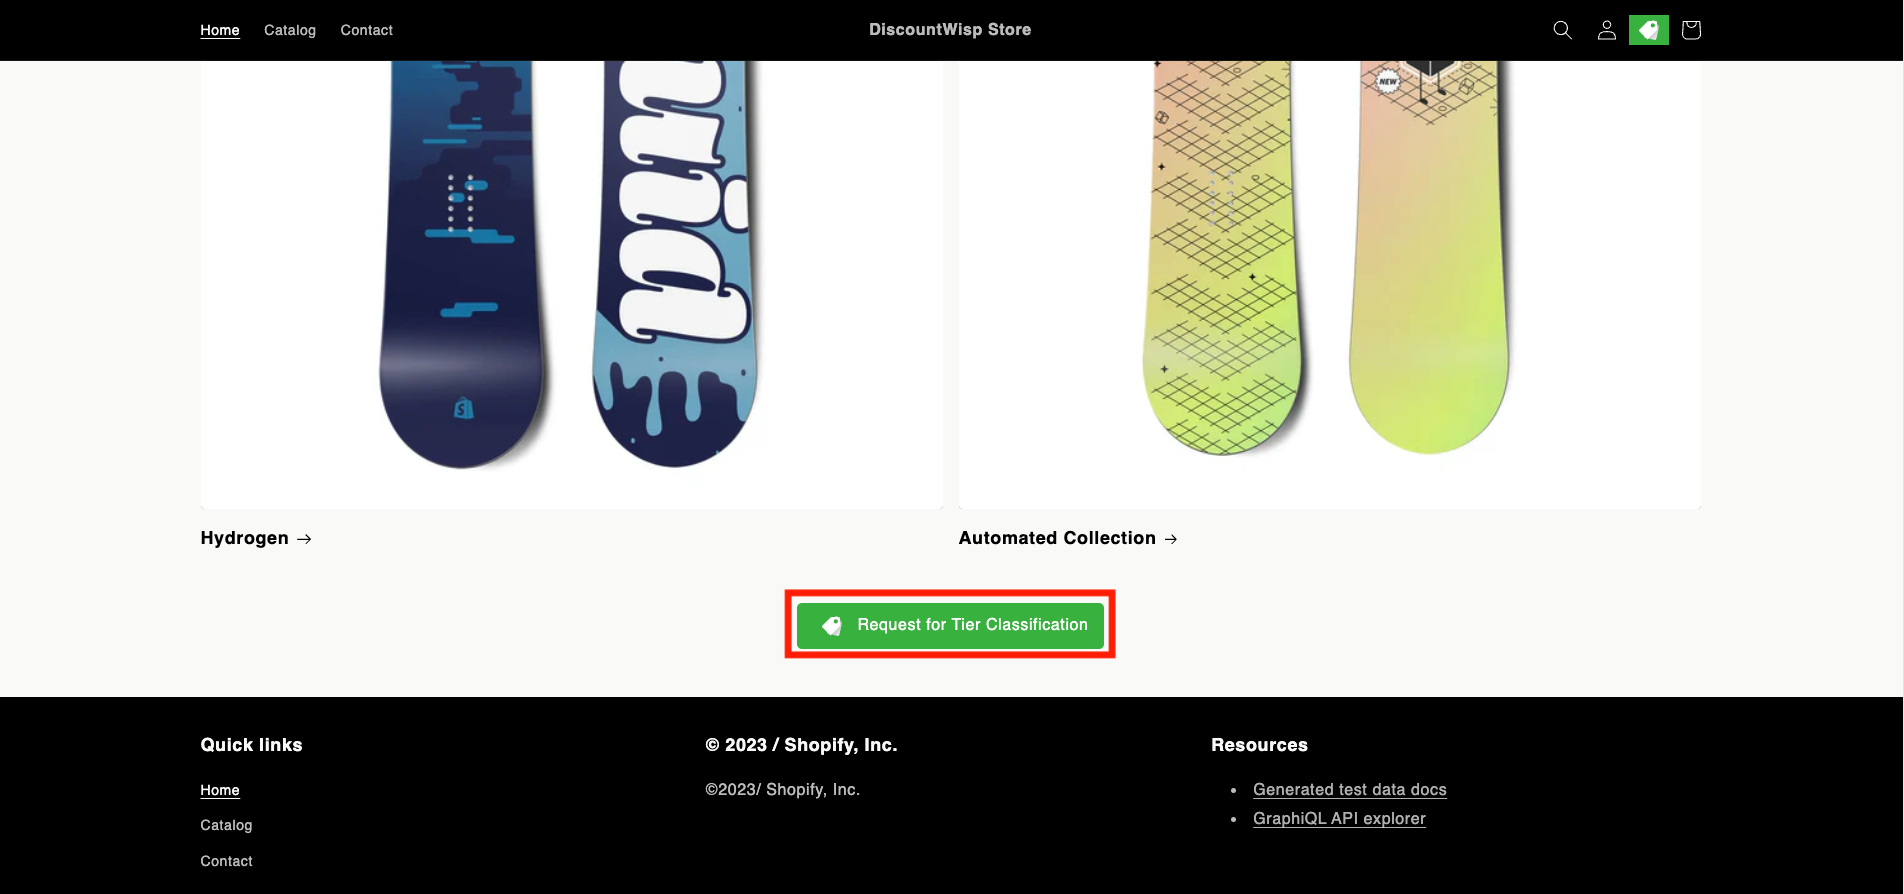
Clicking on any of these will take you to the DiscountWisp Customer portal and open the form for customer tier classification request.
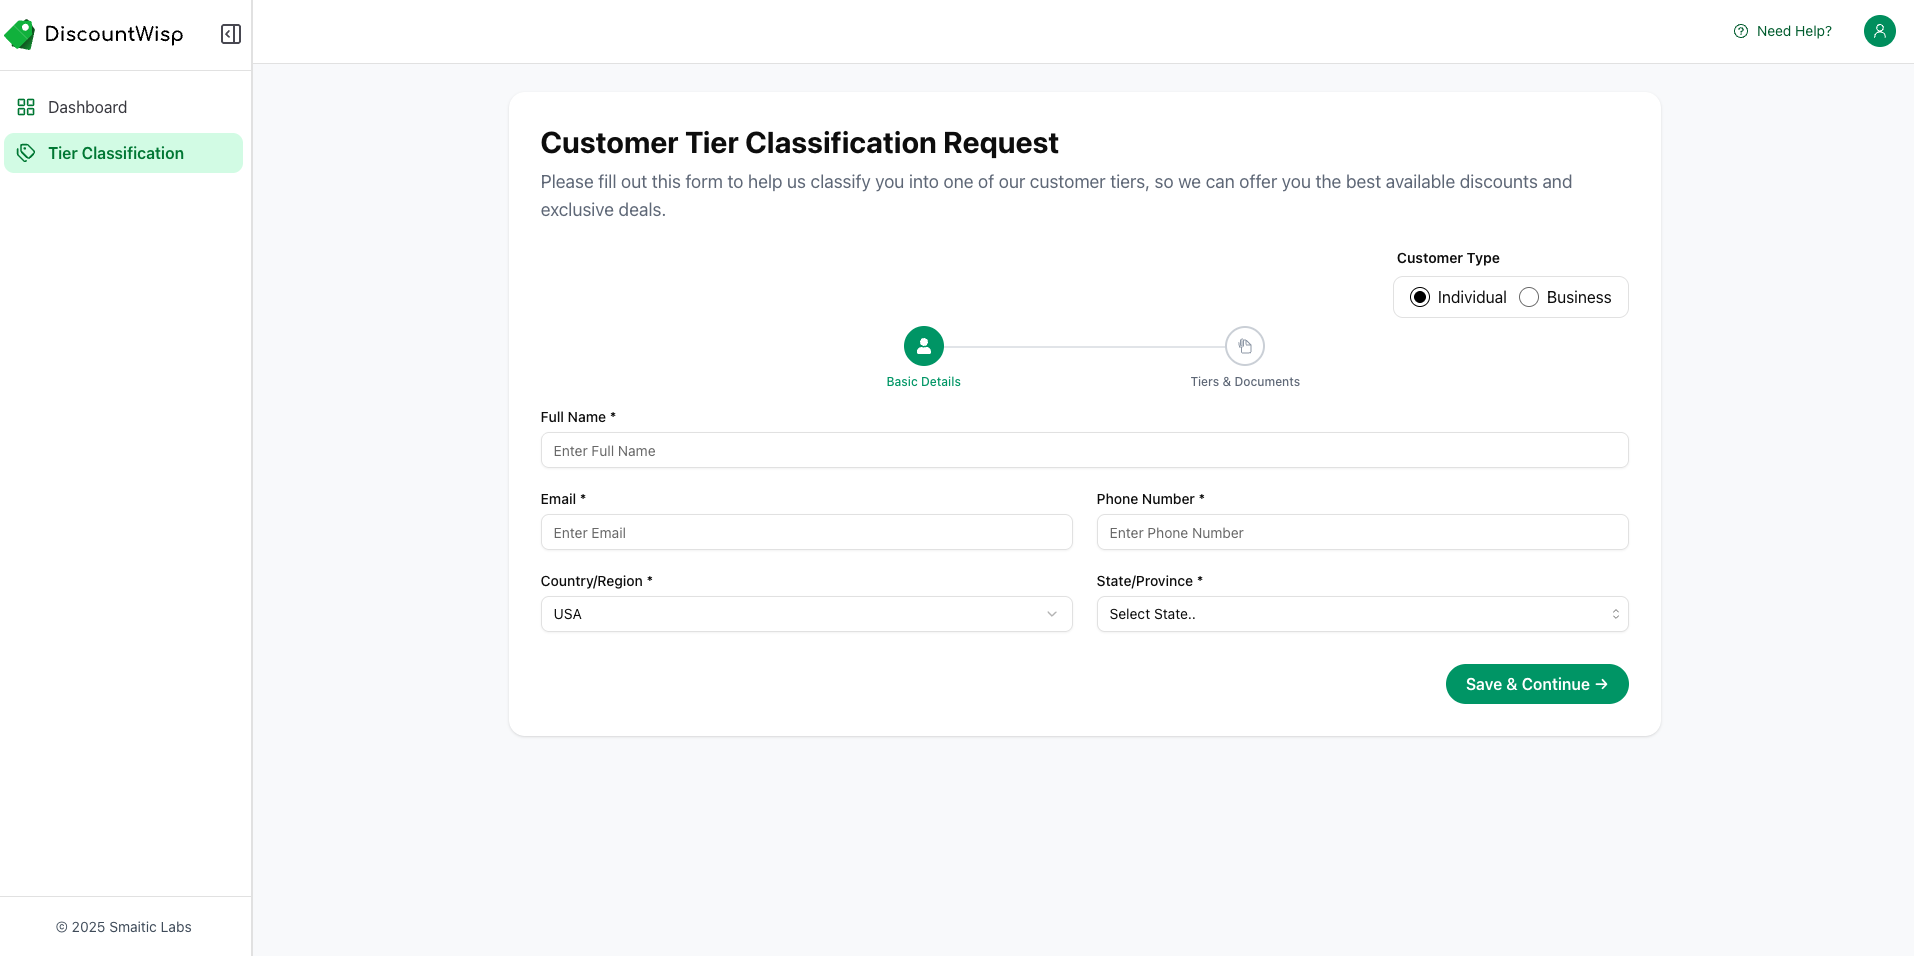
Tier Classification Form: Required Details Based on Customer Type
To ensure customers are properly segmented and eligible for the right tier-based discounts, DiscountWisp requires you to fill out a Tier Classification Form. The information collected helps verify your eligibility and assign you to the most appropriate discount tier. The fields differ slightly depending on whether you're an Individual or a Business customer.
For Individual Customers
If you’re a personal buyer (not representing a business or organization), select Customer Type: Individual.
You’ll be asked to complete the following sections:
1. Basic Details
Provide essential contact and location information: Full Name, Email Address, Phone Number, Country/Region, State/Province
2. Tier Claim & Supporting Documents
This section determines your access to exclusive discounts:
-
Select whether you’re claiming tax exemption
-
Choose your desired customer tier
-
Upload any relevant supporting documents such as:
-
Tax exemption certificate
-
Purchase authorization form
-
Any additional supporting files
-
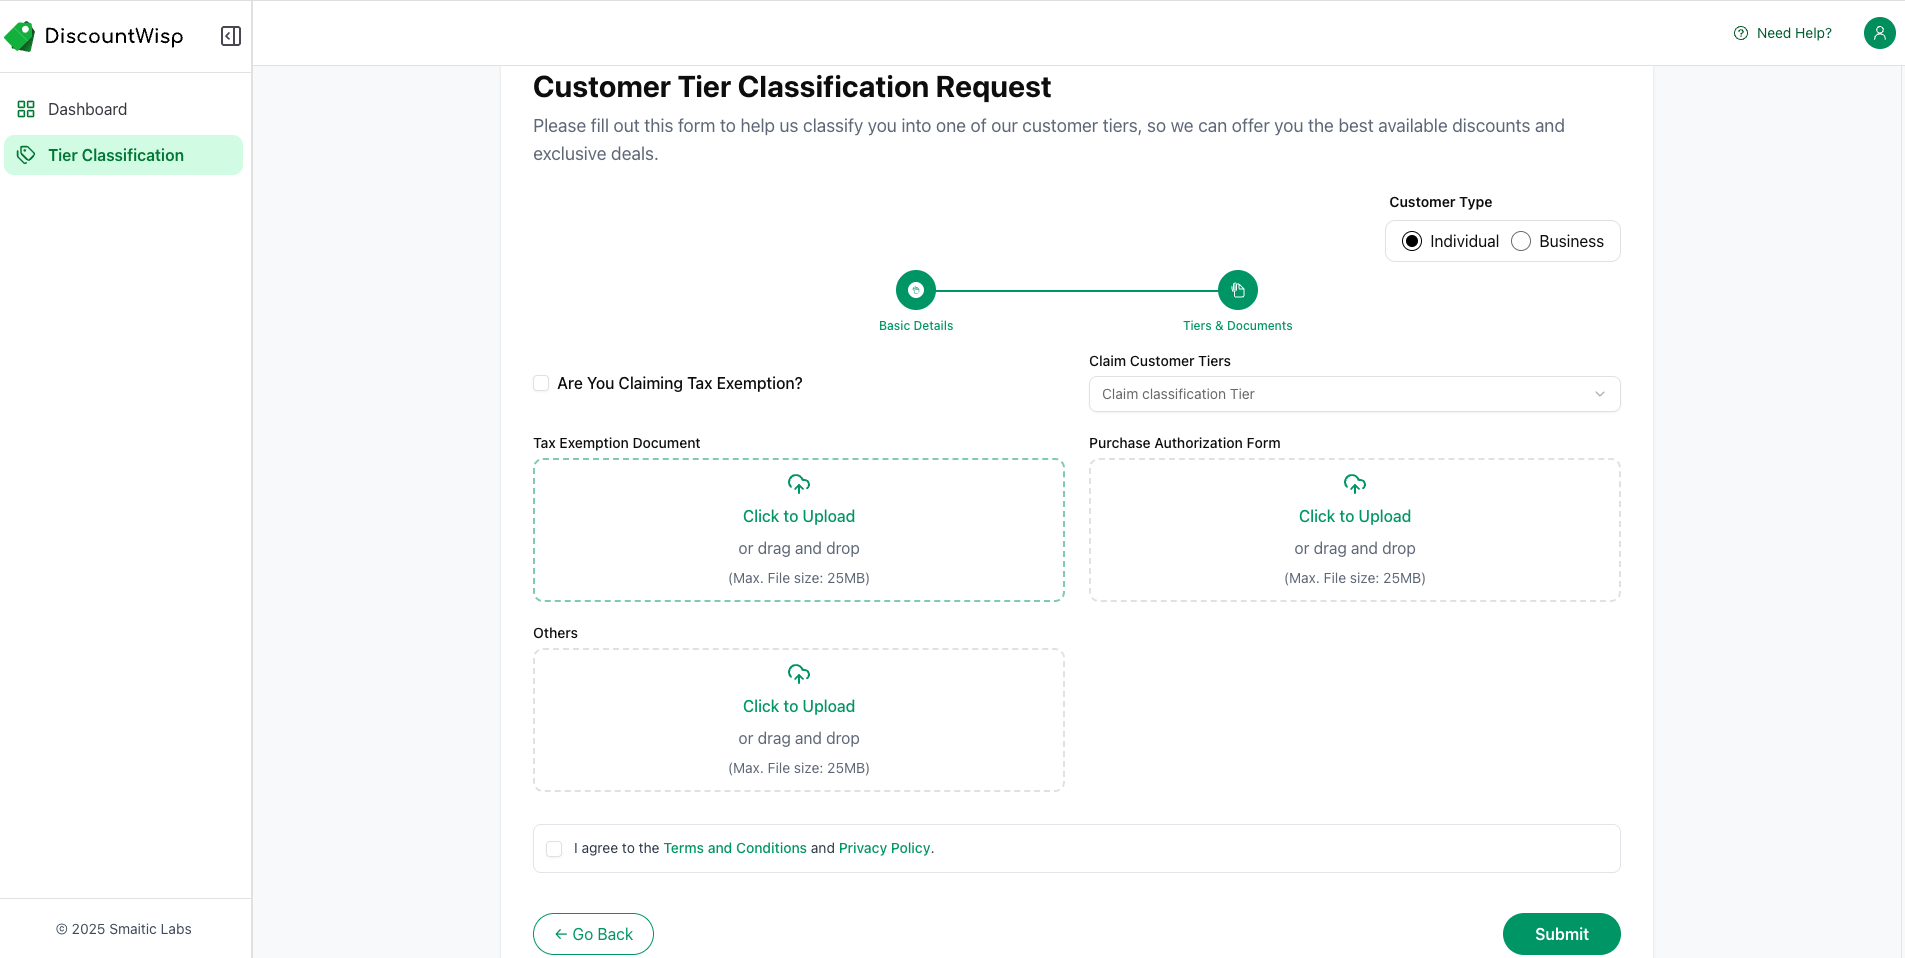
This information helps the merchant validate your classification and determine if you're eligible for personalized pricing.
For Business Customers
If you’re representing a company or organization, select Customer Type: Business.
You’ll be asked to fill out a more detailed form.
1. Basic Details:
Provide comprehensive business information including: Business/Company Name, Email, Phone Number, Business Type/Industry, Years in Business, Expected Monthly Order Volume, Expected Monthly Spend, Company Website, Business Tax ID/VAT Number, Country/Region, State/Province, City, Zip/Postal Code.
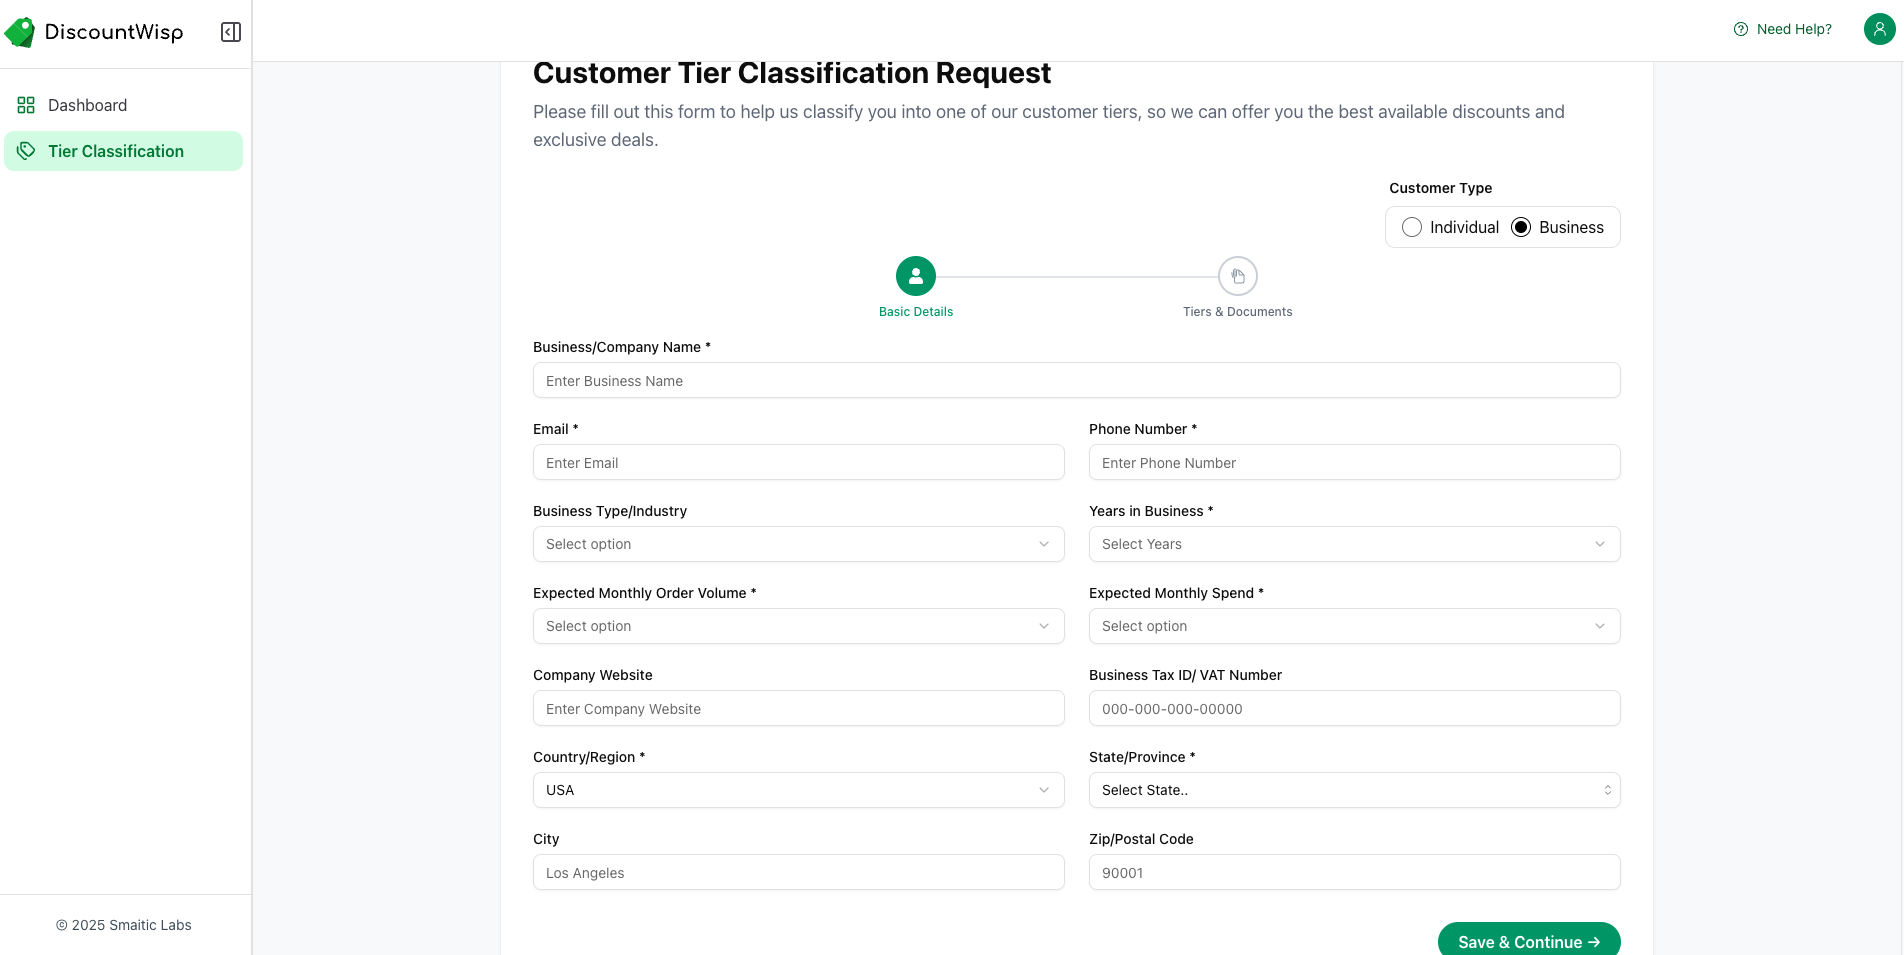
2. Tier Claim & Supporting Documents
To support your tier claim:
-
Indicate if you’re applying for tax exemption
-
Select your preferred customer tier
-
Upload relevant business documents such as:
-
Business license
-
Tax exemption certificate
-
Signed reseller agreement
-
Purchase authorization form
-
Any other verification documents

-
This data enables store admins to accurately segment your account and assign discount privileges accordingly.
Accessing the Customer Dashboard
Once you’ve signed in to the store and requested tier classification, you can access your Customer Dashboard to track your status, view assigned tiers, and manage your request history — all in one place.
Dashboard Overview
Your dashboard provides a clear snapshot of your classification journey and discount eligibility.
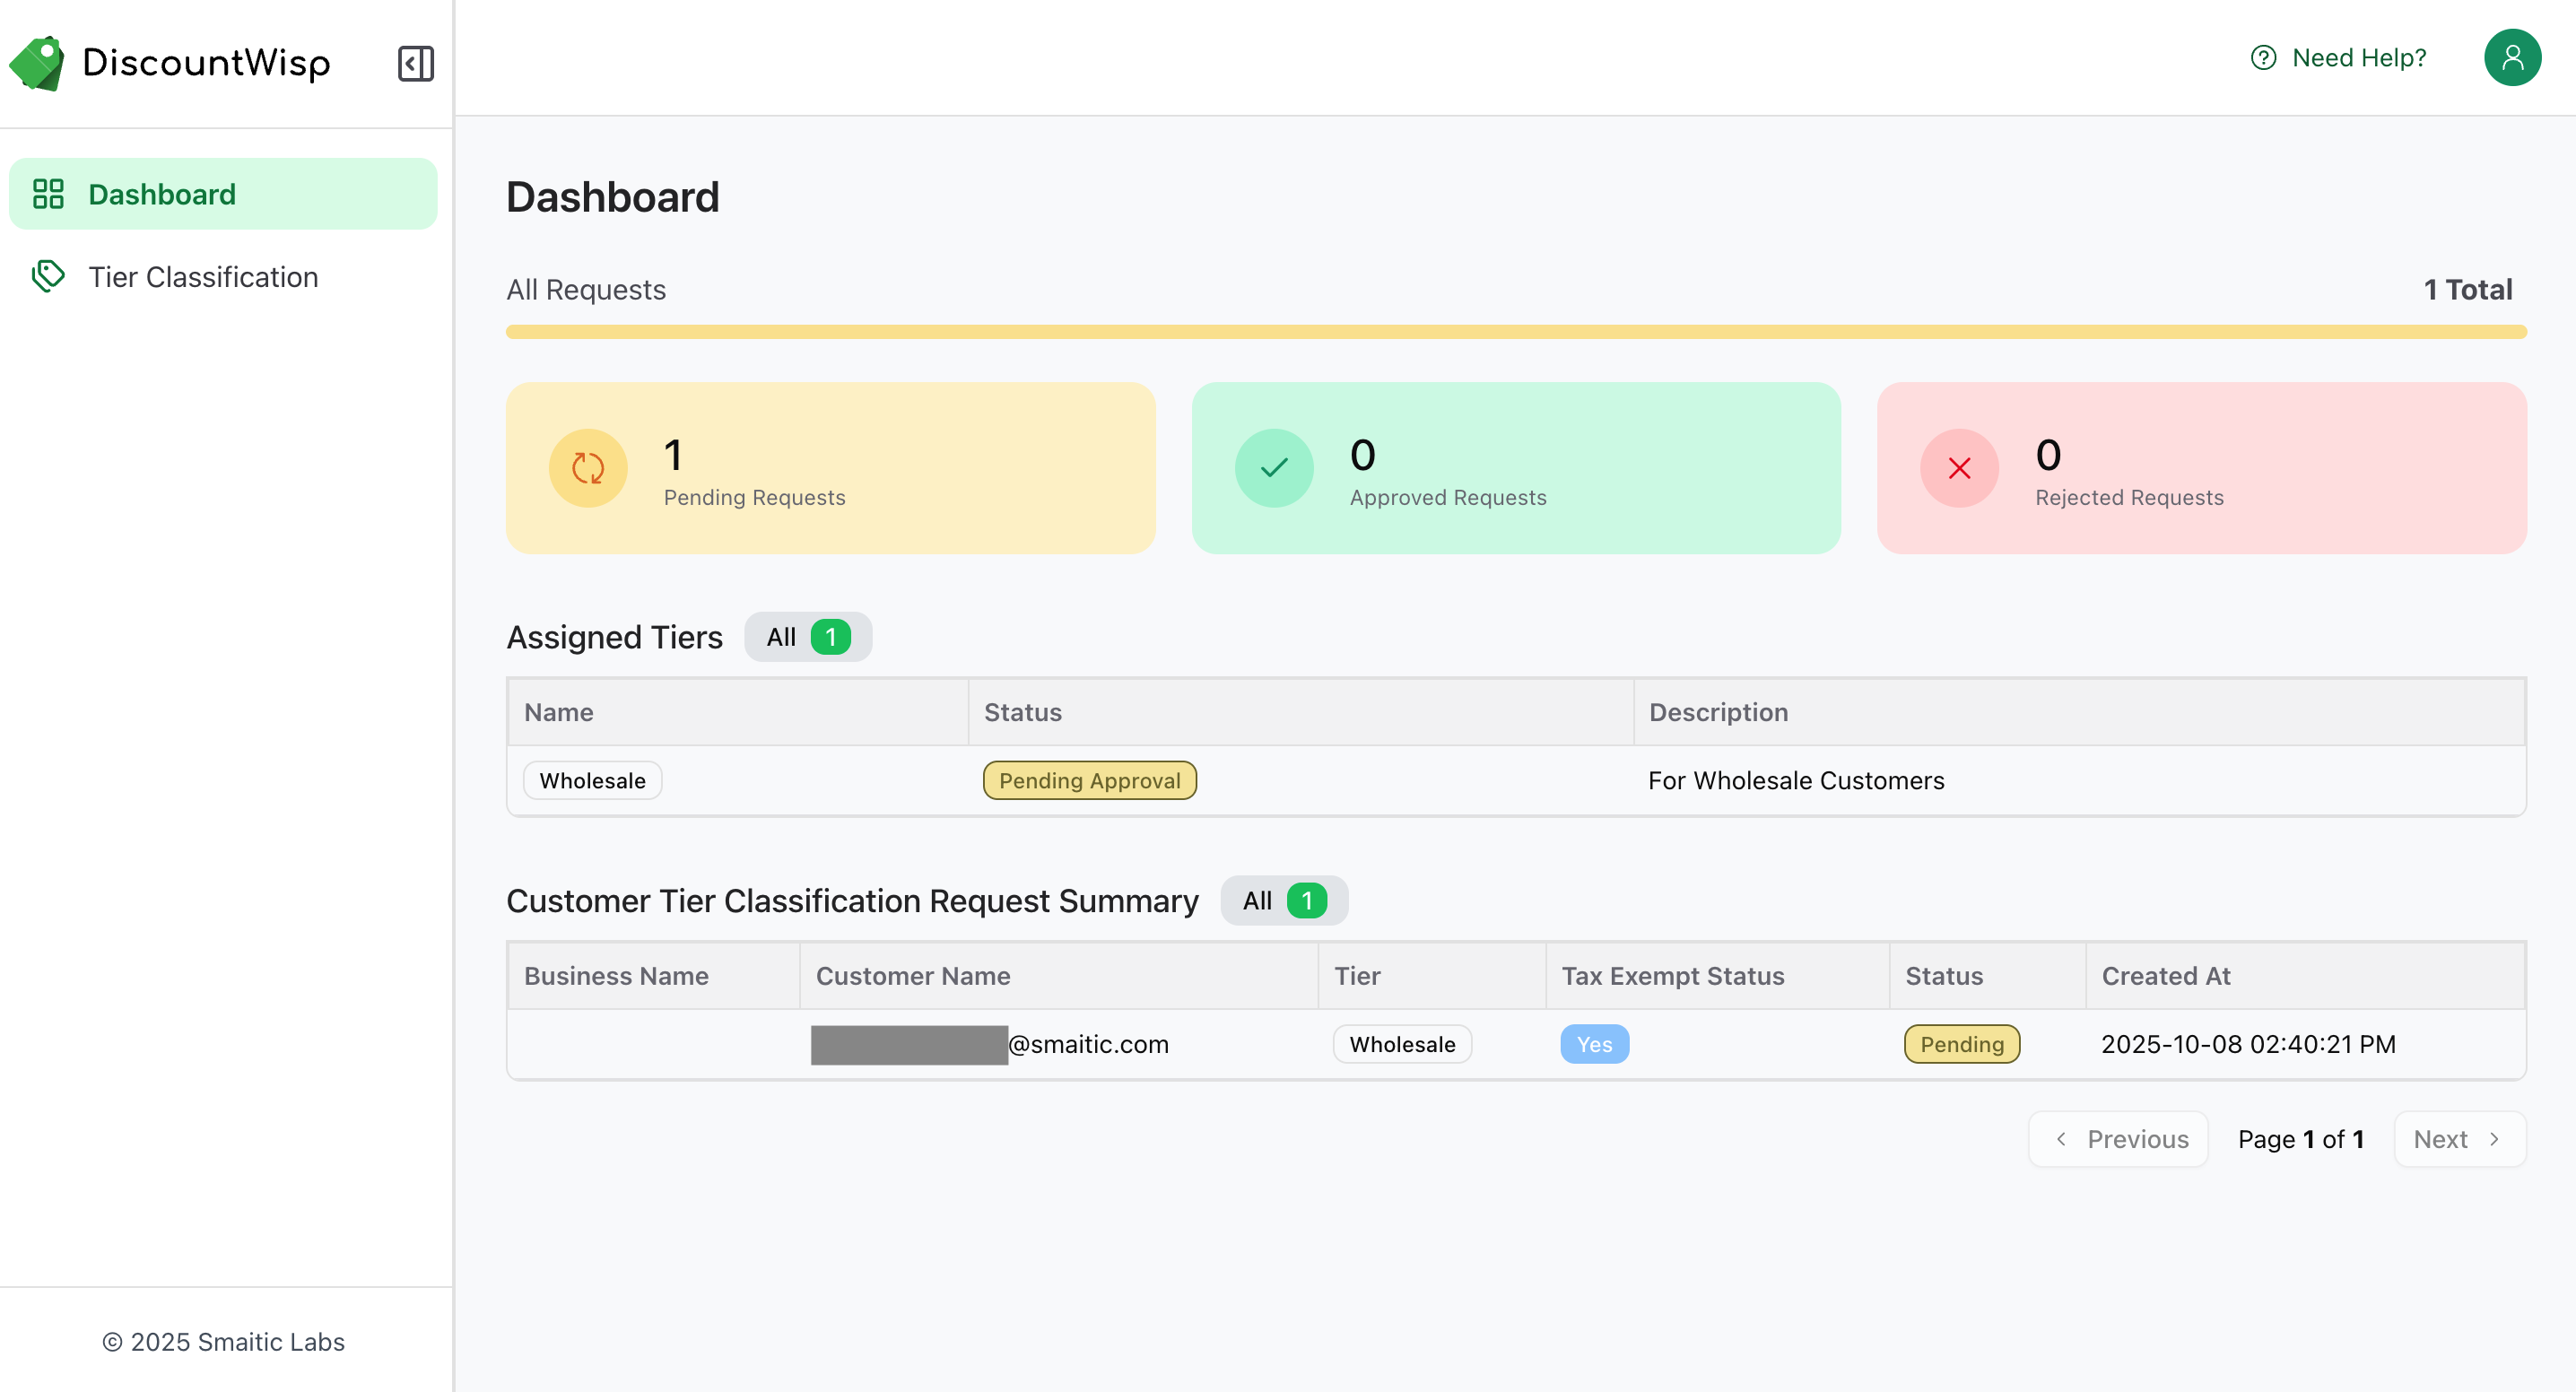
1. Request Status Summary Cards
At the top of the dashboard, you’ll see quick-glance cards showing the count of your:
-
Pending Requests – Requests you’ve submitted but haven’t been reviewed yet.
-
Approved Requests – Requests that have been reviewed and accepted, often tied to tier assignment.
-
Rejected Requests – Requests that were declined, typically due to missing information or eligibility concerns.
These cards help you stay informed without needing to check individual request statuses.
2. Assigned Tier Details
If your tier classification request has been approved, the Assigned Tiers section displays the customer tiers you’ve been assigned to. For each assigned tier, you’ll see:
-
Tier Name
-
Tier Description – Includes eligibility context, discount expectations, and more.
If no tier has been assigned yet, you’ll see a message stating “No assigned tiers”. This means your request is either still pending or hasn’t been submitted yet.
3. Request History Table
At the bottom of the dashboard is the Request Summary Table, which provides a line-by-line record of all your submitted tier classification requests.
The table includes:
-
Business Name – The name you entered when submitting the request.
-
Customer Name – Your name as per the form.
-
Claimed Tier – The tier you requested to be classified into.
-
Tax Exempt Status – Whether you opted in for tax exemption.
-
Request Status – Shows whether the request is Pending, Approved, or Rejected.
-
Requested Date – The exact date you submitted the request.
This section allows you to monitor past requests, see approval patterns, and keep documentation organized for your own records.
Approval & Tier Assignment Flow
Once the form is submitted, the store processes the request and assigns a customer to an appropriate discount tier.
Auto vs Manual Approval: What it Means for the Customer
Stores might have configured the approval flow as auto-approval and manual approval.
- Auto Approval : The app will automatically evaluate form inputs like expected monthly spend, order volume, and existing purchase history and approve the tier classification request while assigning a tier immediately upon the form submission.
- Manual Approval : The store's admin team reviews your application manually. This might take 1–3 business days depending on their workflow.
Notification of Approval/Rejection
- Approved : You’ll be assigned a tier and start seeing your eligible discounts immediately.
- Rejected : Your request was denied. Some stores may provide a reason. You can resubmit the request with modified details.
- Pending : Awaiting review. You may be asked for more information.
How Customers Are Assigned Tiers
Based on your projected order volume, expected spend, and other provided information, you’ll be mapped to a discount tier such as:
- Reseller
- Distributor
- Frequent Buyer
- VIP Member
- Tax-Exempt Tier etc.
Merchants can assign you to one or more tiers , and DiscountWisp ensures that the highest applicable discount is always applied.
Accessing Discounts
Once classified and tier-assigned, customers can begin enjoying personalized discounts automatically.
Viewing Eligible Discounts on Product Pages
DiscountWisp allows stores to display applicable discounts on product detail pages. You might see:
- “Buy 10+, Save $5/unit”
- “Exclusive 15% for Distributor Tier”
- “Clearance Discount: $10 off for Qualified Buyers”
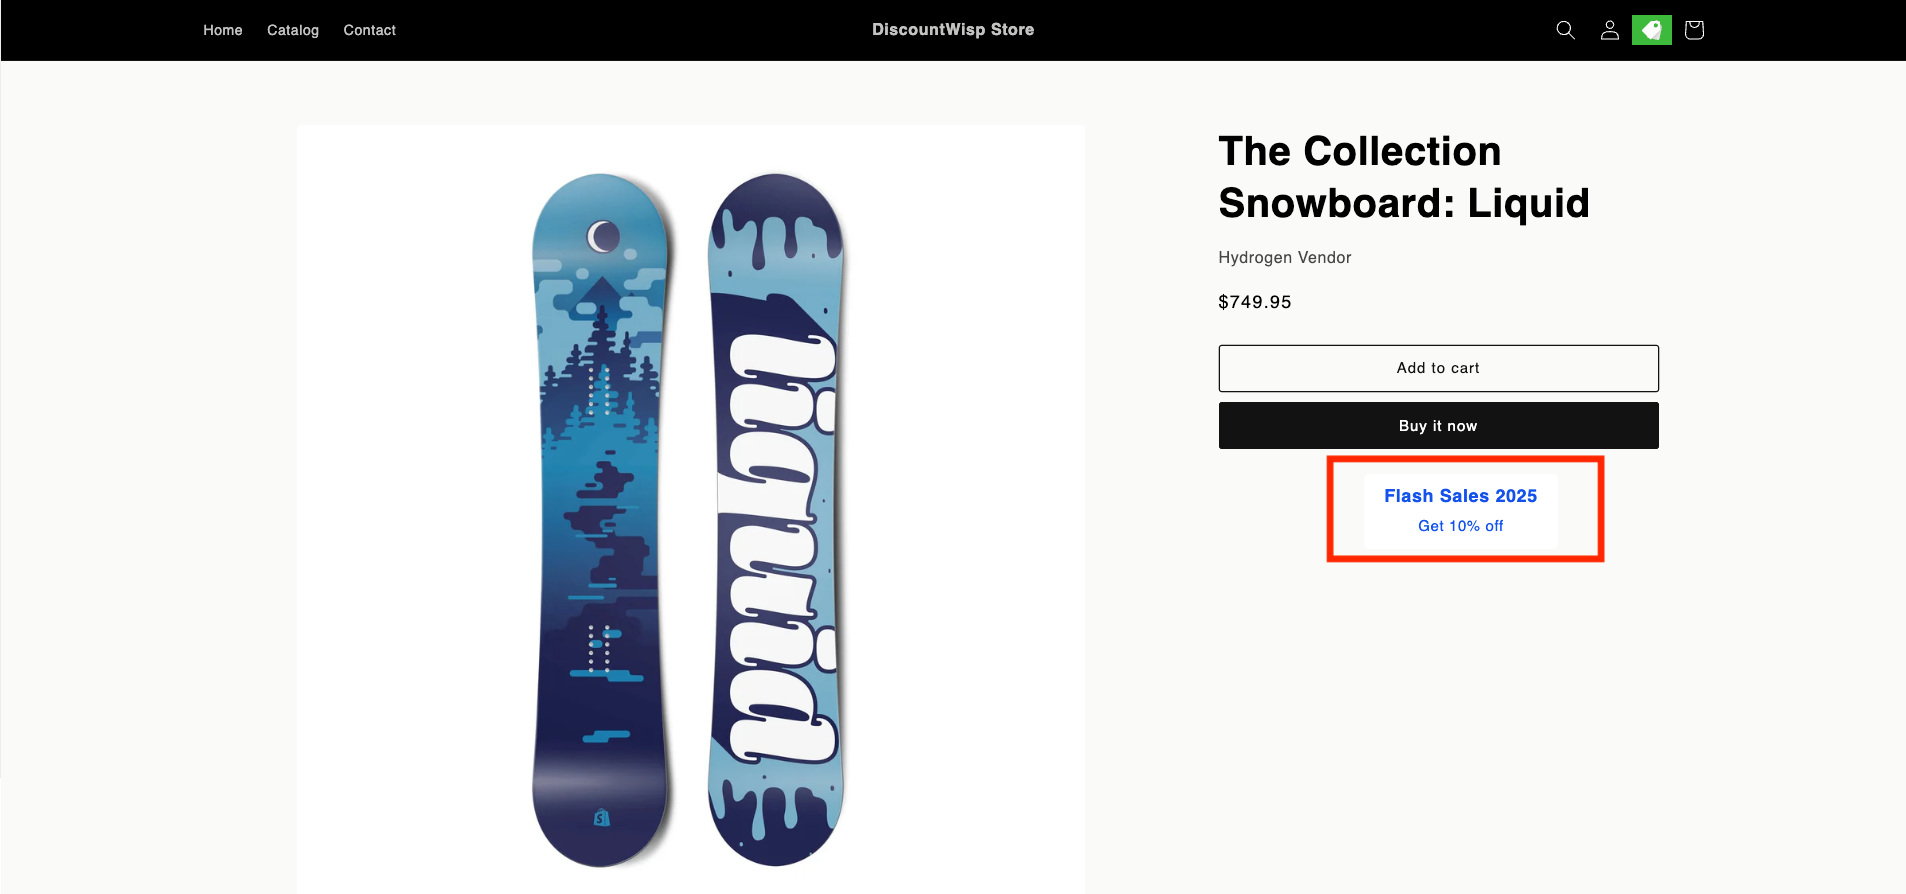
This lets you know exactly what discounts you're eligible for before adding items to your cart.
Applying Discounts at Checkout
DiscountWisp does not require any manual coupon code entry. All applicable discounts:
- Are automatically applied at checkout
- Are visible as line items or subtotal adjustments
- Depend on your assigned tier and the discount rules active in the current campaign

You must be logged in to the same customer account that was classified to see the benefits.
Understanding Discount Thresholds and Rules
Different campaigns may have different discount logic , such as:
| Discount Type | Condition | Example |
|---|---|---|
| Minimum Order Quantity (MOQ) | Buy a minimum quantity to get a discount | "Buy 10+, get 10% off" |
| Volume Ladder | Discount increases with quantity | "Buy 20+, 5%; 50+, 10%" |
| Fixed Amount Discount | Flat amount off per item | "$5 off per unit" |
| Percentage Discount | Percentage off total price | "Get 15% off for Gold Tier" |
DiscountWisp ensures these rules are followed dynamically during checkout.
Understanding Sales Campaigns
Stores can run time-based, tier-specific sales campaigns , including:
- Seasonal Sales (e.g., Black Friday, Christmas, Summer Sale)
- Clearance or Flash Sales
- Product-specific Promotions
- Launch Offers for New SKUs
As a classified customer, you'll see these campaigns reflected in:
- Product pages (banner or tag)
- Your cart
- Order summary
Each campaign has a start and end date, and only eligible customers (based on tiers) will receive the benefits.
Automated Notifications
DiscountWisp keeps you informed with automatic email notifications at key stages of your customer tier classification journey, including successful request submission, approvals, rejections, and revocation.
If you encounter any issues or have questions about using DiscountWisp, don't hesitate to reach out to our support team directly from your DiscountWisp dashboard or contact Support Team.